Task 4 - External Connectivity
Overview
This section walks you through providing External connectivity to VXLAN EVPN fabrics. The lab topology features an External fabric (BGP ASN 65333) that includes an Edge-Router to which Server4 (172.16.10.101/24) is connected.
For Servers on the VXLAN fabric to be able to communicate with Server4, we need to construct VRF-Lite based External connectivity (L3Out).
NDFC fully automates building VRF_Lite connectivity between Border (Border-Gateway / Border-Spine) devices in a VXLAN EVPN Fabric and Edge Router devices in an External Fabric.
If the VRF Lite Deployment option in the Advanced section of the VXLAN EVPN Fabric setting is Back2Back&ToExternal, then NDFC will automatically consider all the links between the devices as IFC (Inter Fabric Connections). NDFC must discover the adjacency via CDP for this to happen. If these conditions are met, NDFC will attach the ext_fabric_setup policy to the links so it will be selectable in the VRF attachment workflow.
Create External Fabric
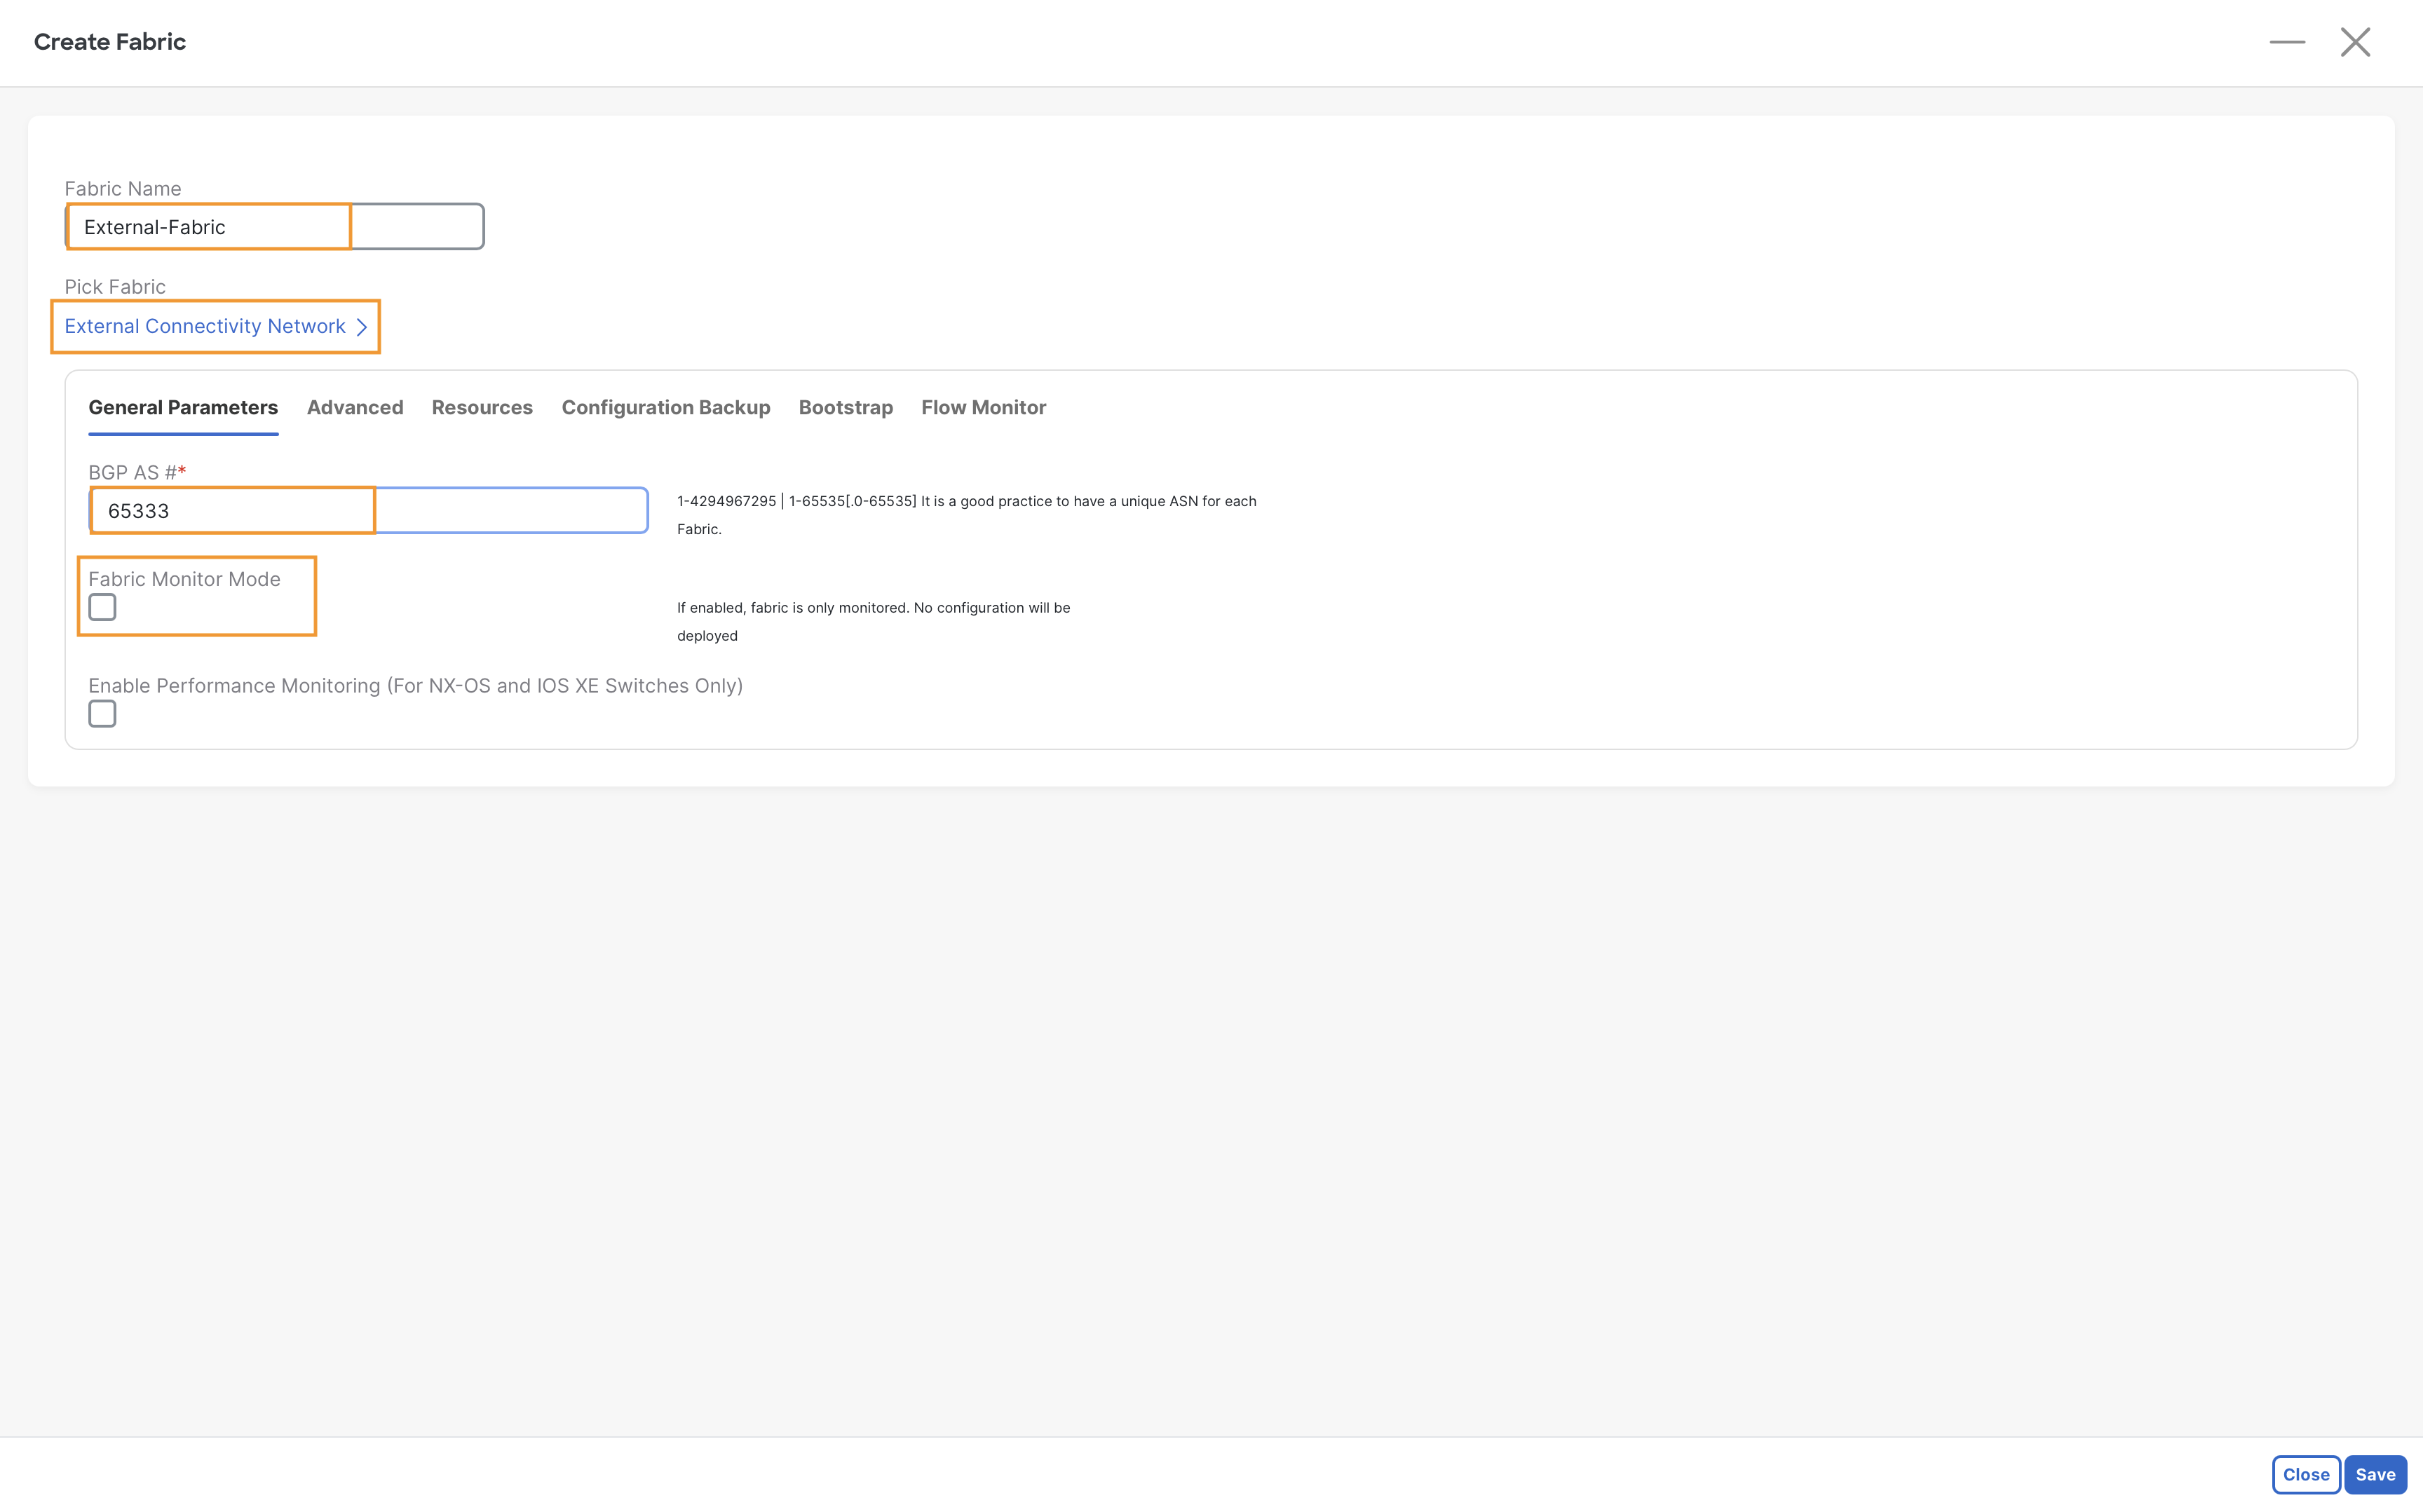
Step 1 – Create an external fabric with the following parameters:
On Fabric Controller page, go to Manage > Fabrics and click on Create Fabric from Actions drop-down menu
- Fabric Name – External-Fabric
- Fabric Template – External Connectivity Network
- BGP AS # - 65333
- Fabric Monitor Mode – Uncheck the box
- Click Save to create the fabric
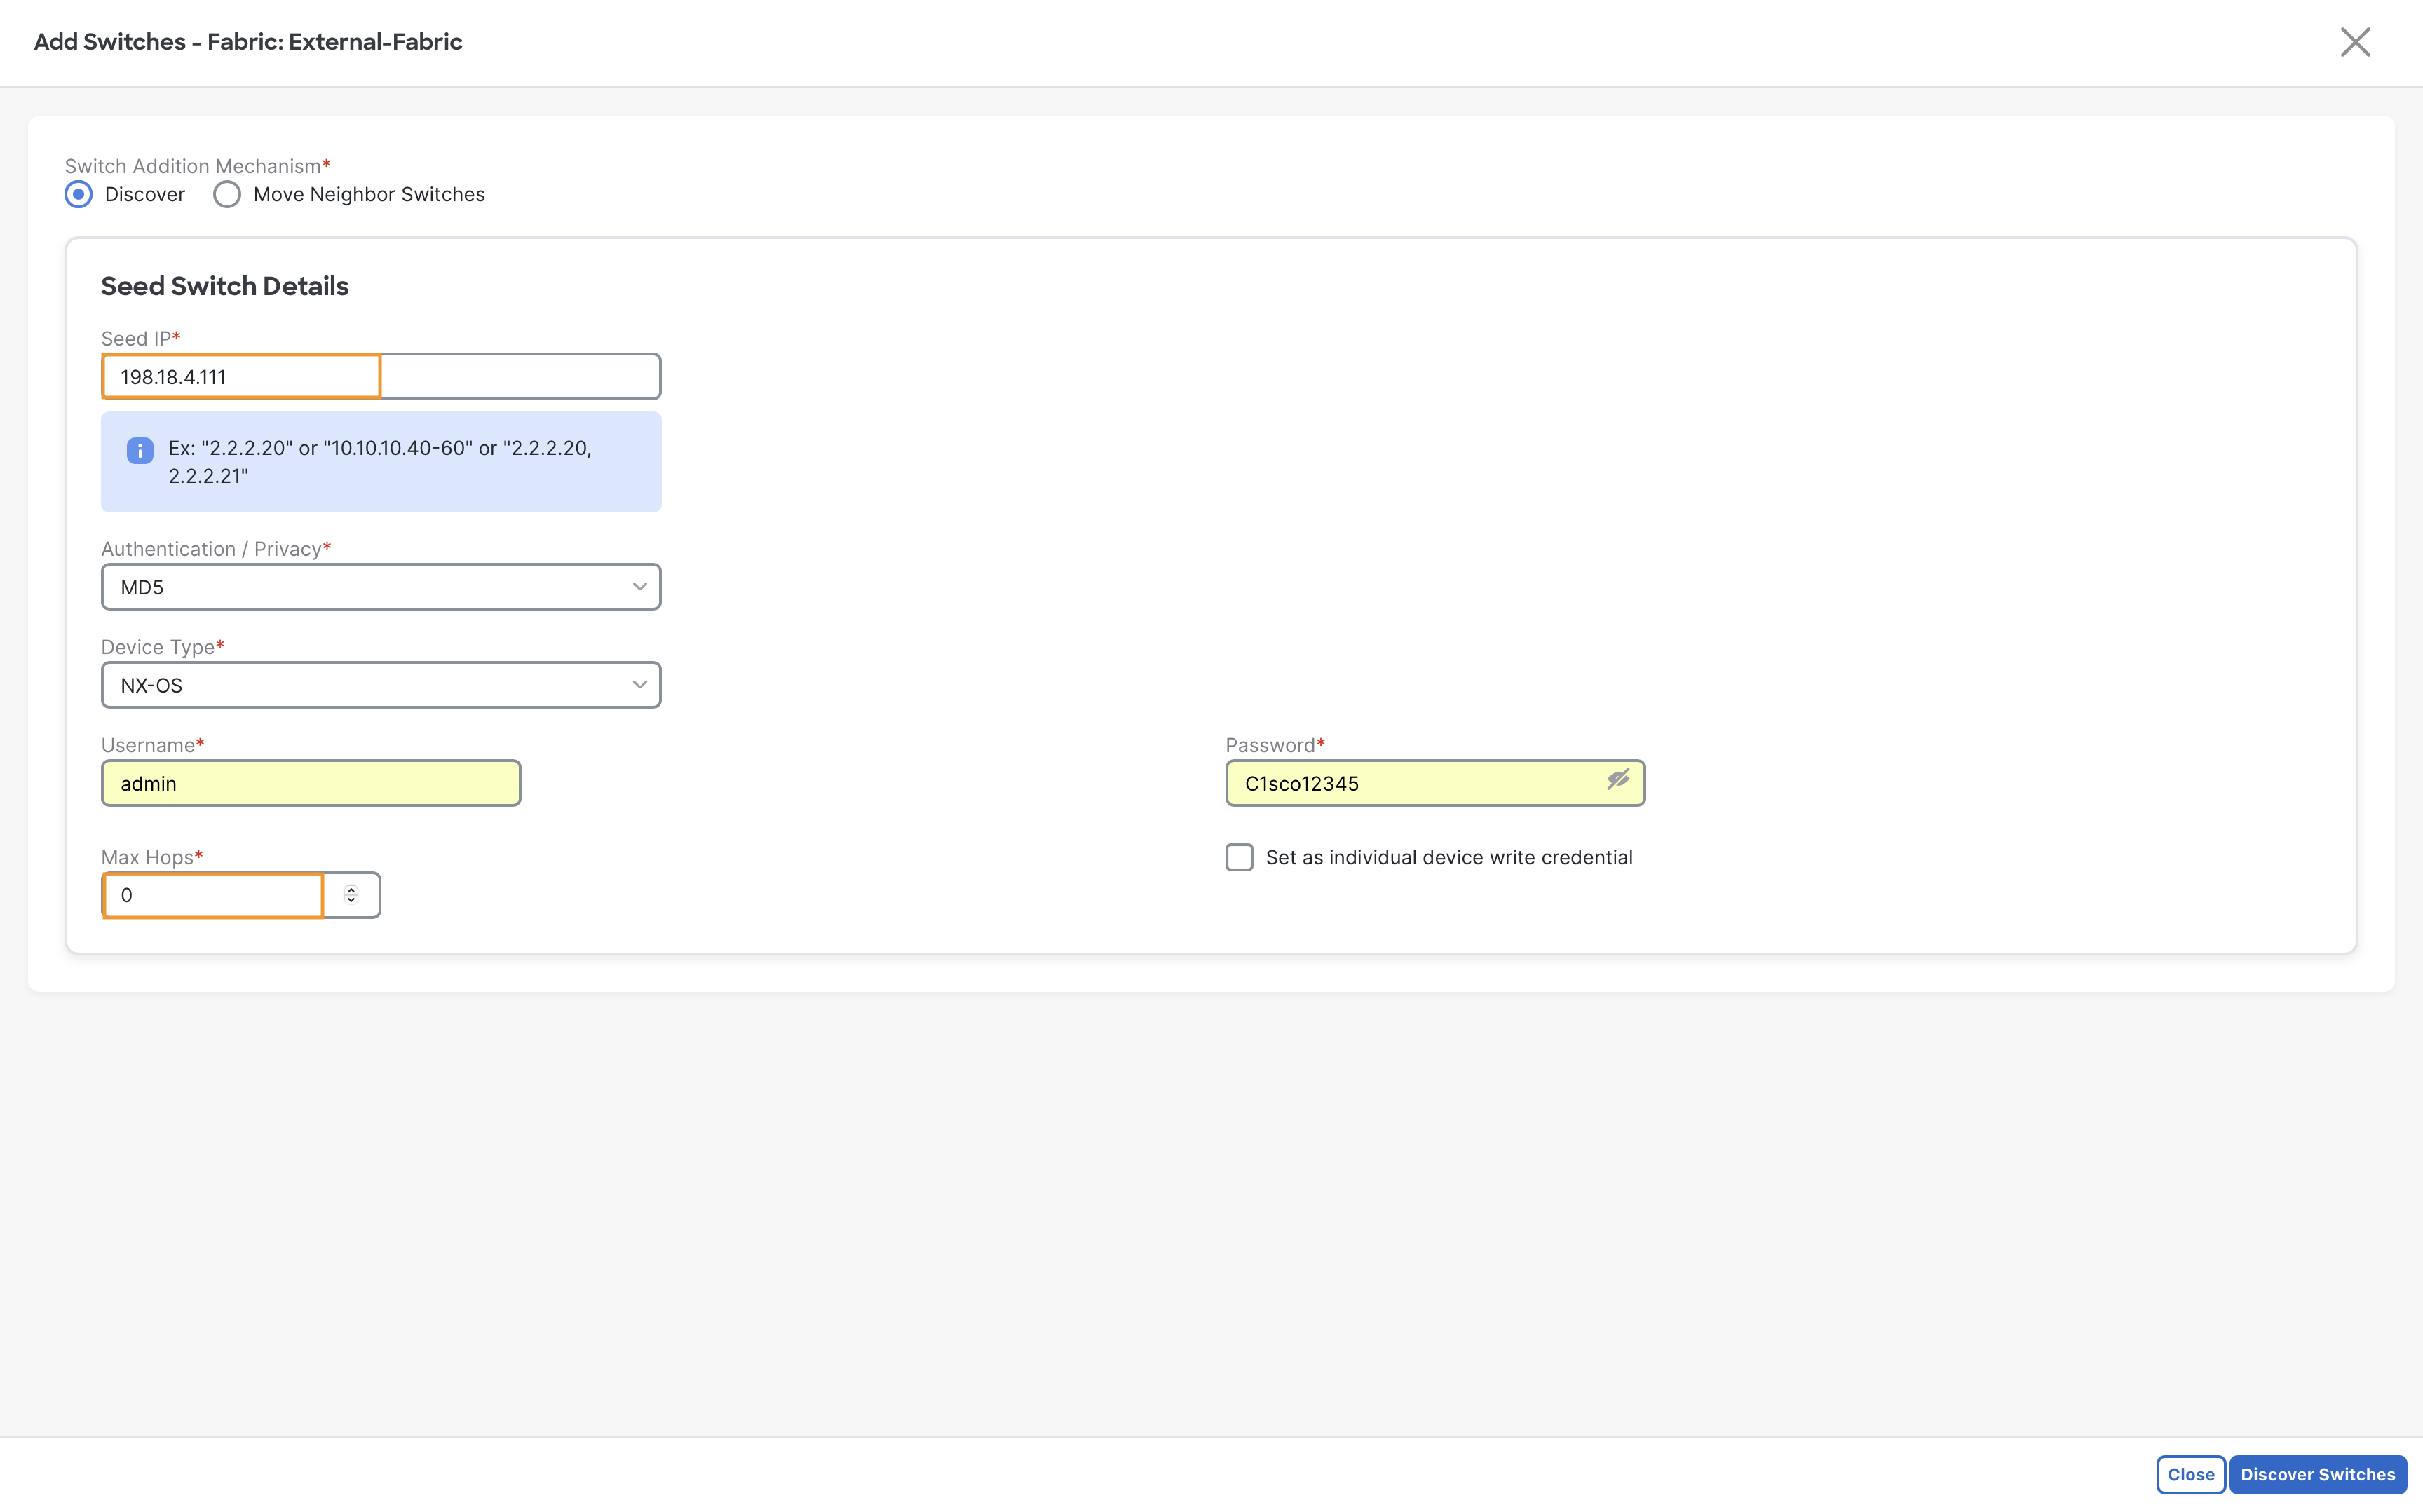
Step 2 – On Fabric Controller page, go to Manage > Fabrics and double click on External-Fabric.
To add Edge-Router into External-Fabric, click on Add Swicthes from Actions drop-down from Fabric Overview page and use the following destails to dicsover the device
- Seed IP – 198.18.4.111
- Credentials – admin/C1sco12345
- Max Hops - 0
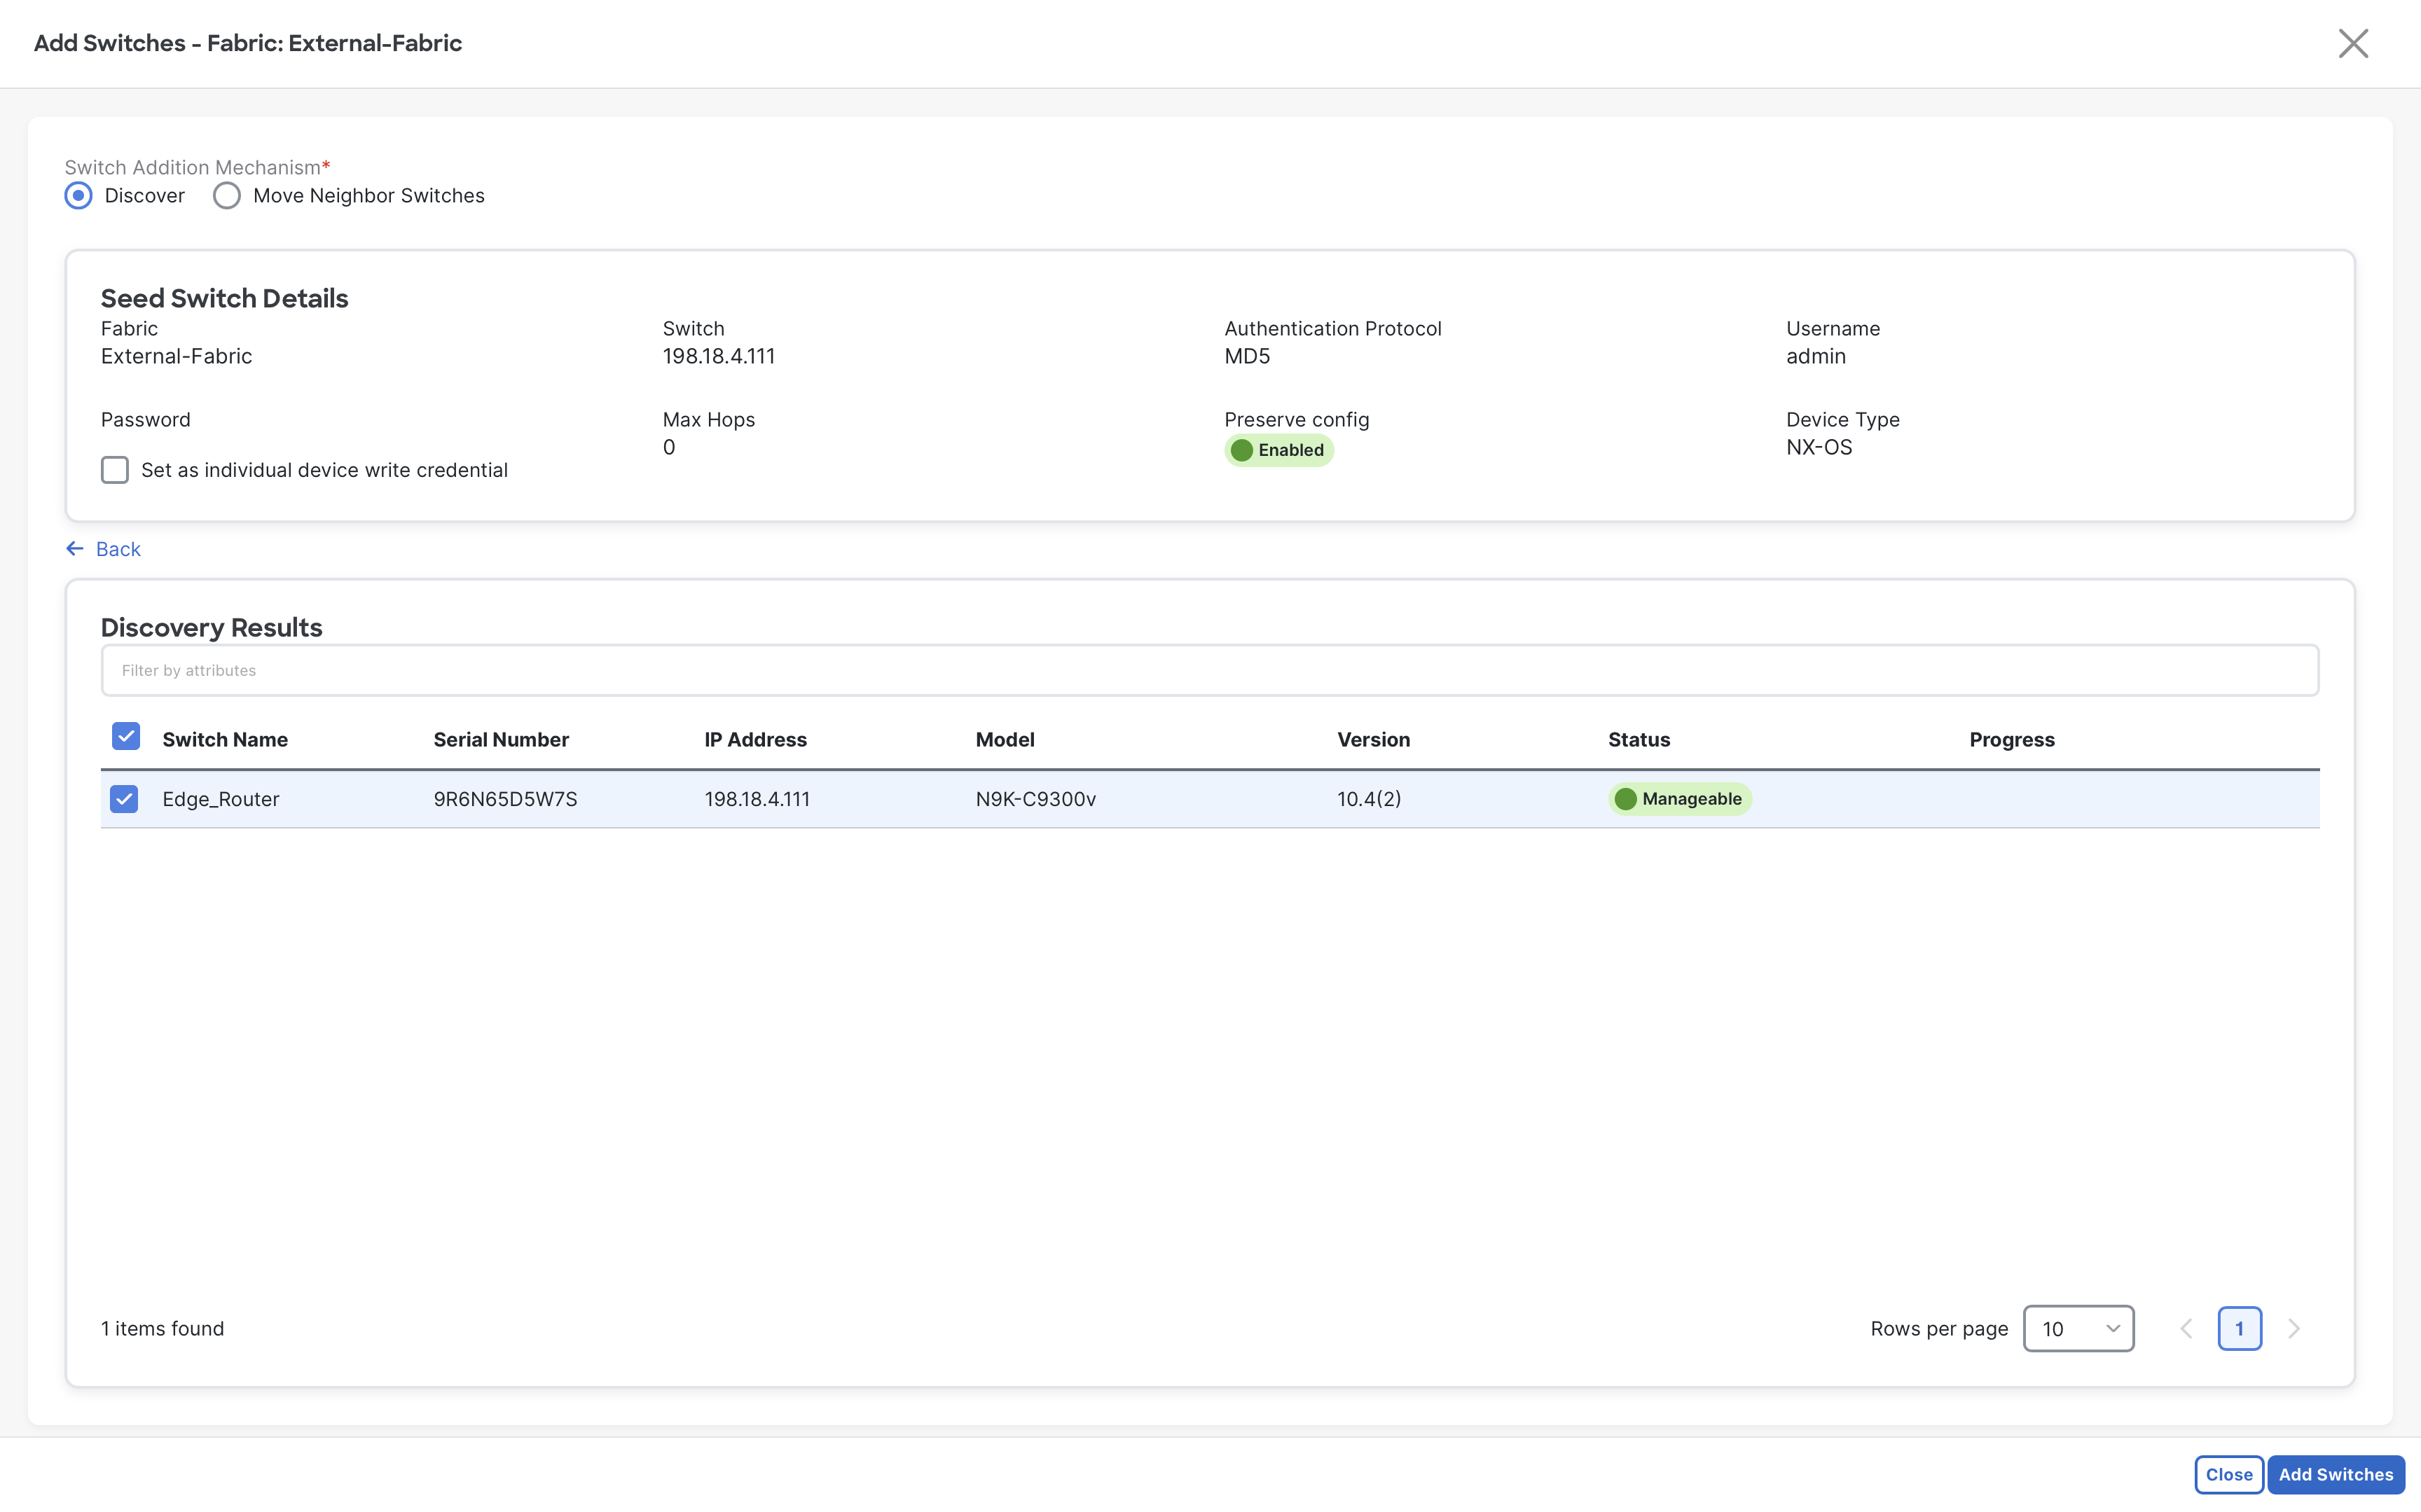
Step 3 – Select the discovered switch and then click on Add Switches
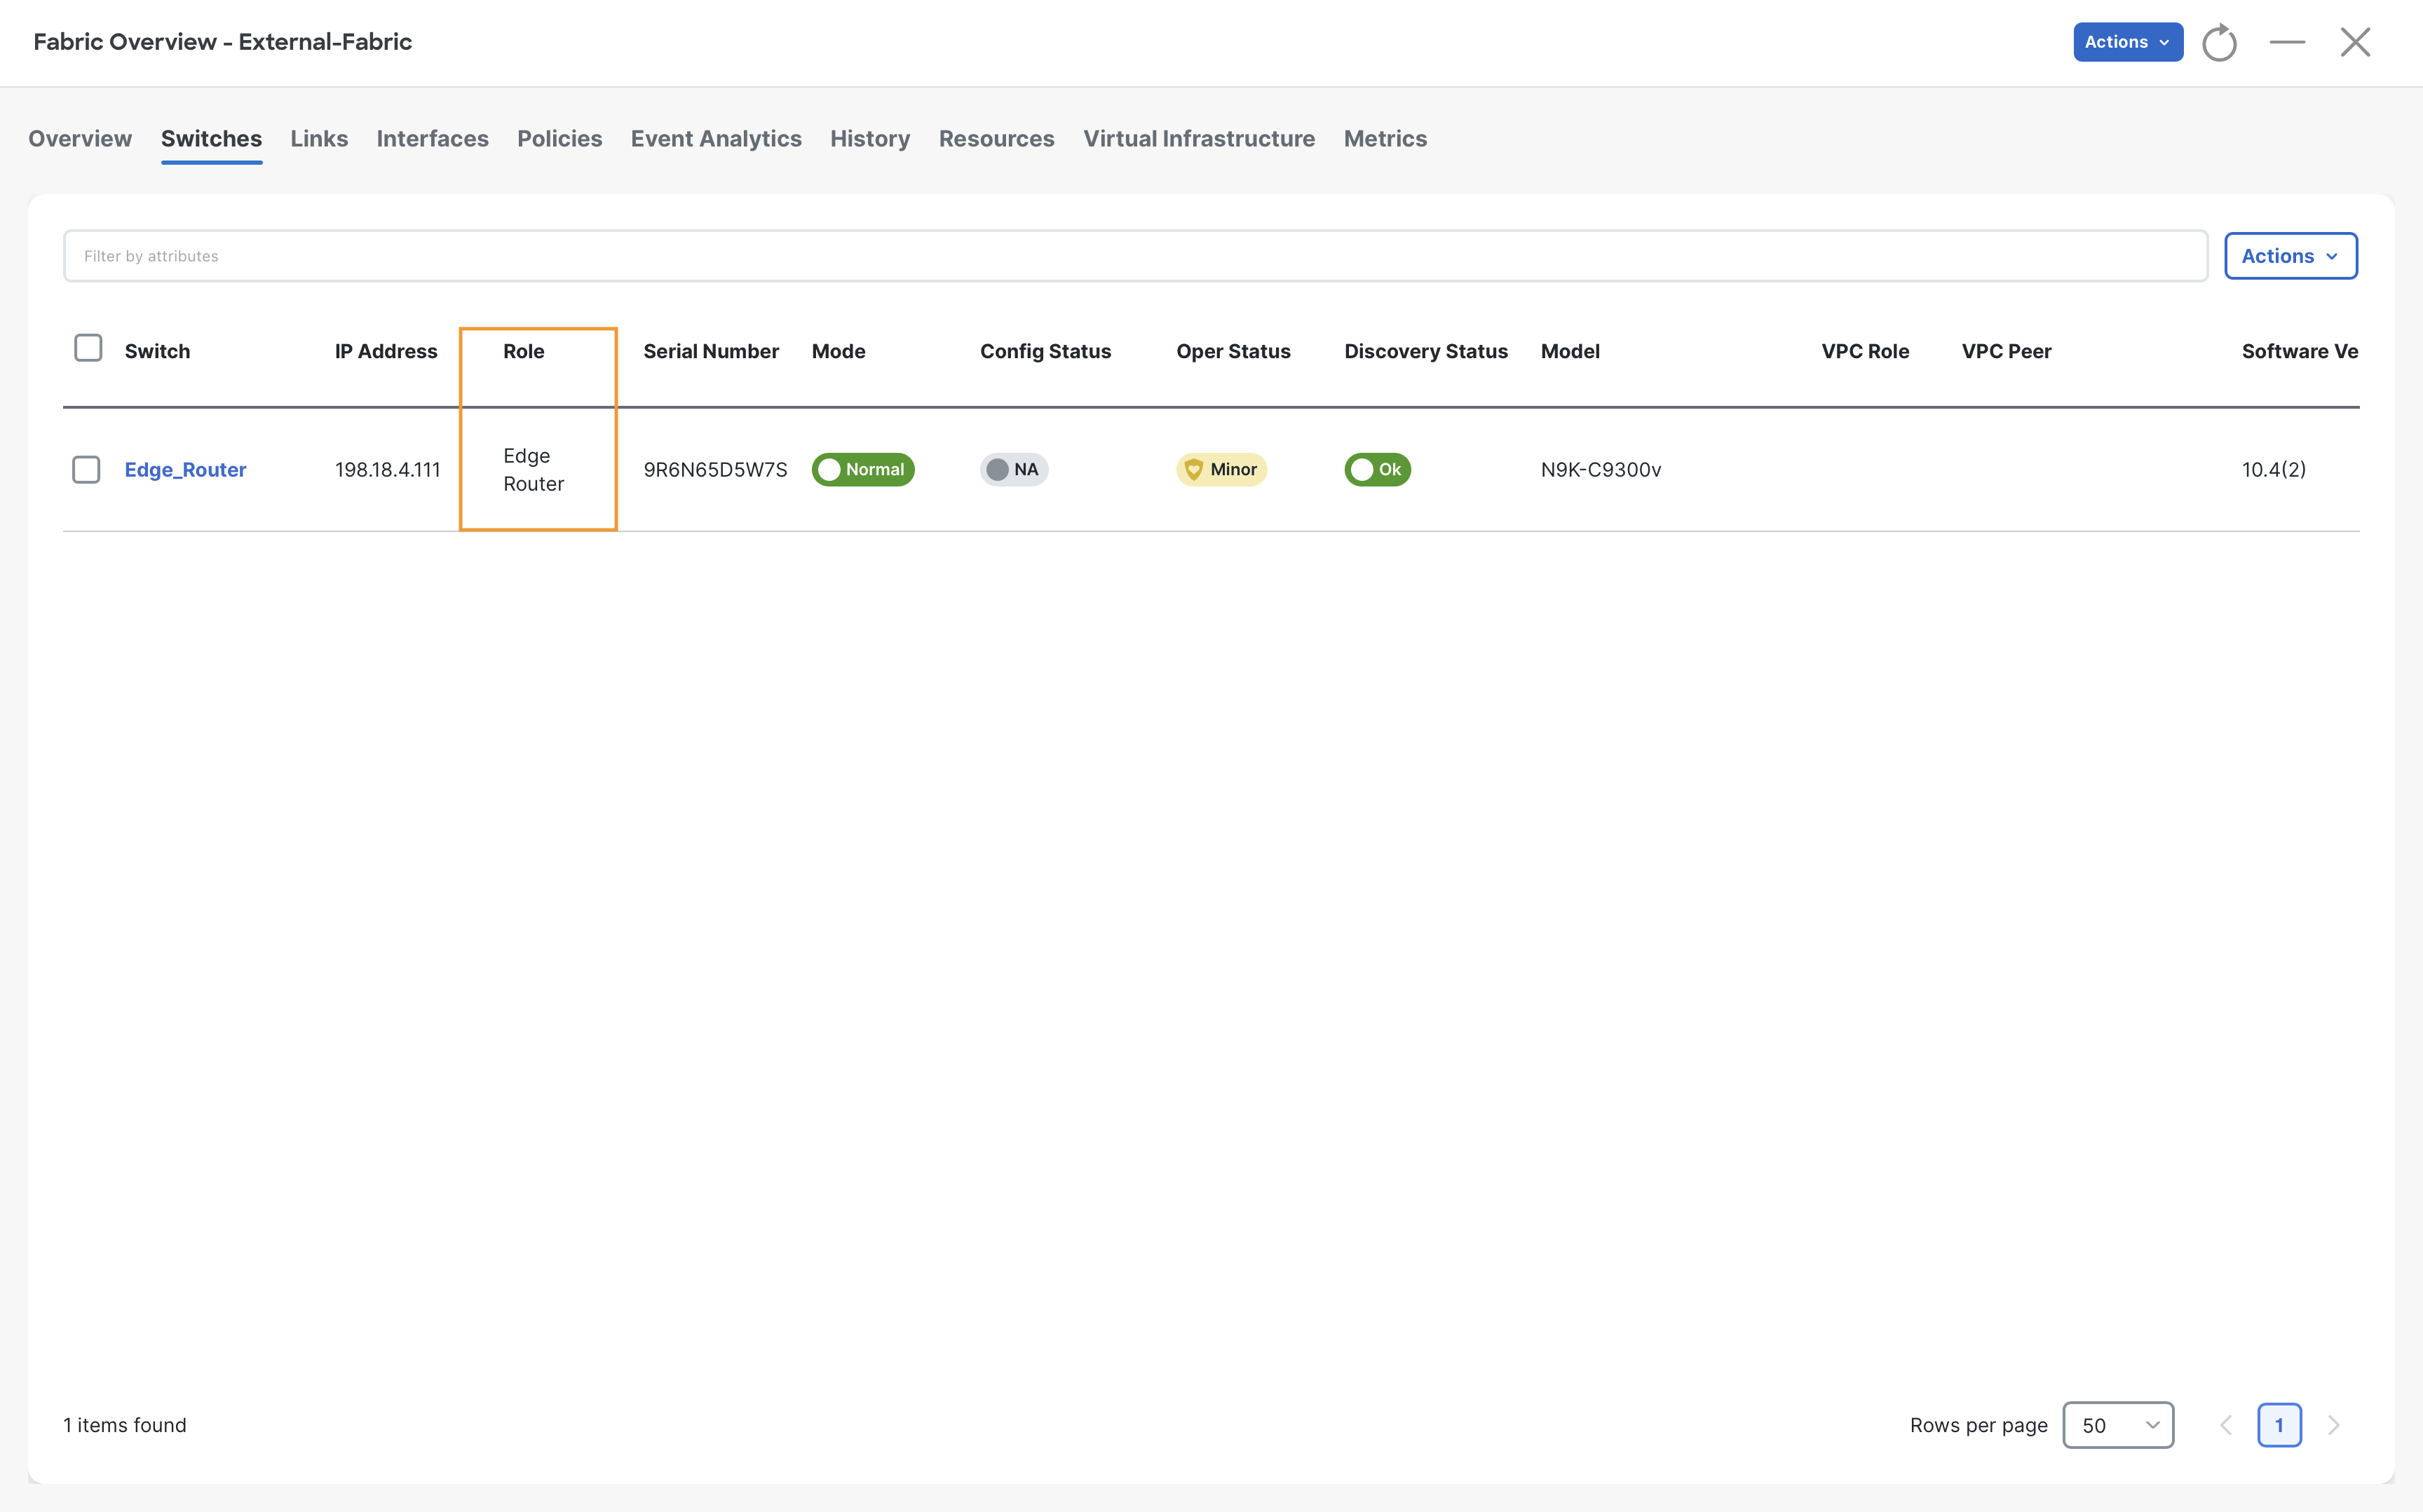
Step 4 – Change the role to Edge Router for Edge_Router
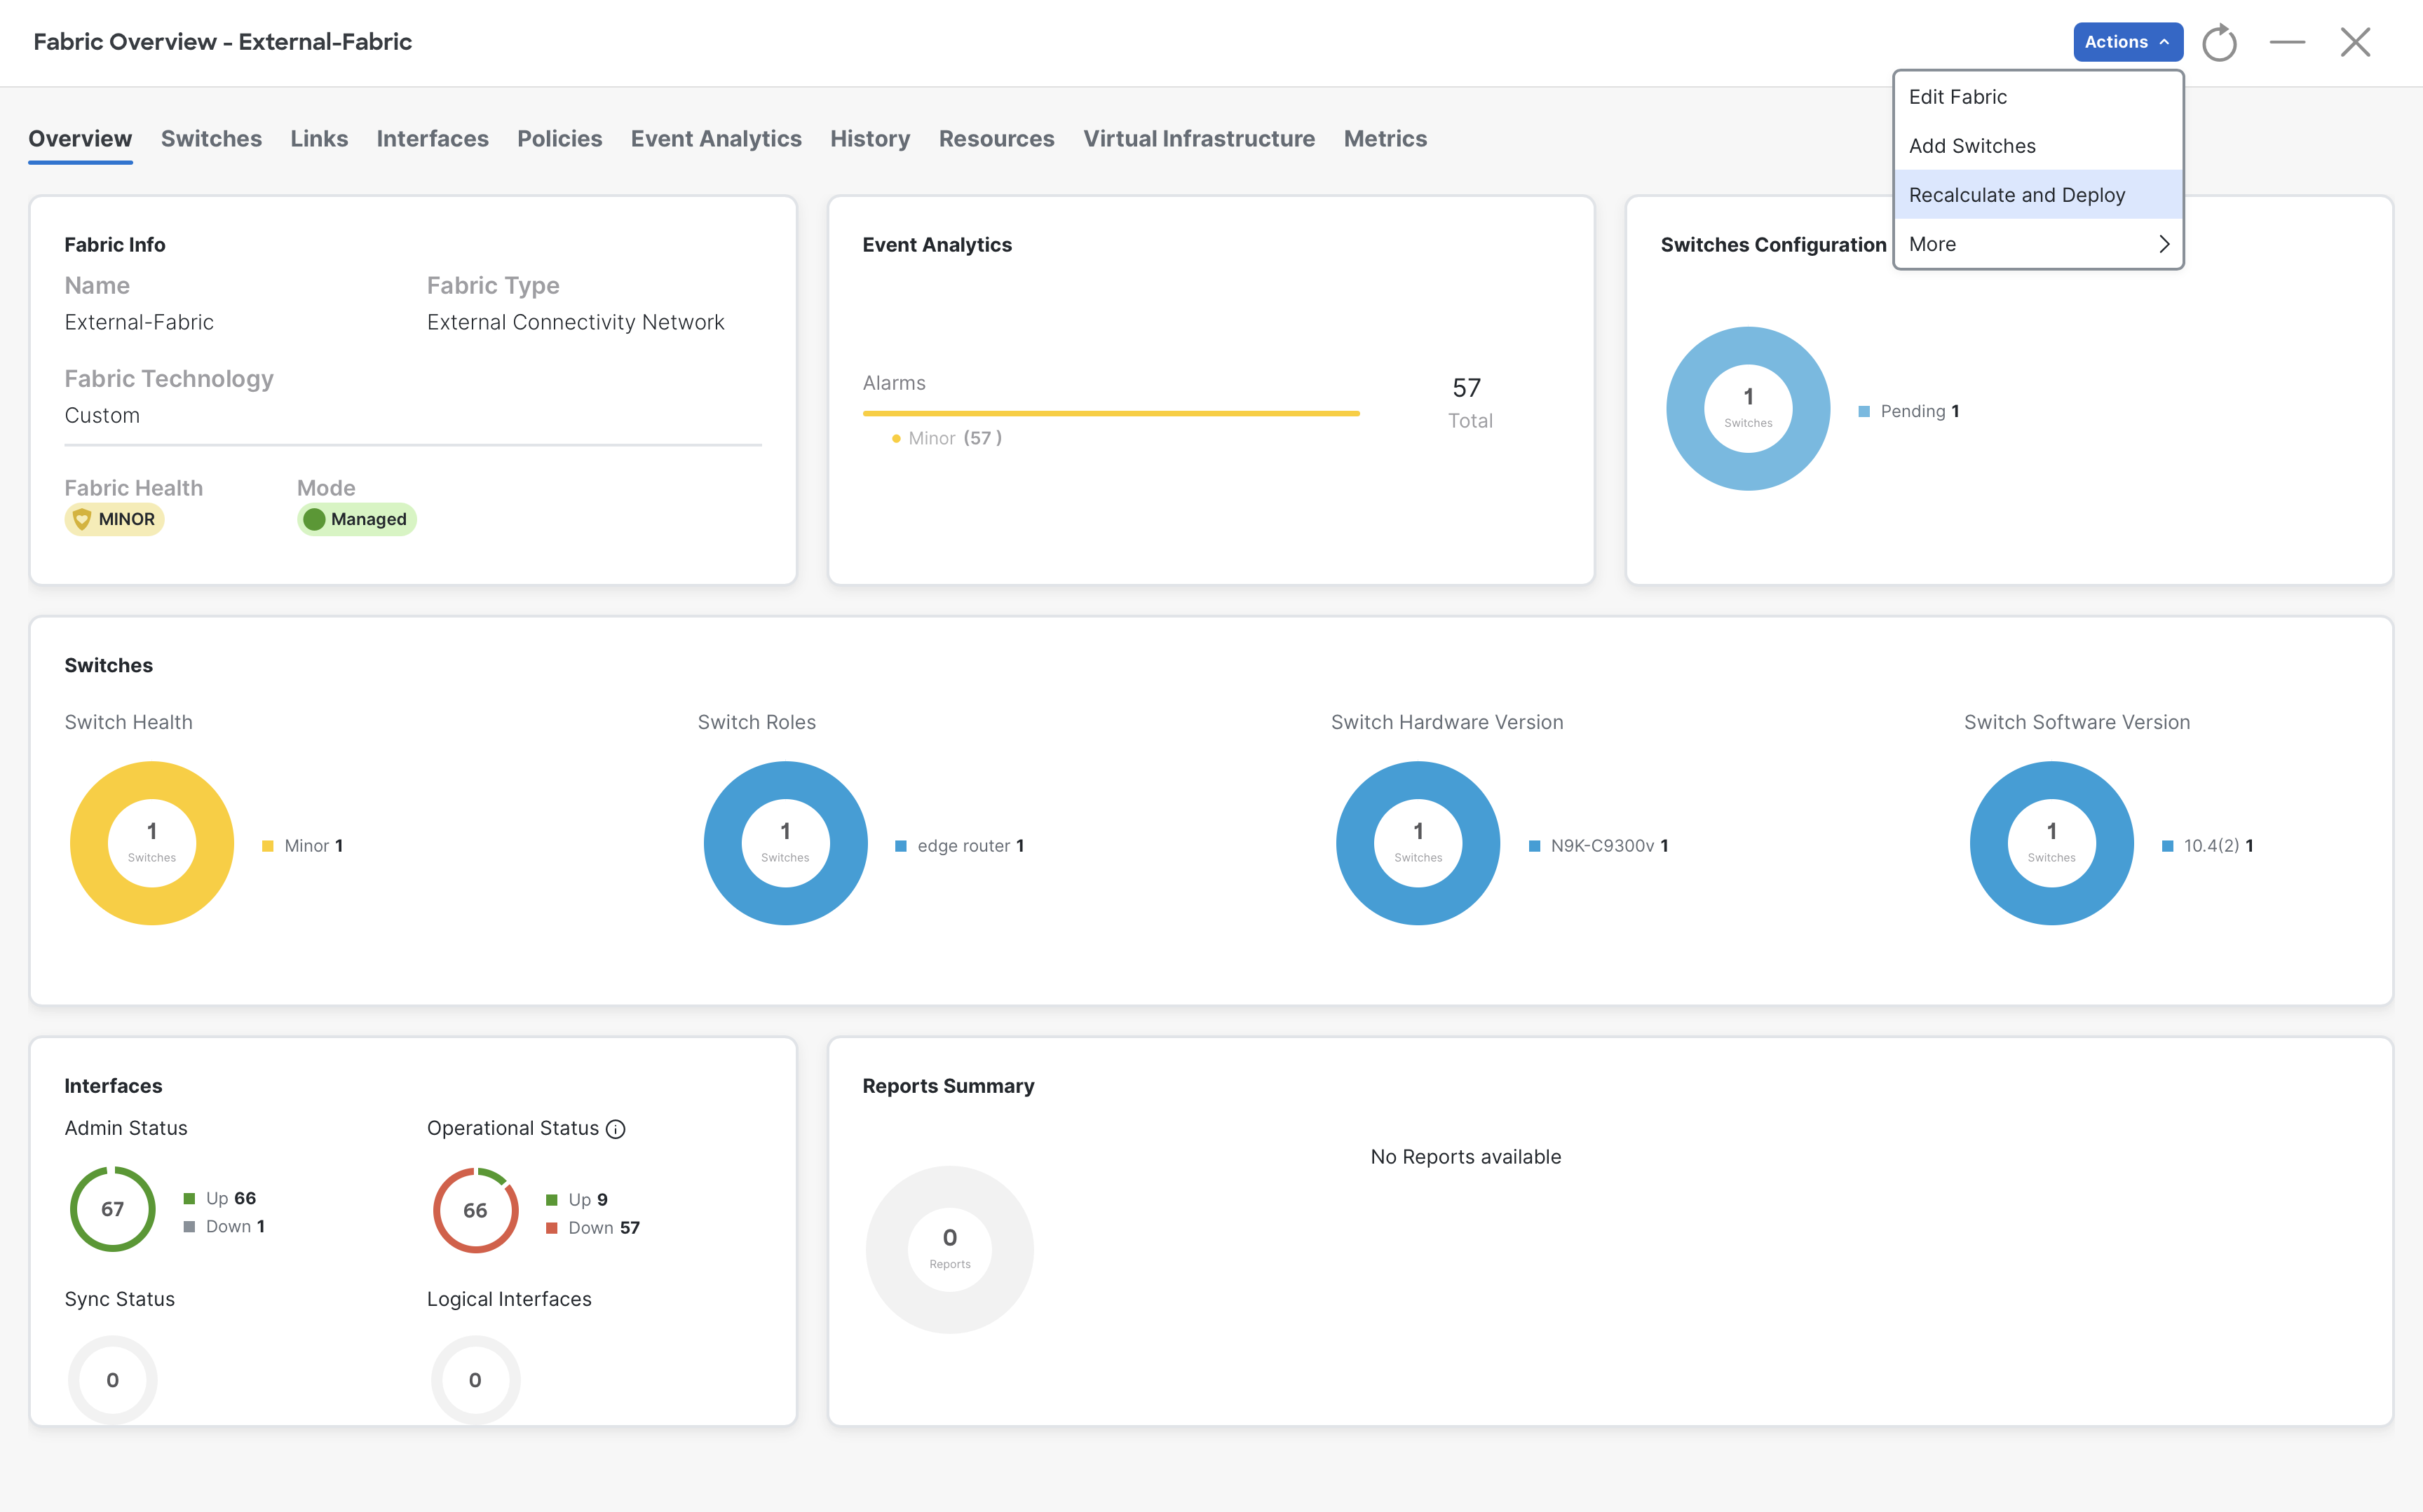
Step 5 - Perform a Recalculate and Deploy
Build VRF-Lite External Connectivity
Step 1 – Go to the Fabric Overview page of Site1-Greenfield and click Actions > Edit Fabric
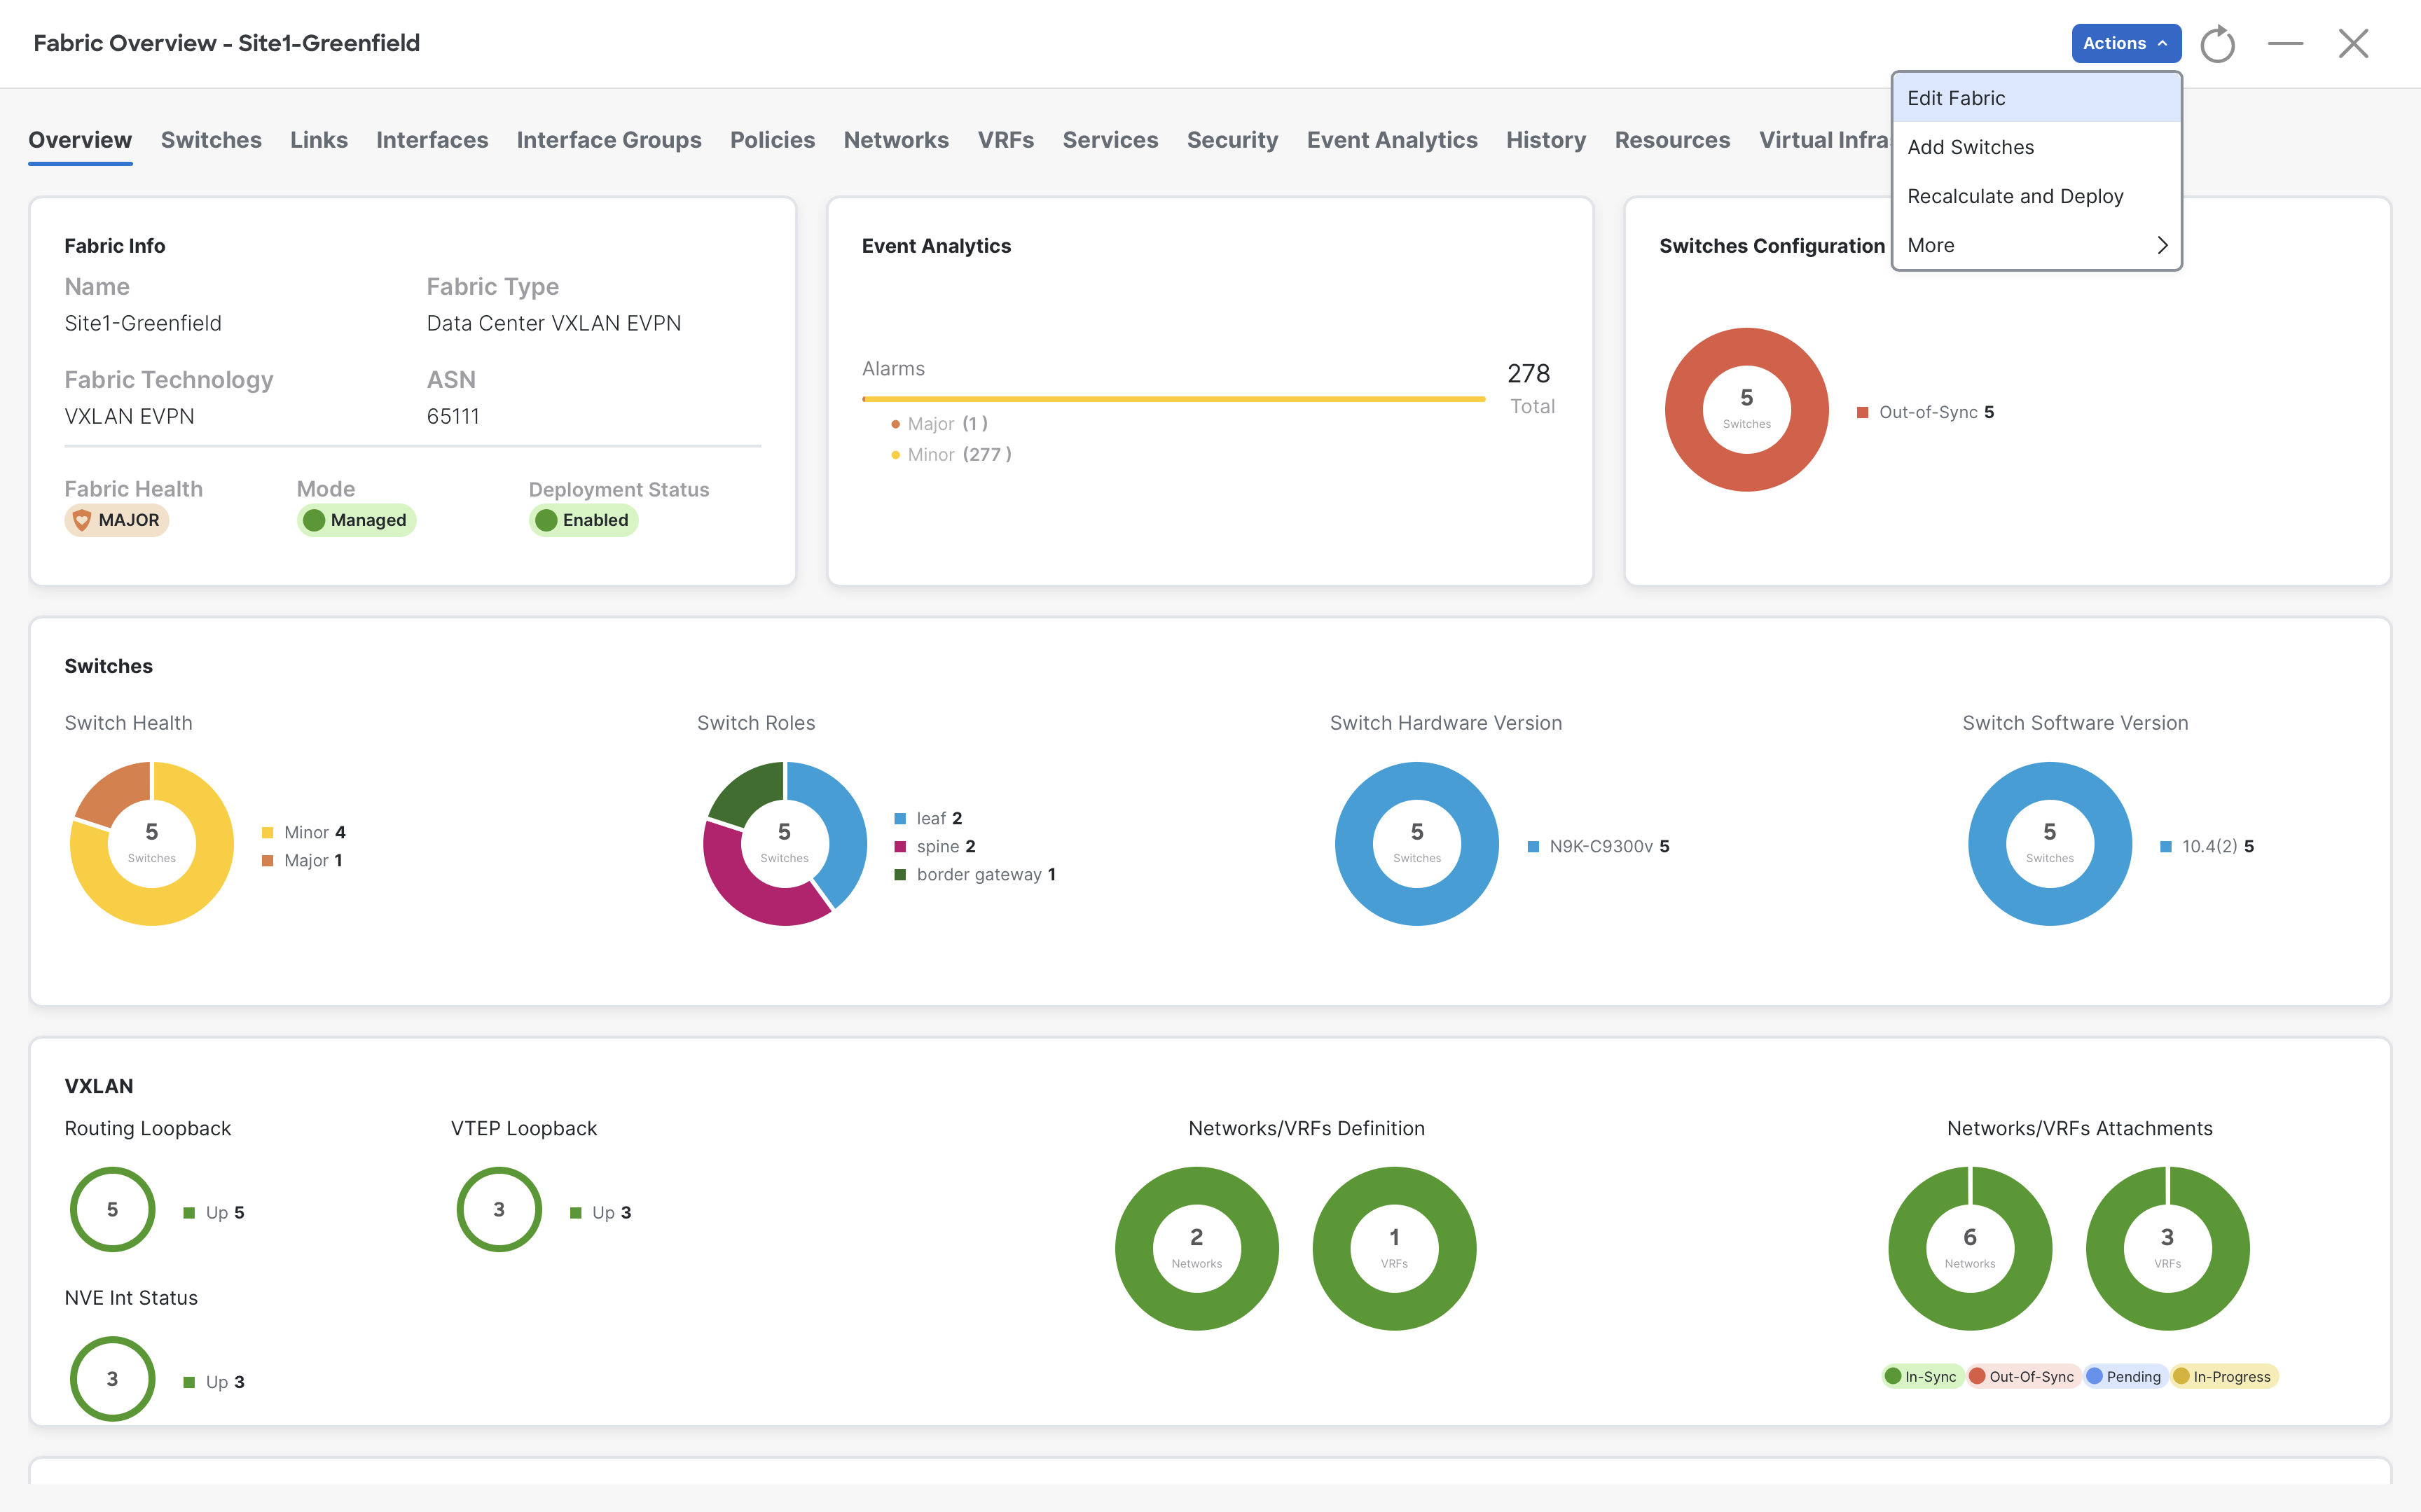
Step 2 - Click the Resources tab and scroll down until you see VRF Lite Deployment and select Back2Back&ToExternal
Info
When you select this feature, NDFC will consider links between an Edge-Router and Border-Leaves as L3OUT links. They will be automatically included in the interface list when extending a VRF outside.
Check the Auto Deploy for Peer check box
Info
When you select this option, NDFC can automate configuration on the external device if they are NX-OS or IOS-XR or IOS-XE (check documentation for specific platforms restrictions). NDFC will provision the required configuration for setting up the sub-interface and the required BGP configuration on the external fabric device.
Also observe the NDFC’s default VRF Lite Subnet IP Range (10.33.0.0/16) and Mask which would be used for building VRF_lite based L3Out to the external fabric

Note
The VRF Lite IP Subnet range 10.33.0.0/16 and Mask 30 are going to be carved from NDFC to assign an address to the P2P links between Border and Edge devices.
Step 3 – Click Save
Step 4 – Click Ok on the warning message displayed
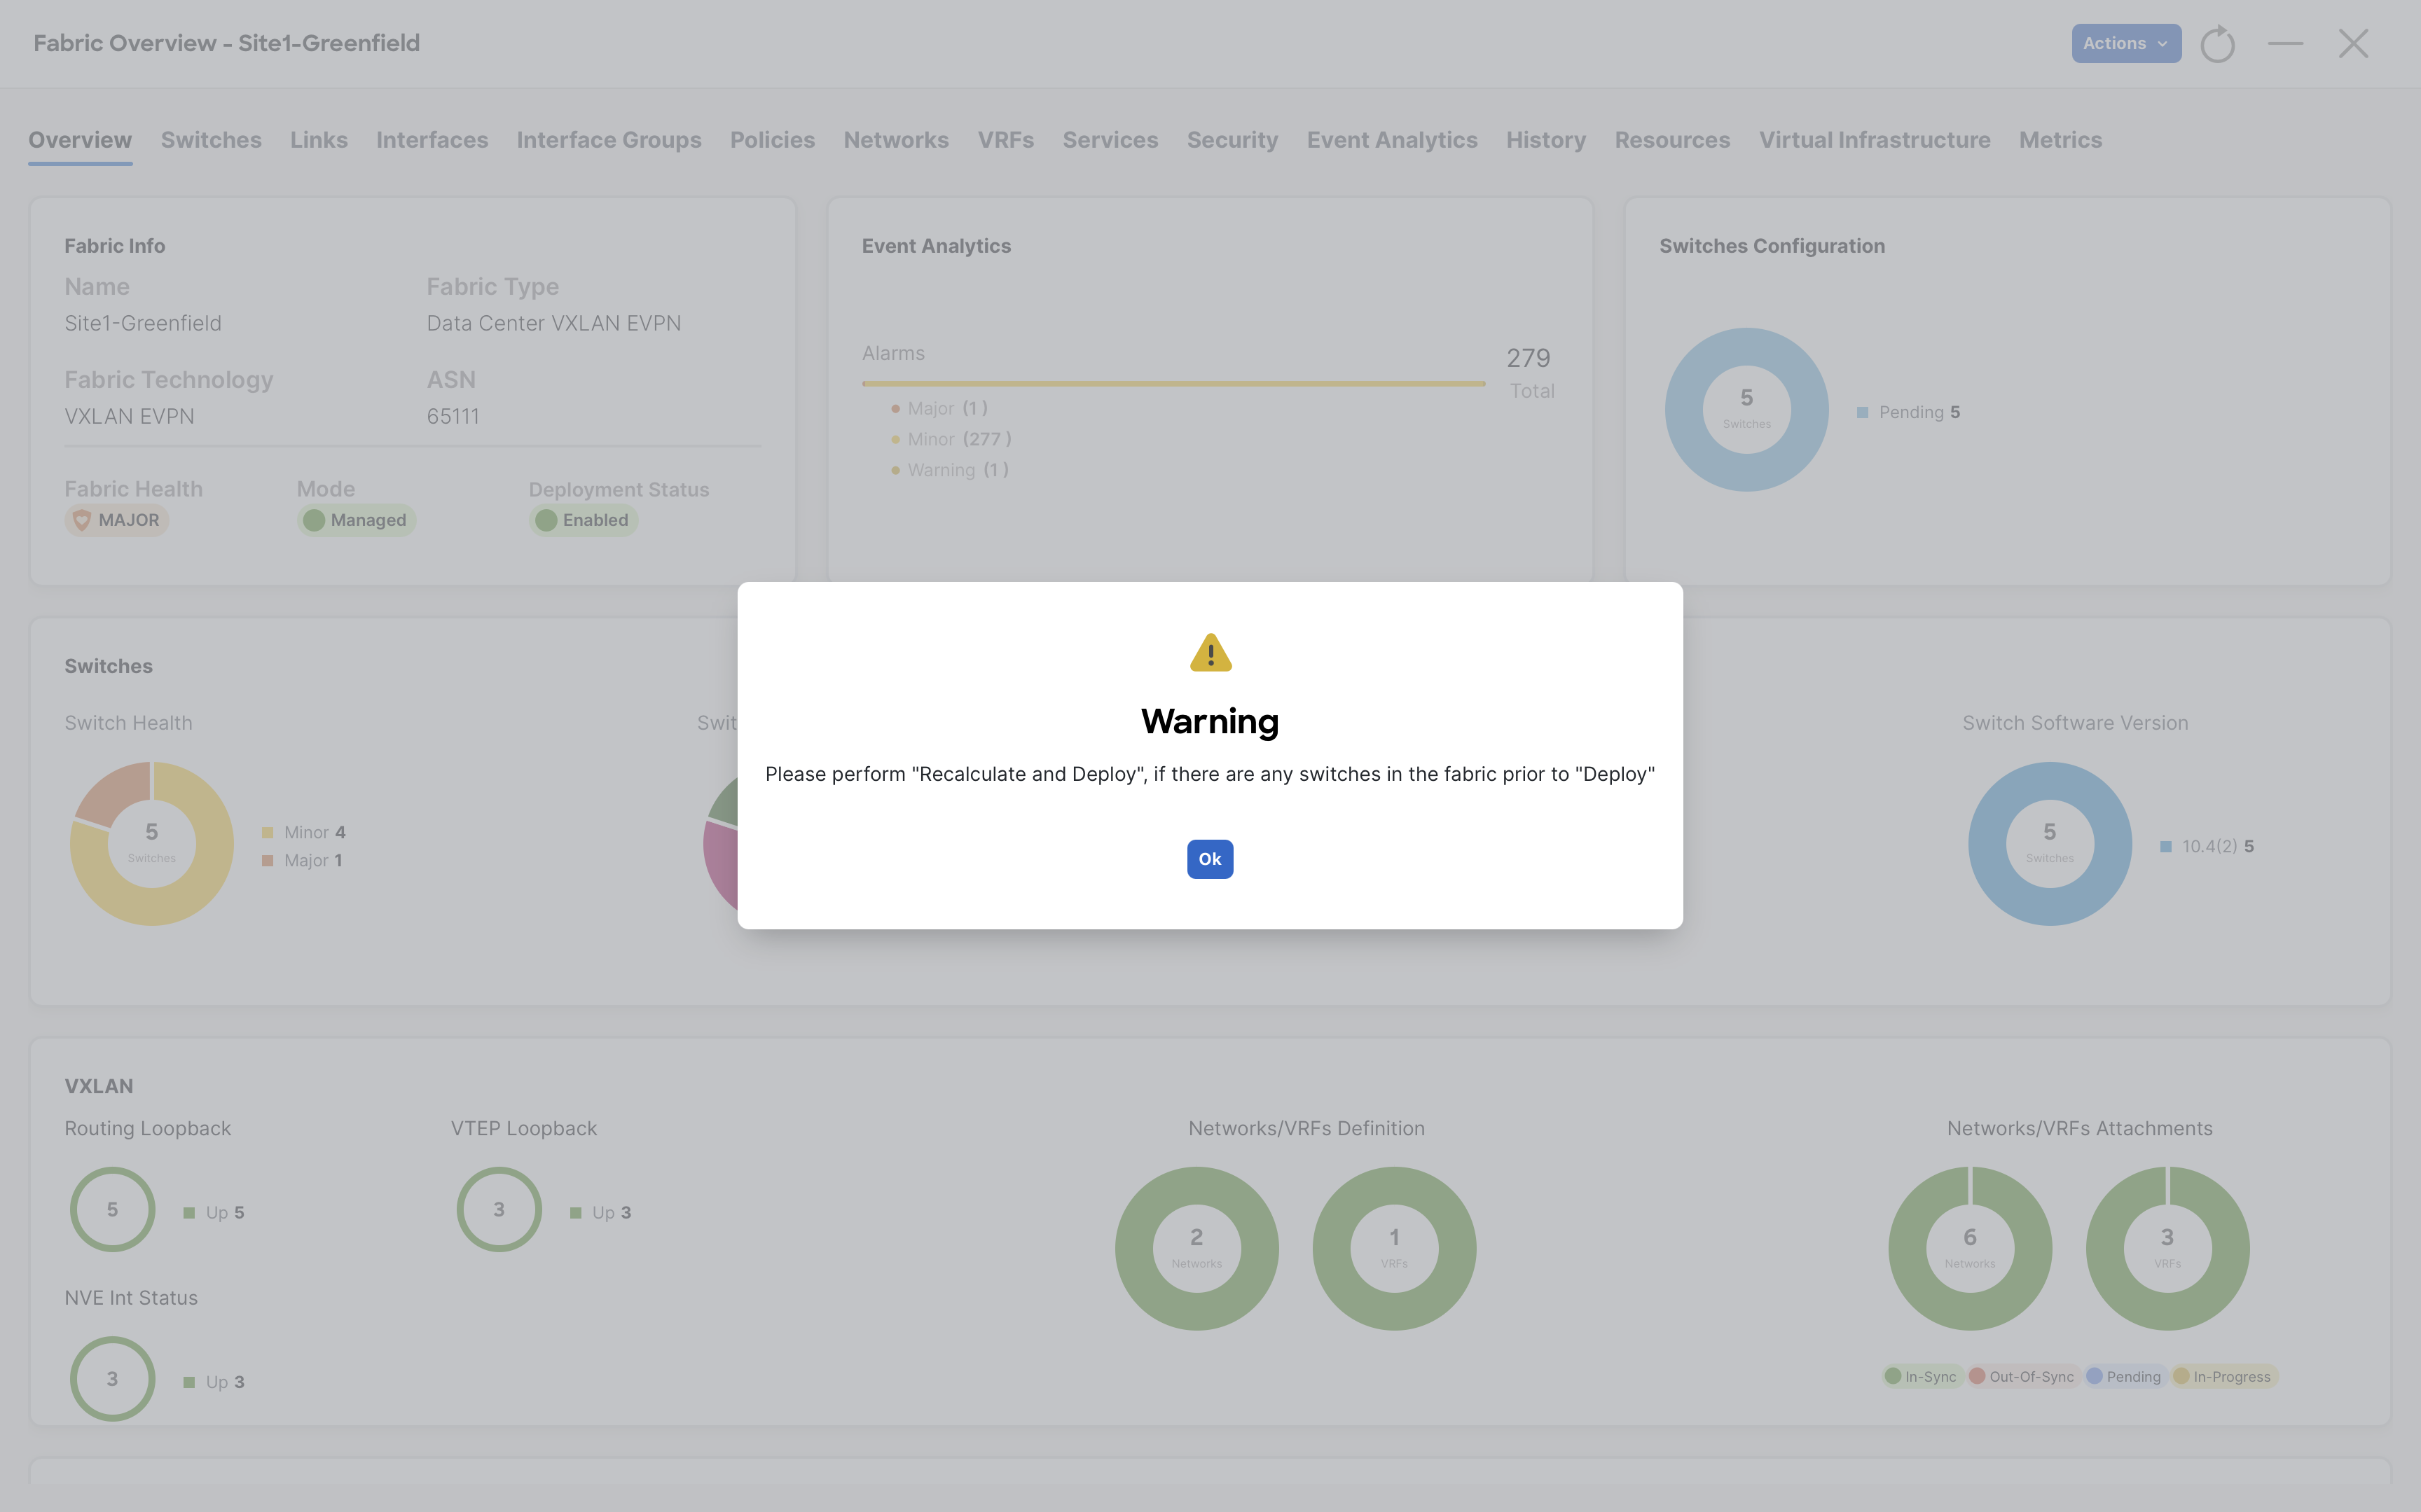
Step 5 – From Fabric Overview - Site1-Greenfield page, click Actions > Recalculate and Deploy and follow the usual process to deploy any required configurations
Info
At this point, NDFC will push some route-maps that might be referenced later on for the external connectivity
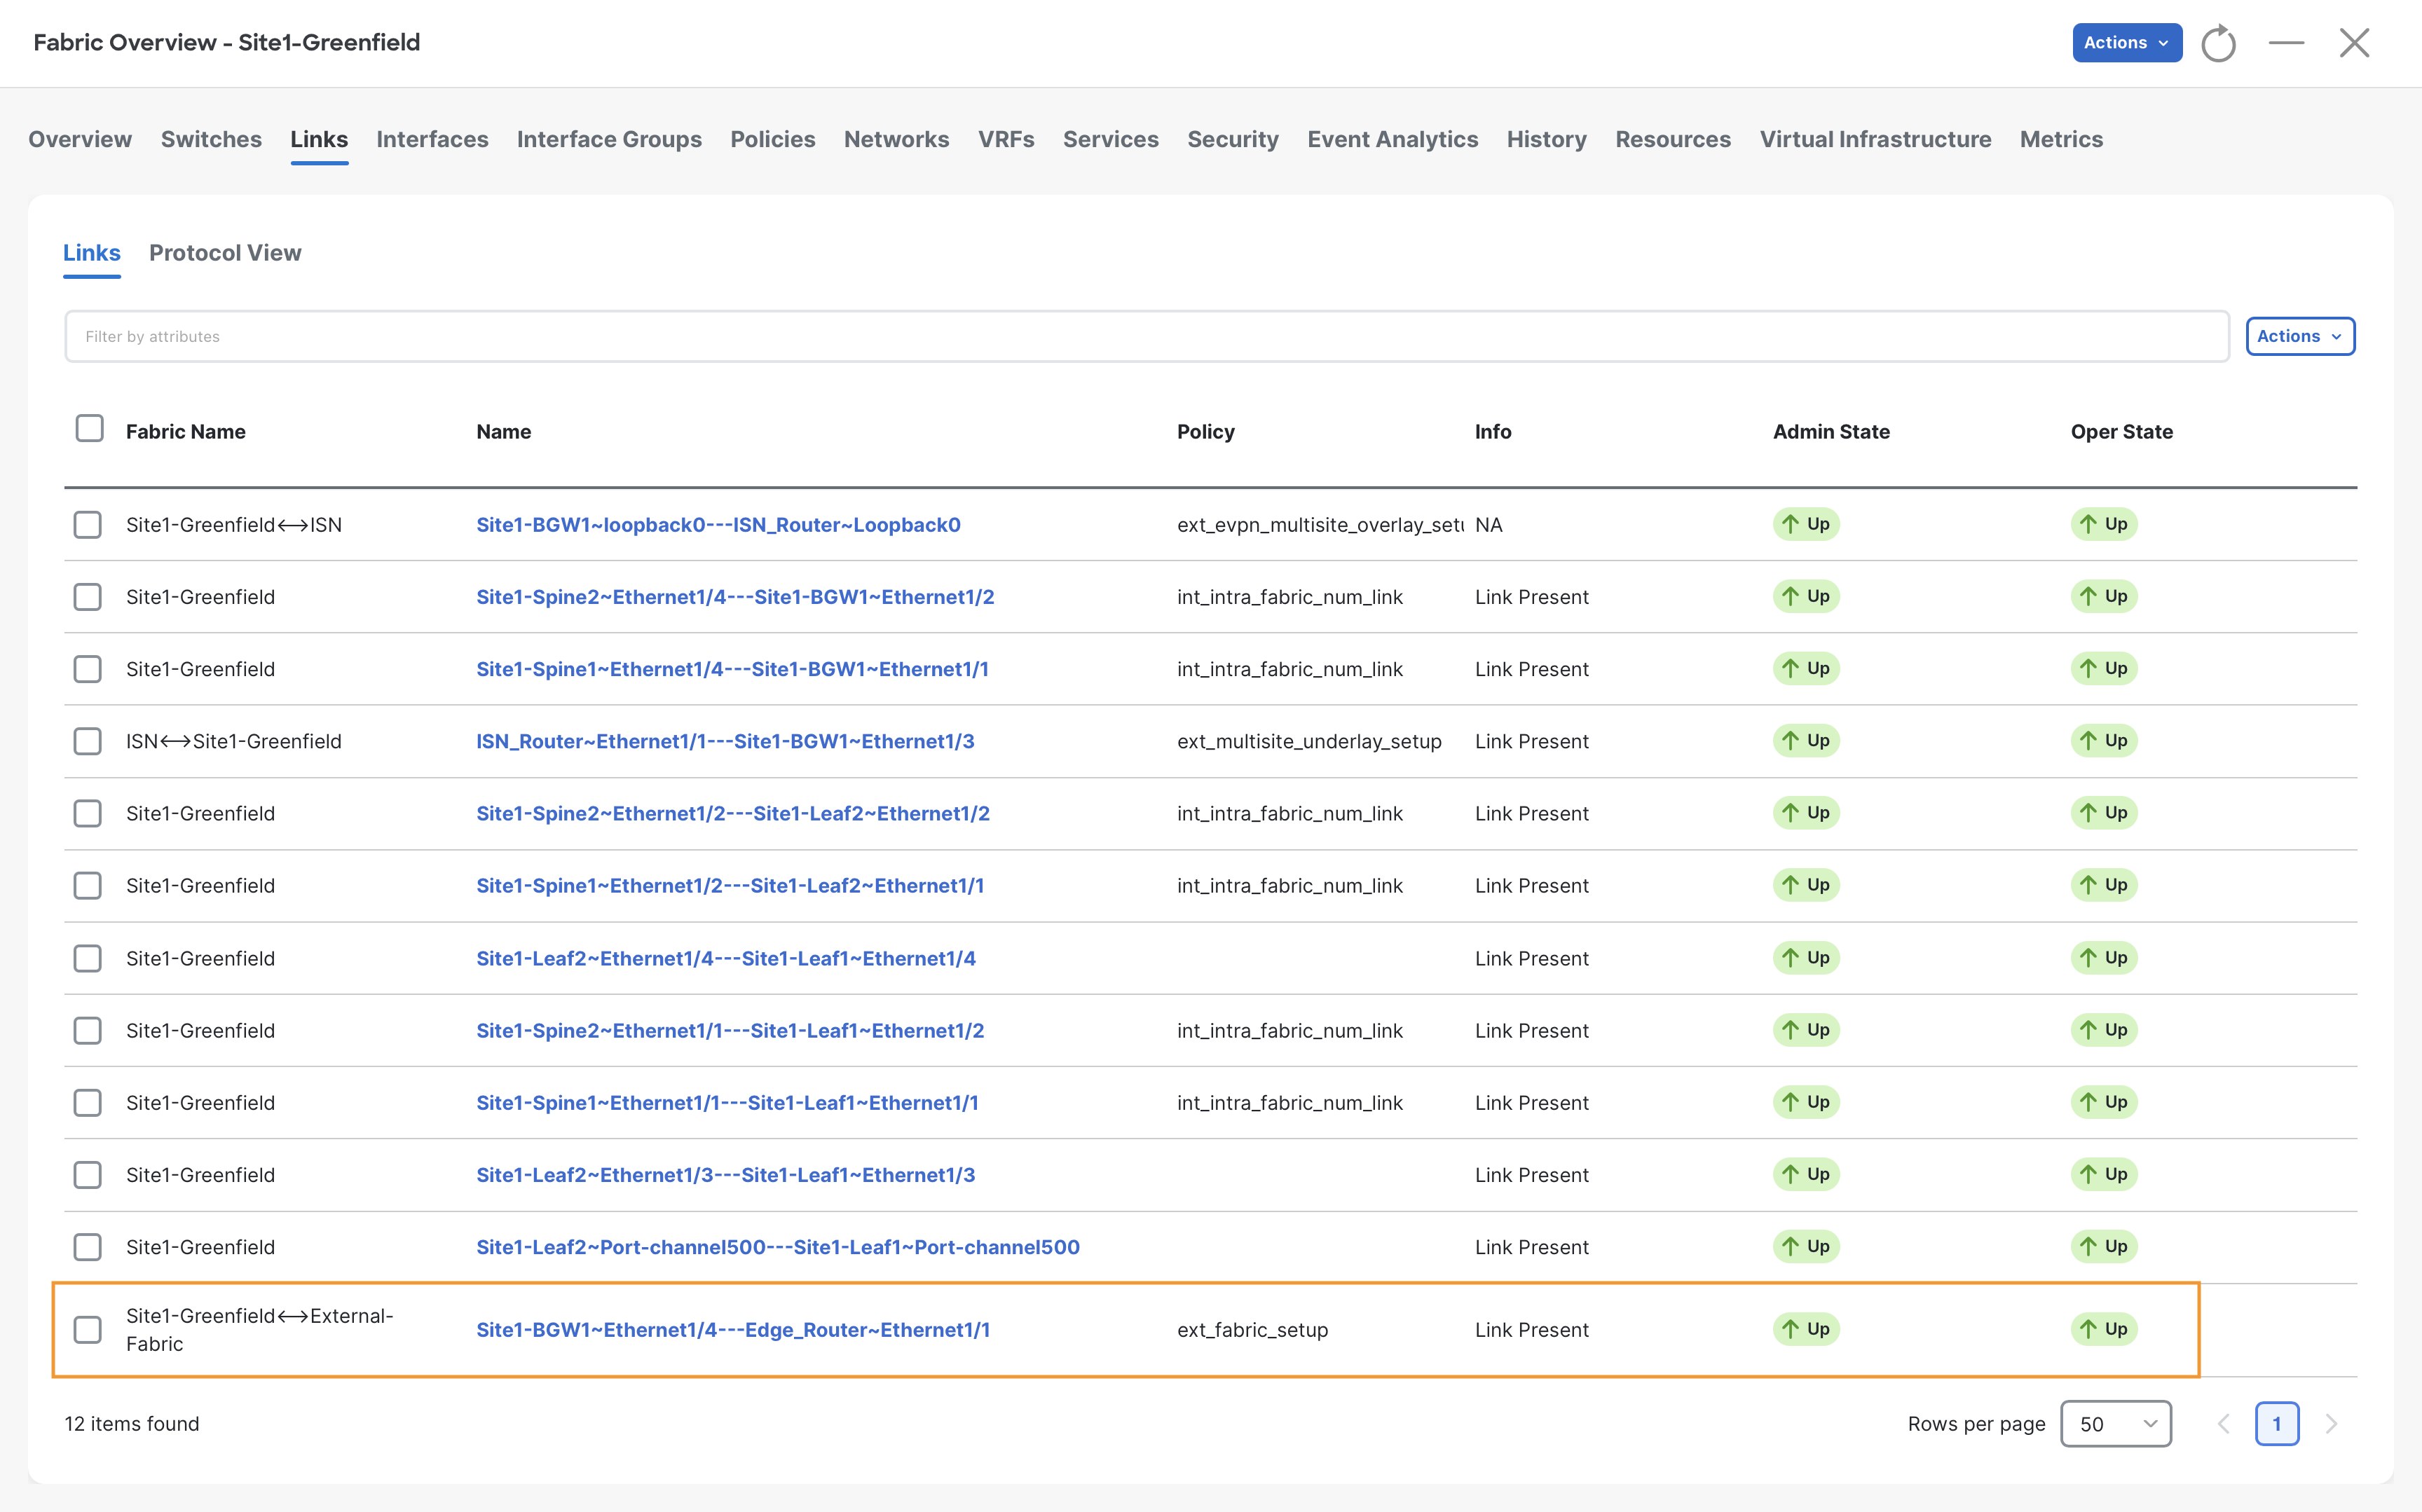
Step 6 – On the Fabric Overview - Site1-Greenfield page, click on the Links tab and verify the policy associated on the external link.
NDFC detected an adjacency between an Edge-Router and a Border Gateway (Border or Border-Spine would be the same) and automatically associated the ext_fabric_setup policy.
Extending VRF to External Fabric
Step 1 – On Fabric Controller page, click Manage > Fabrics and then double click on Site1-Greenfield fabric
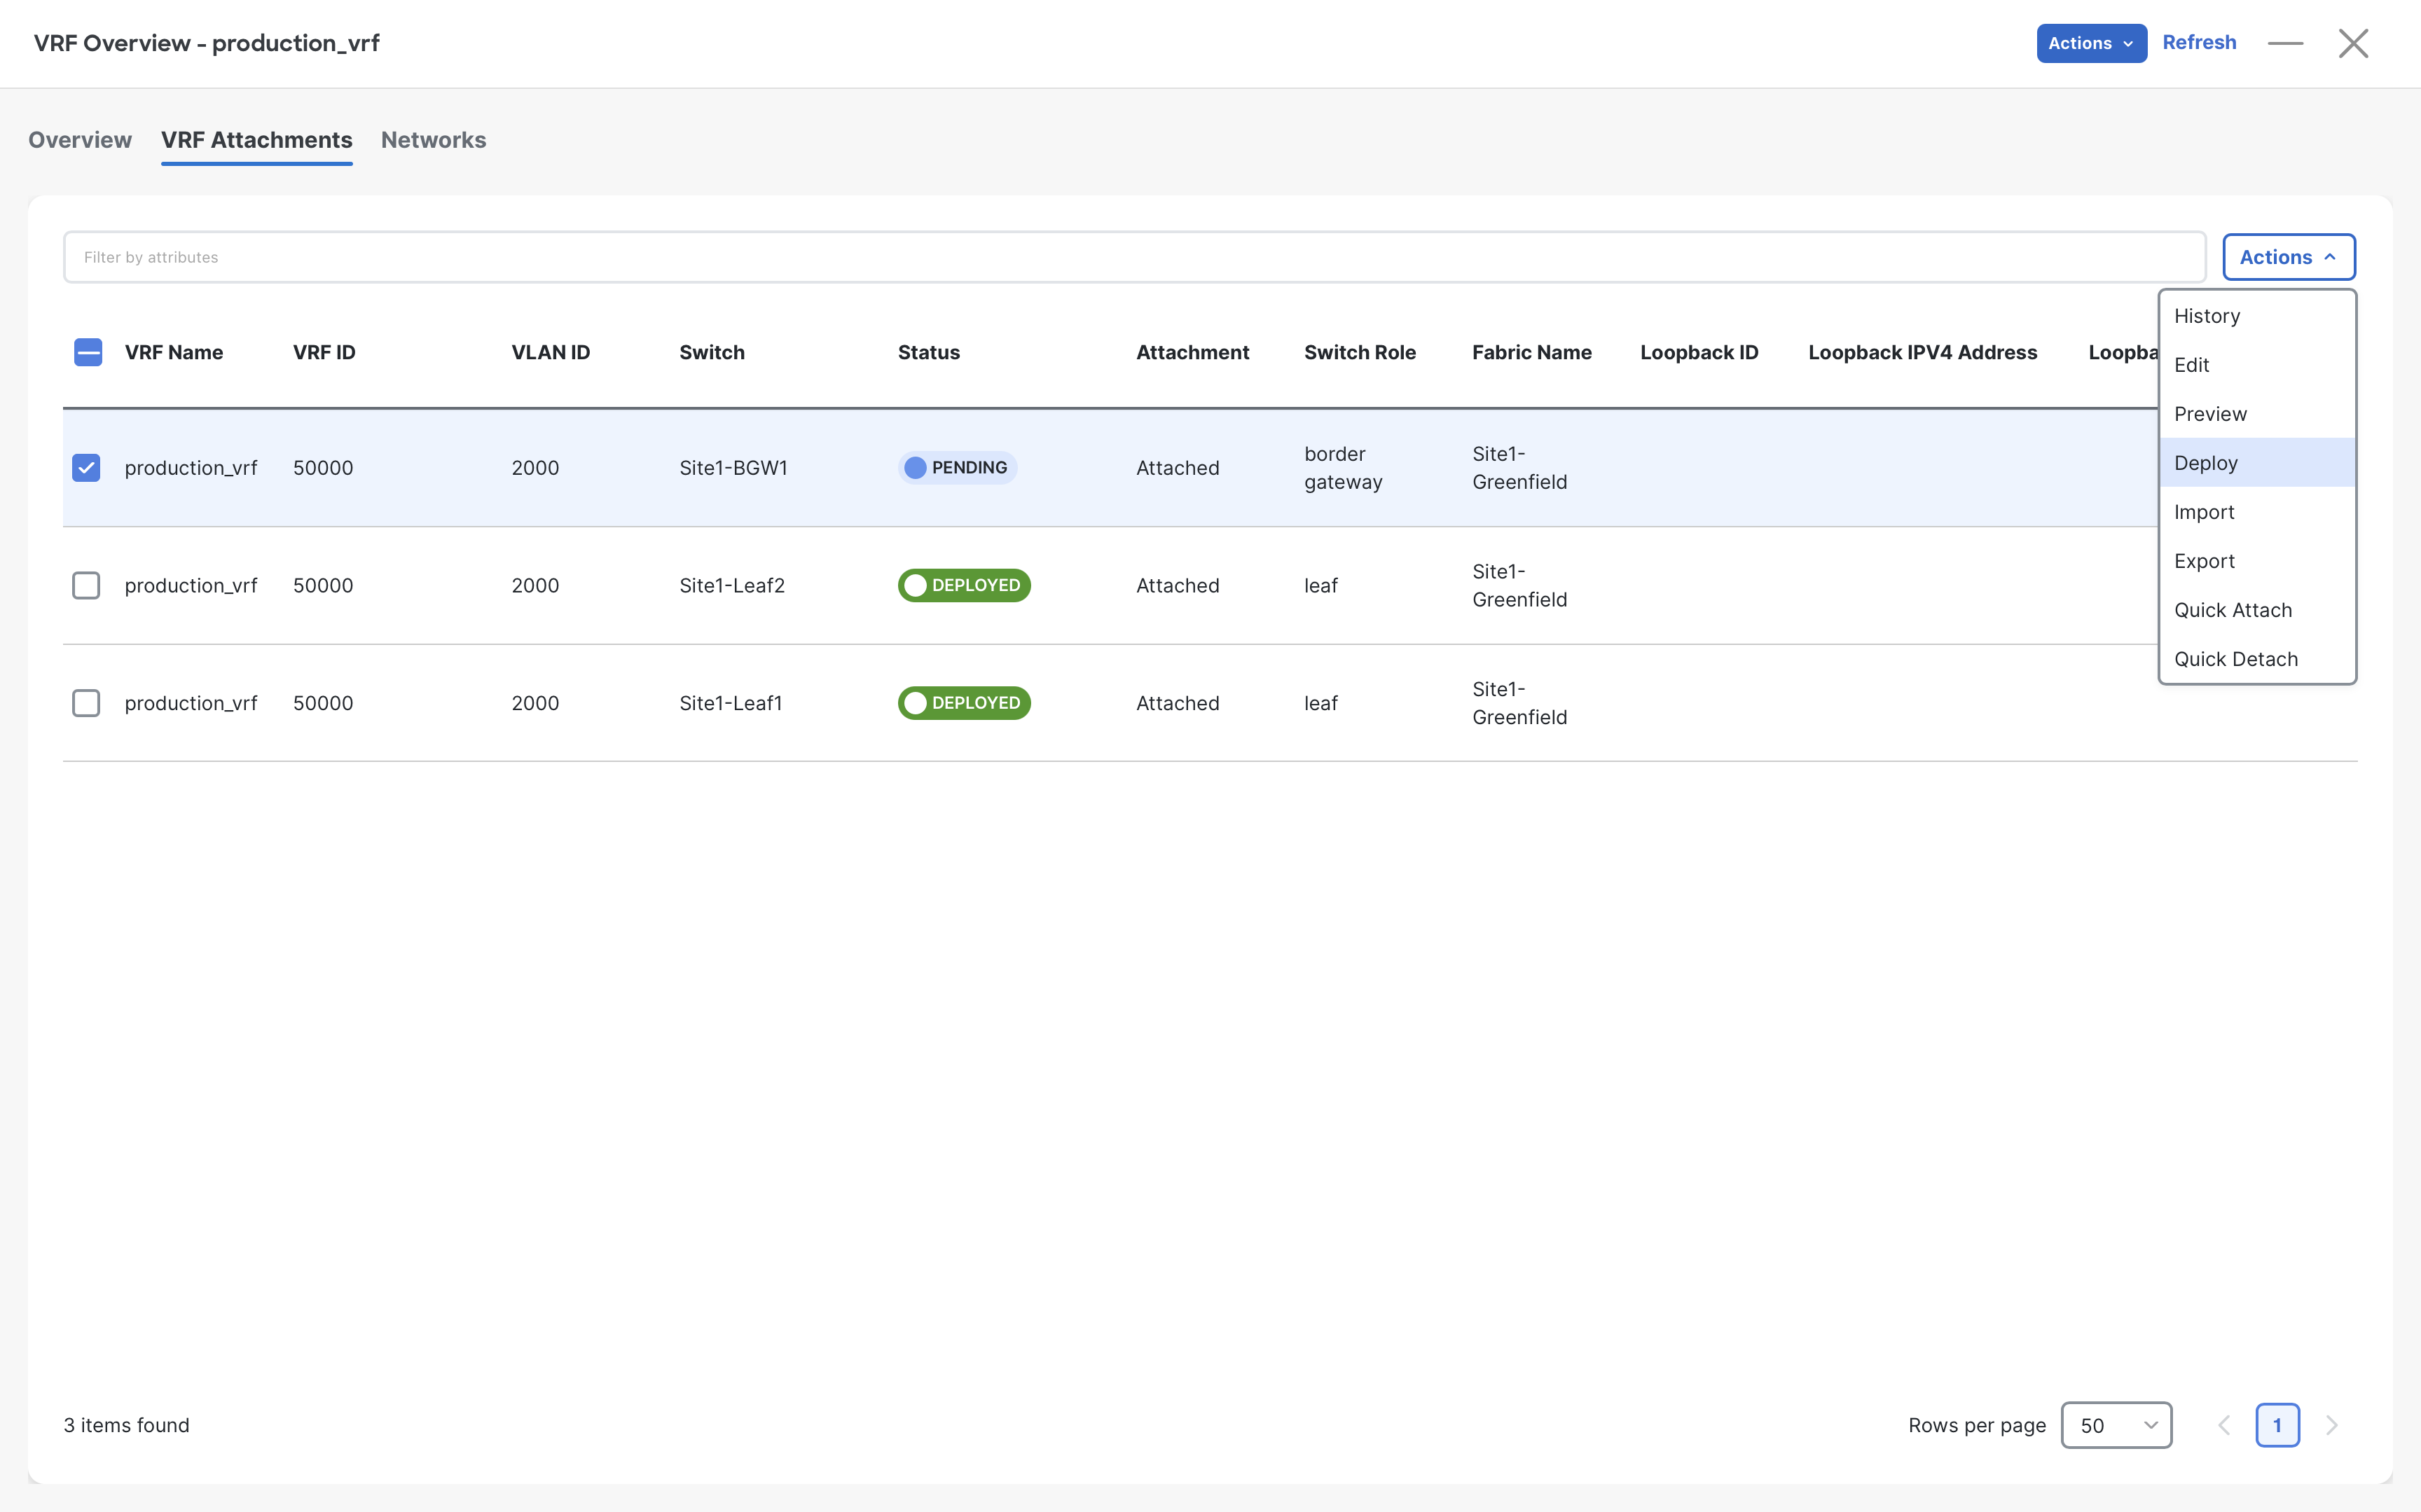
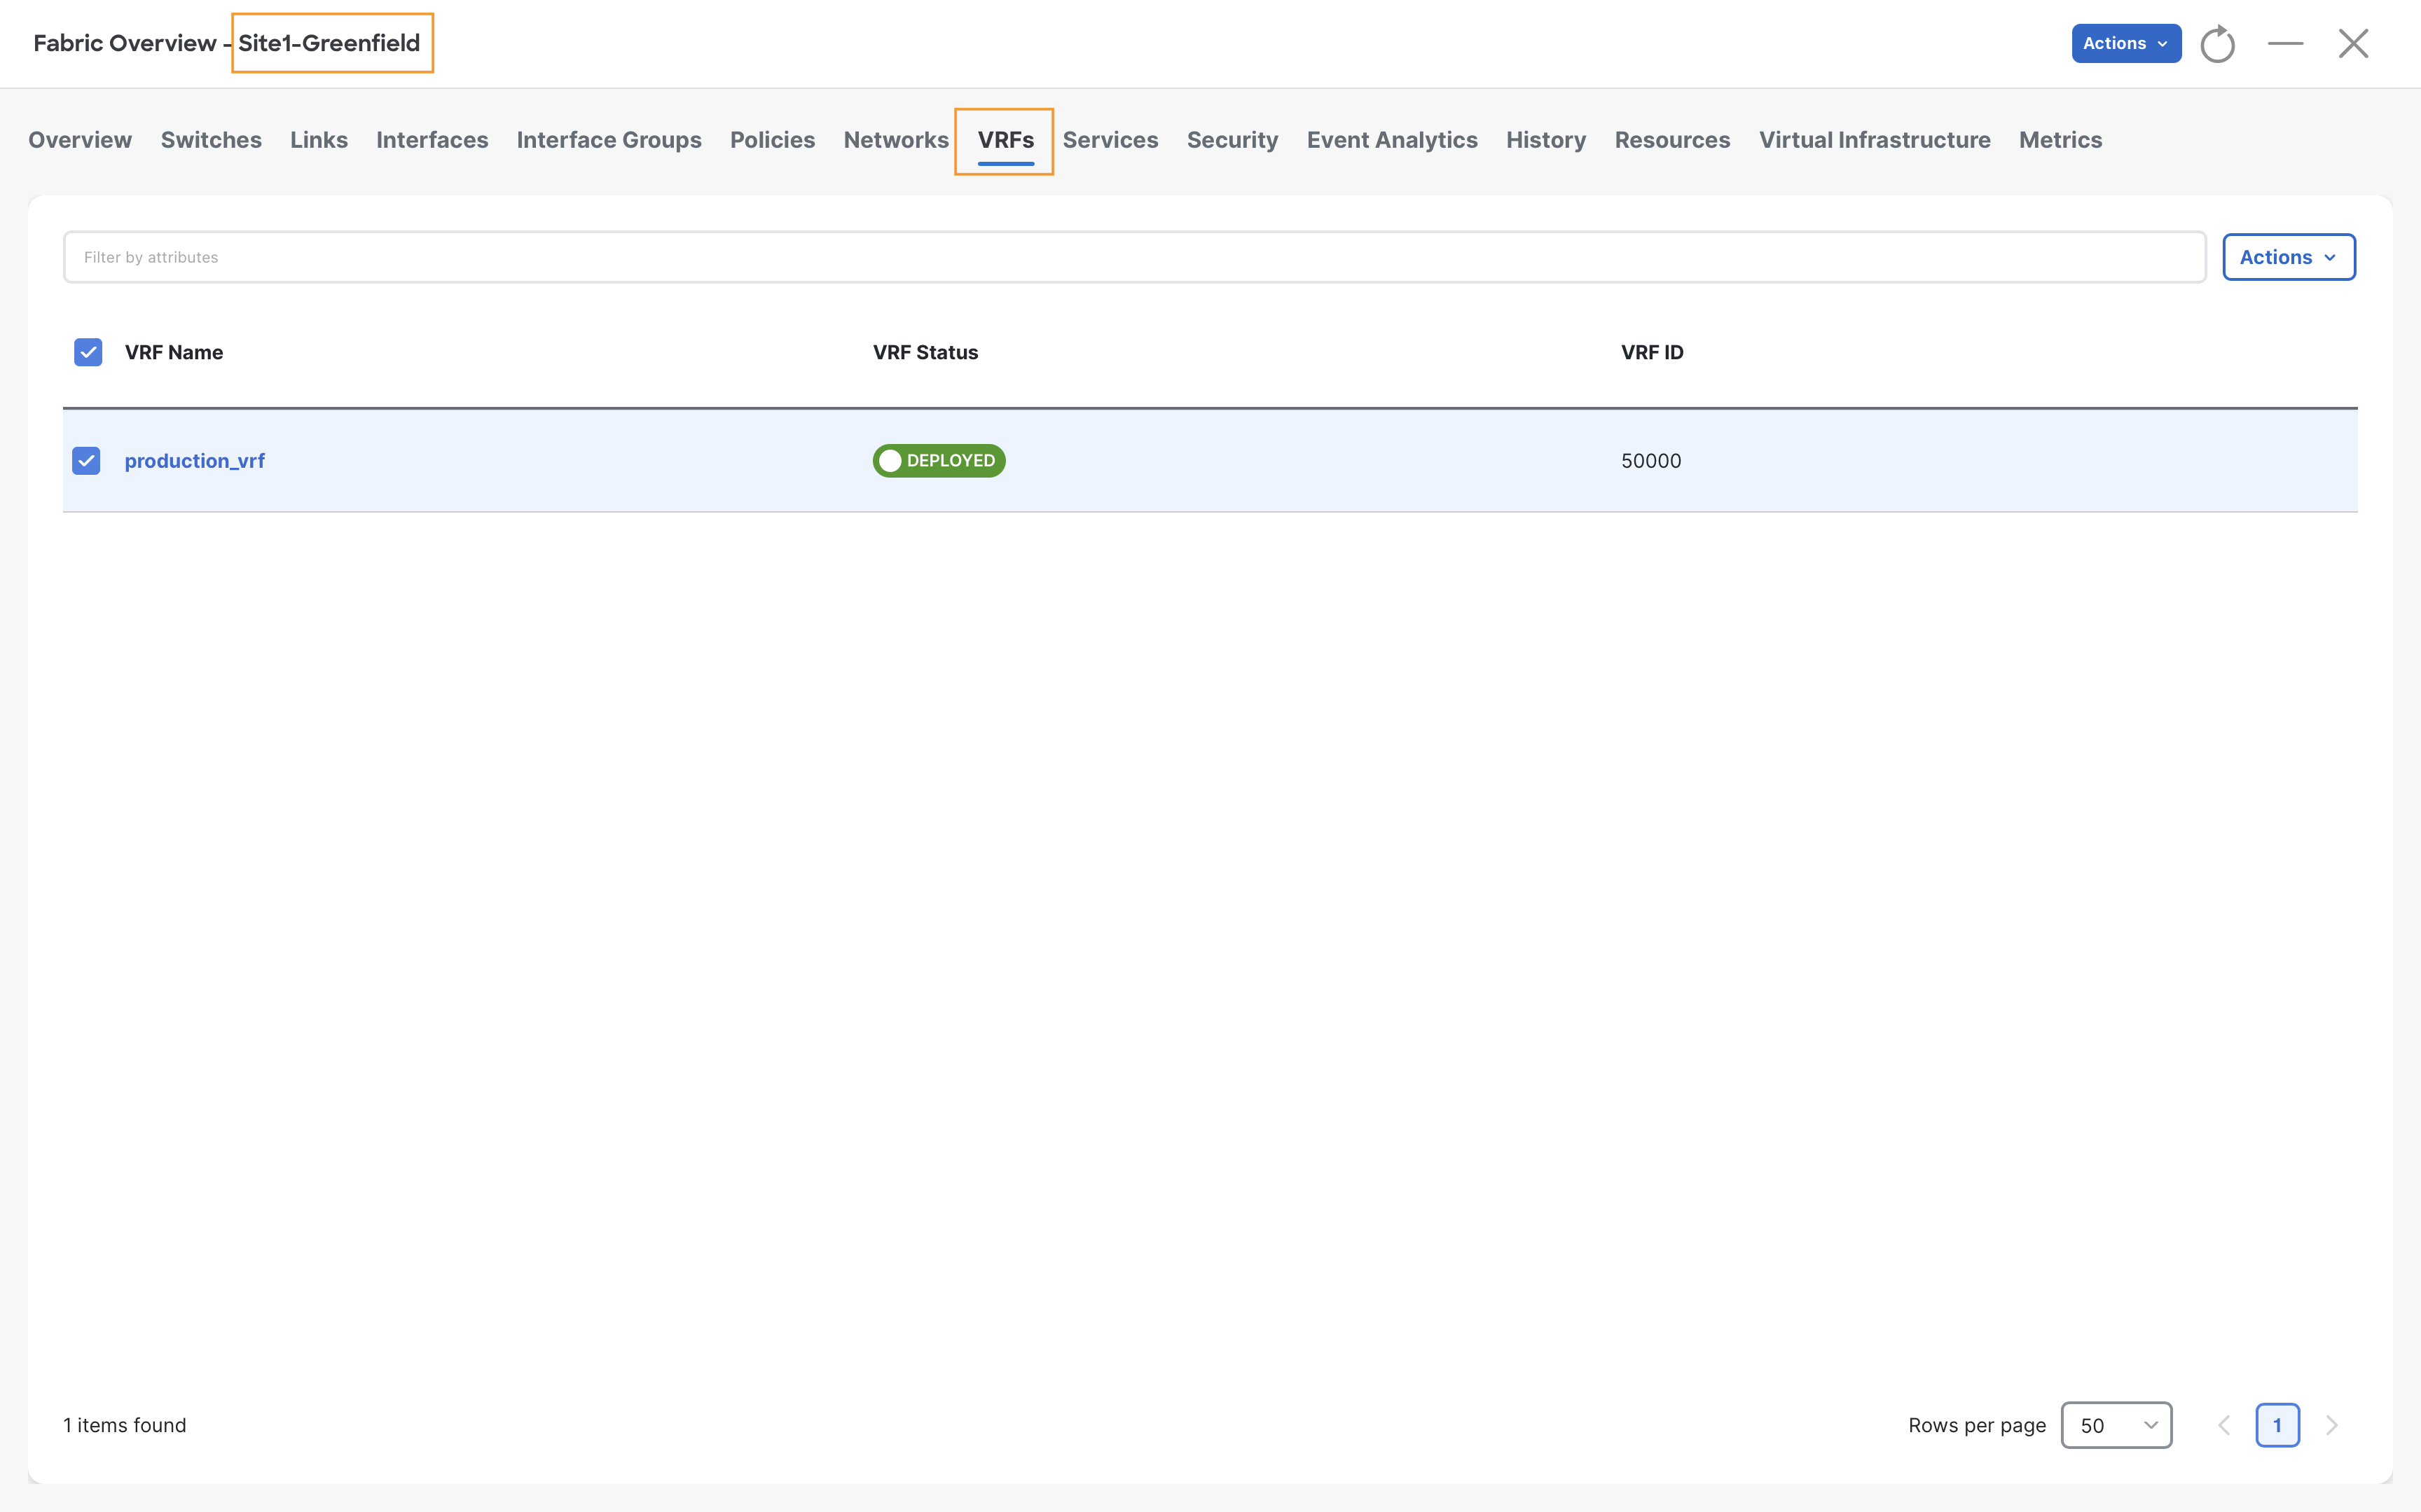
Step 2 – Go to the VRF tab and double click on production_vrf., then click the VRF Attachment tab
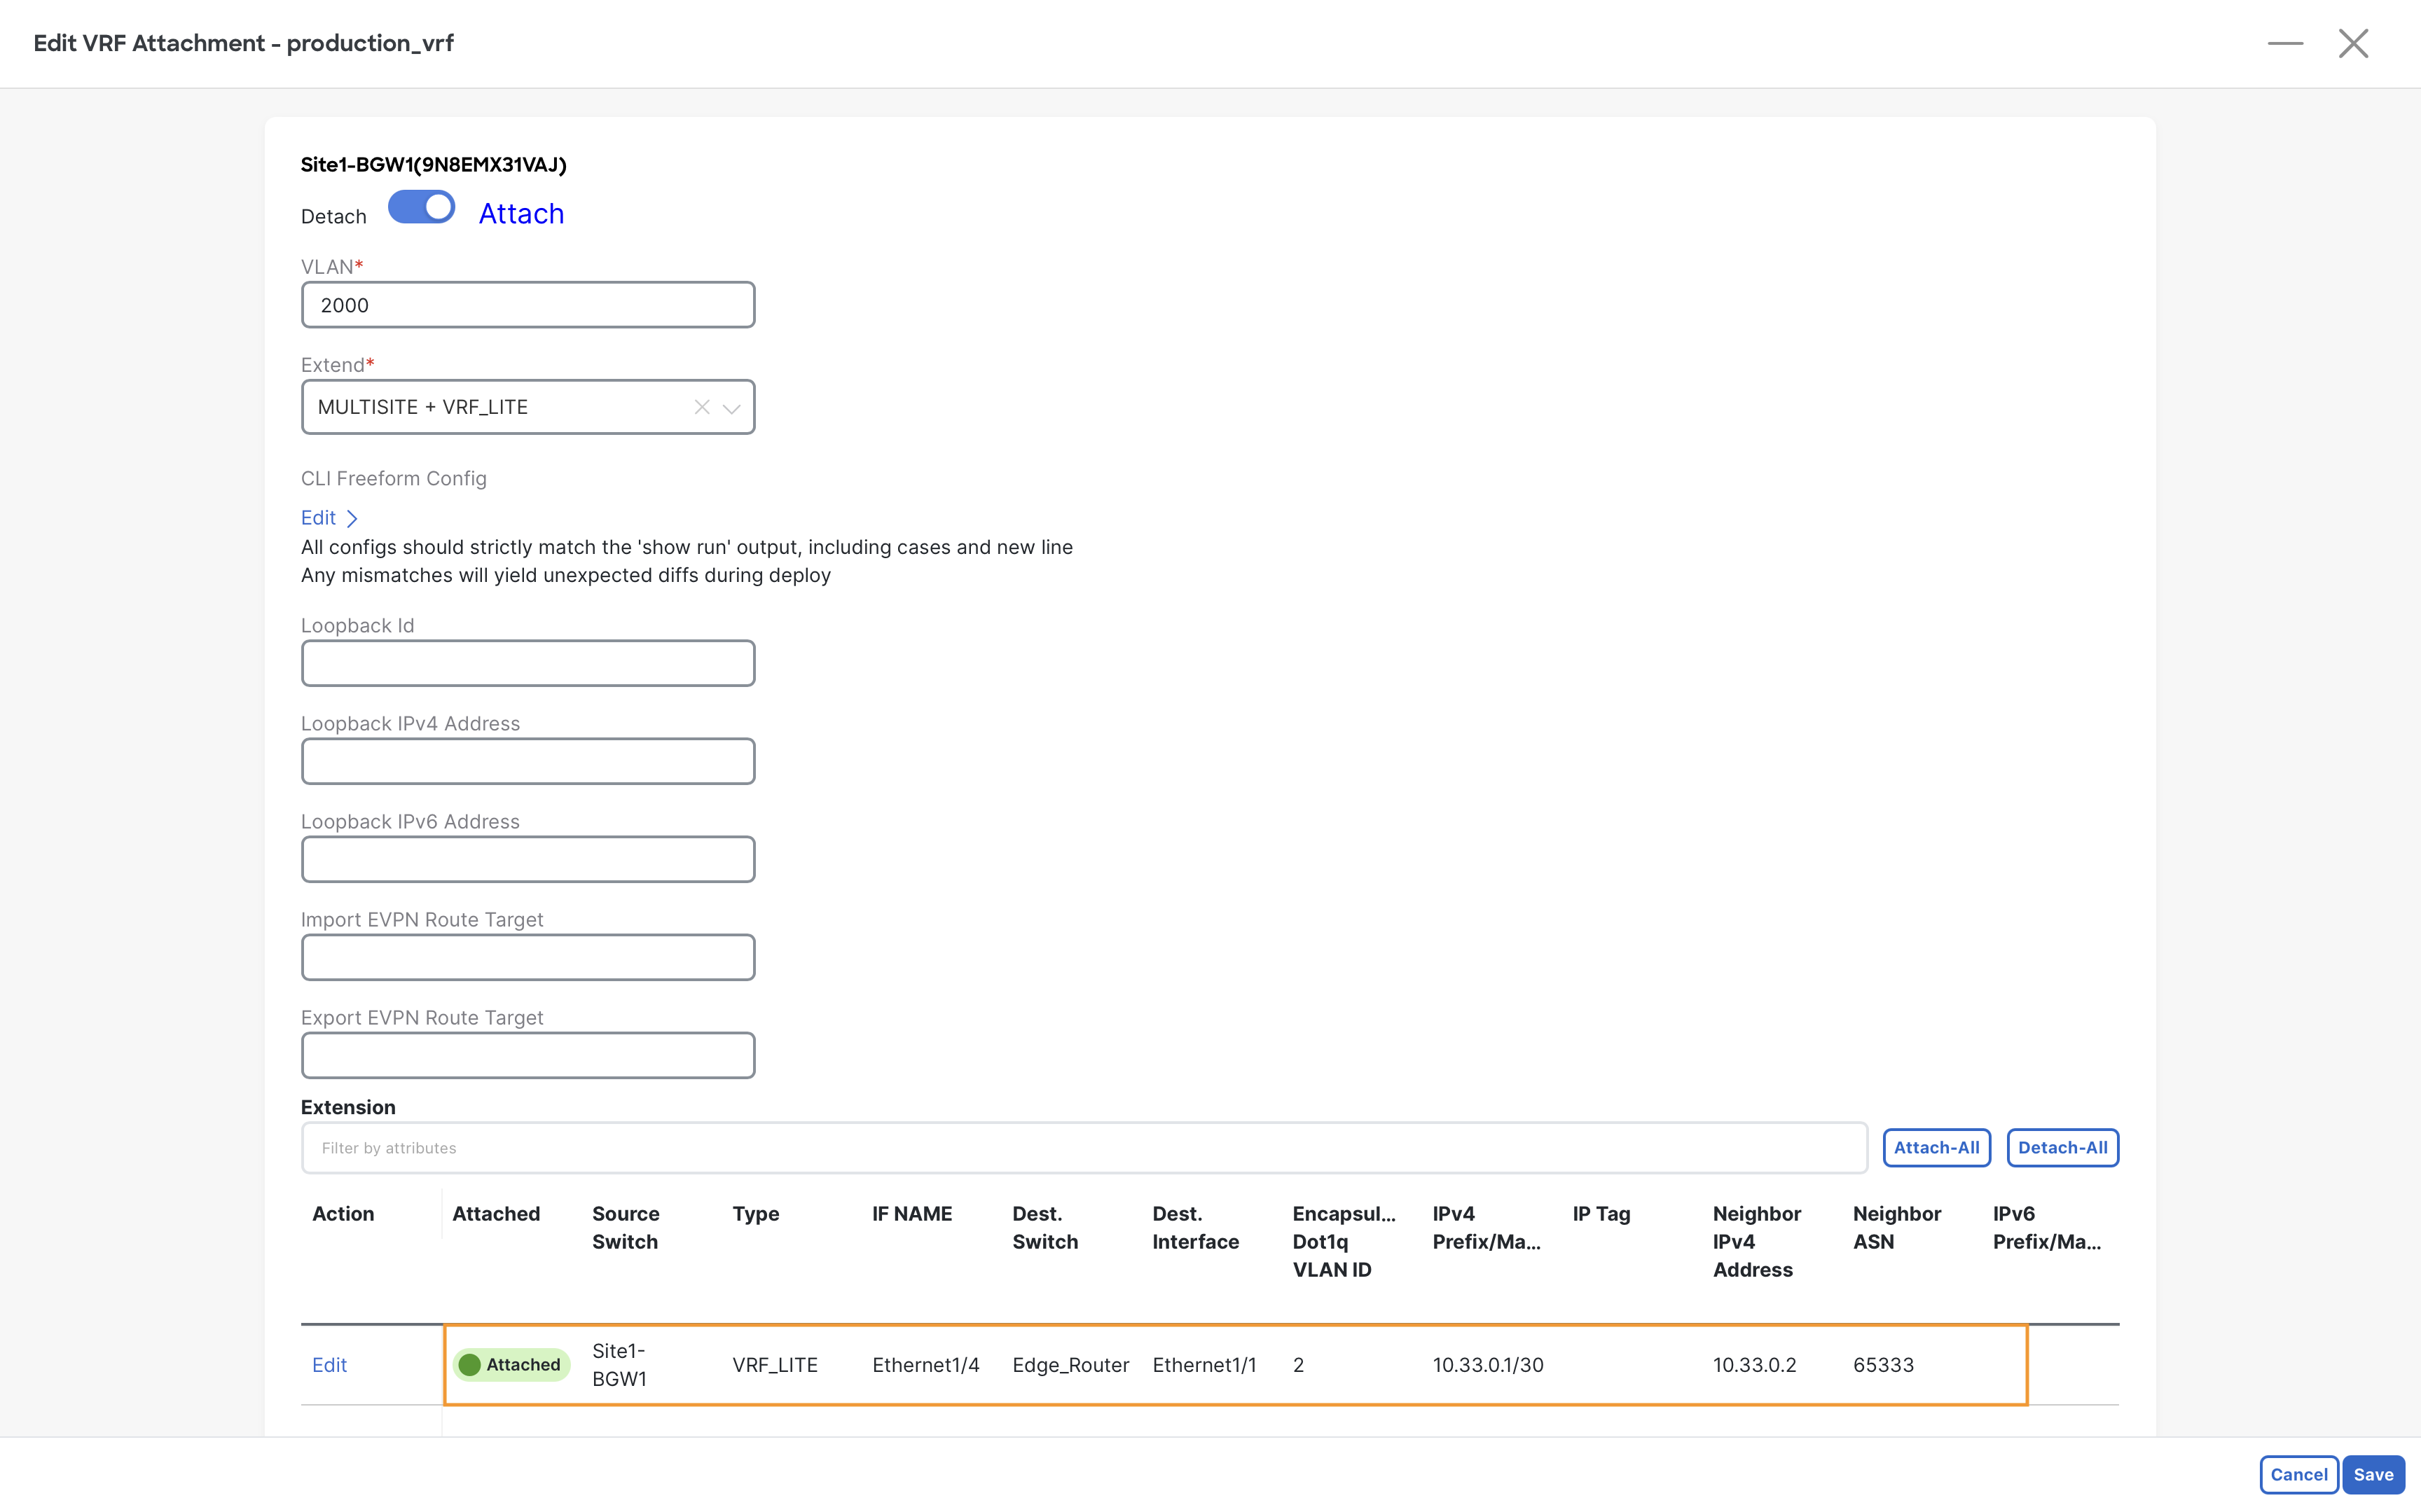
Step 3 – Click on the check box against Site1-BGW1 and click Actions > Edit
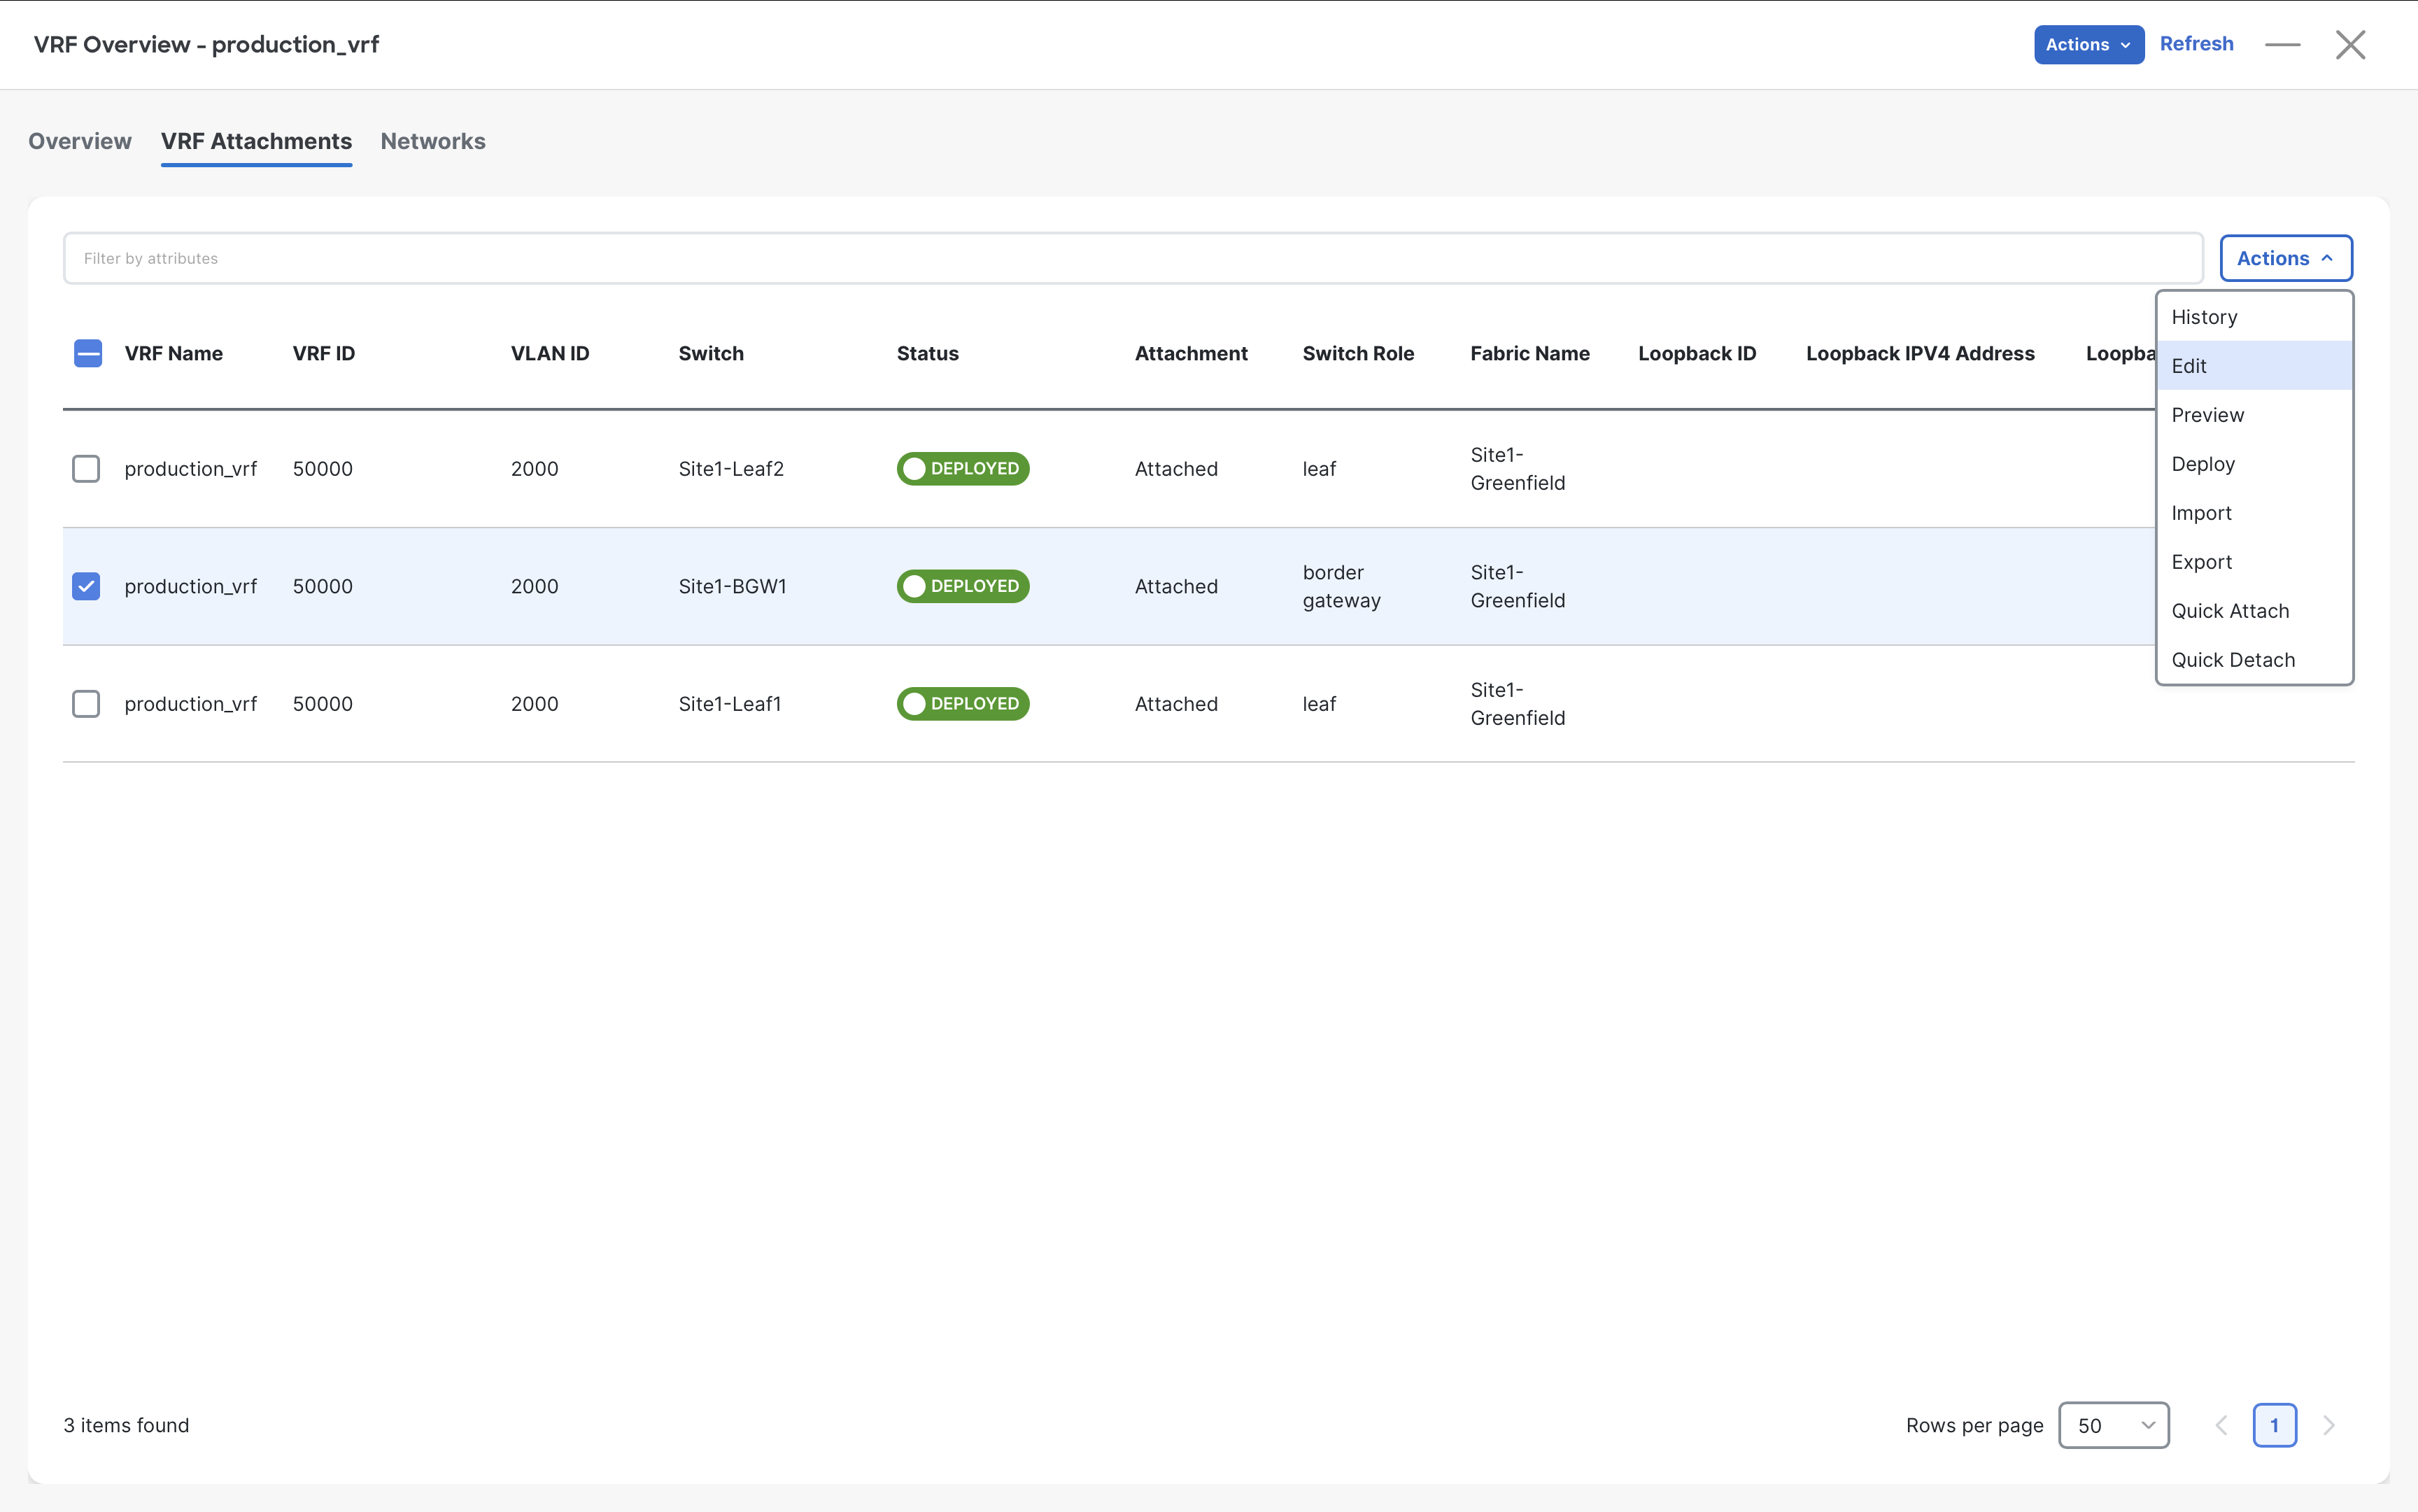
Step 4 – On the Edit VRF Attachment dialog, select MULTISITE + VRF_LITE from the dropdown under the Extend field.
At the bottom, in the Extension section click on the Edit link for Site-BGW1 VRF_LITE extension, this will allow you to edit VRF_LITE extension settings
Info
MULTISITE + VRF_LITE Means that the Site1-BGW1 will act as Border Gateway and also as normal Border Leaf. As it will extend the VRF towards the Multi-Site but also via VRF-Lite connectivity that will be soon created towards the Edge Router.
Tip
You see the link here as it has been associate to the ext_fabric_setup policy. This is the key :-)
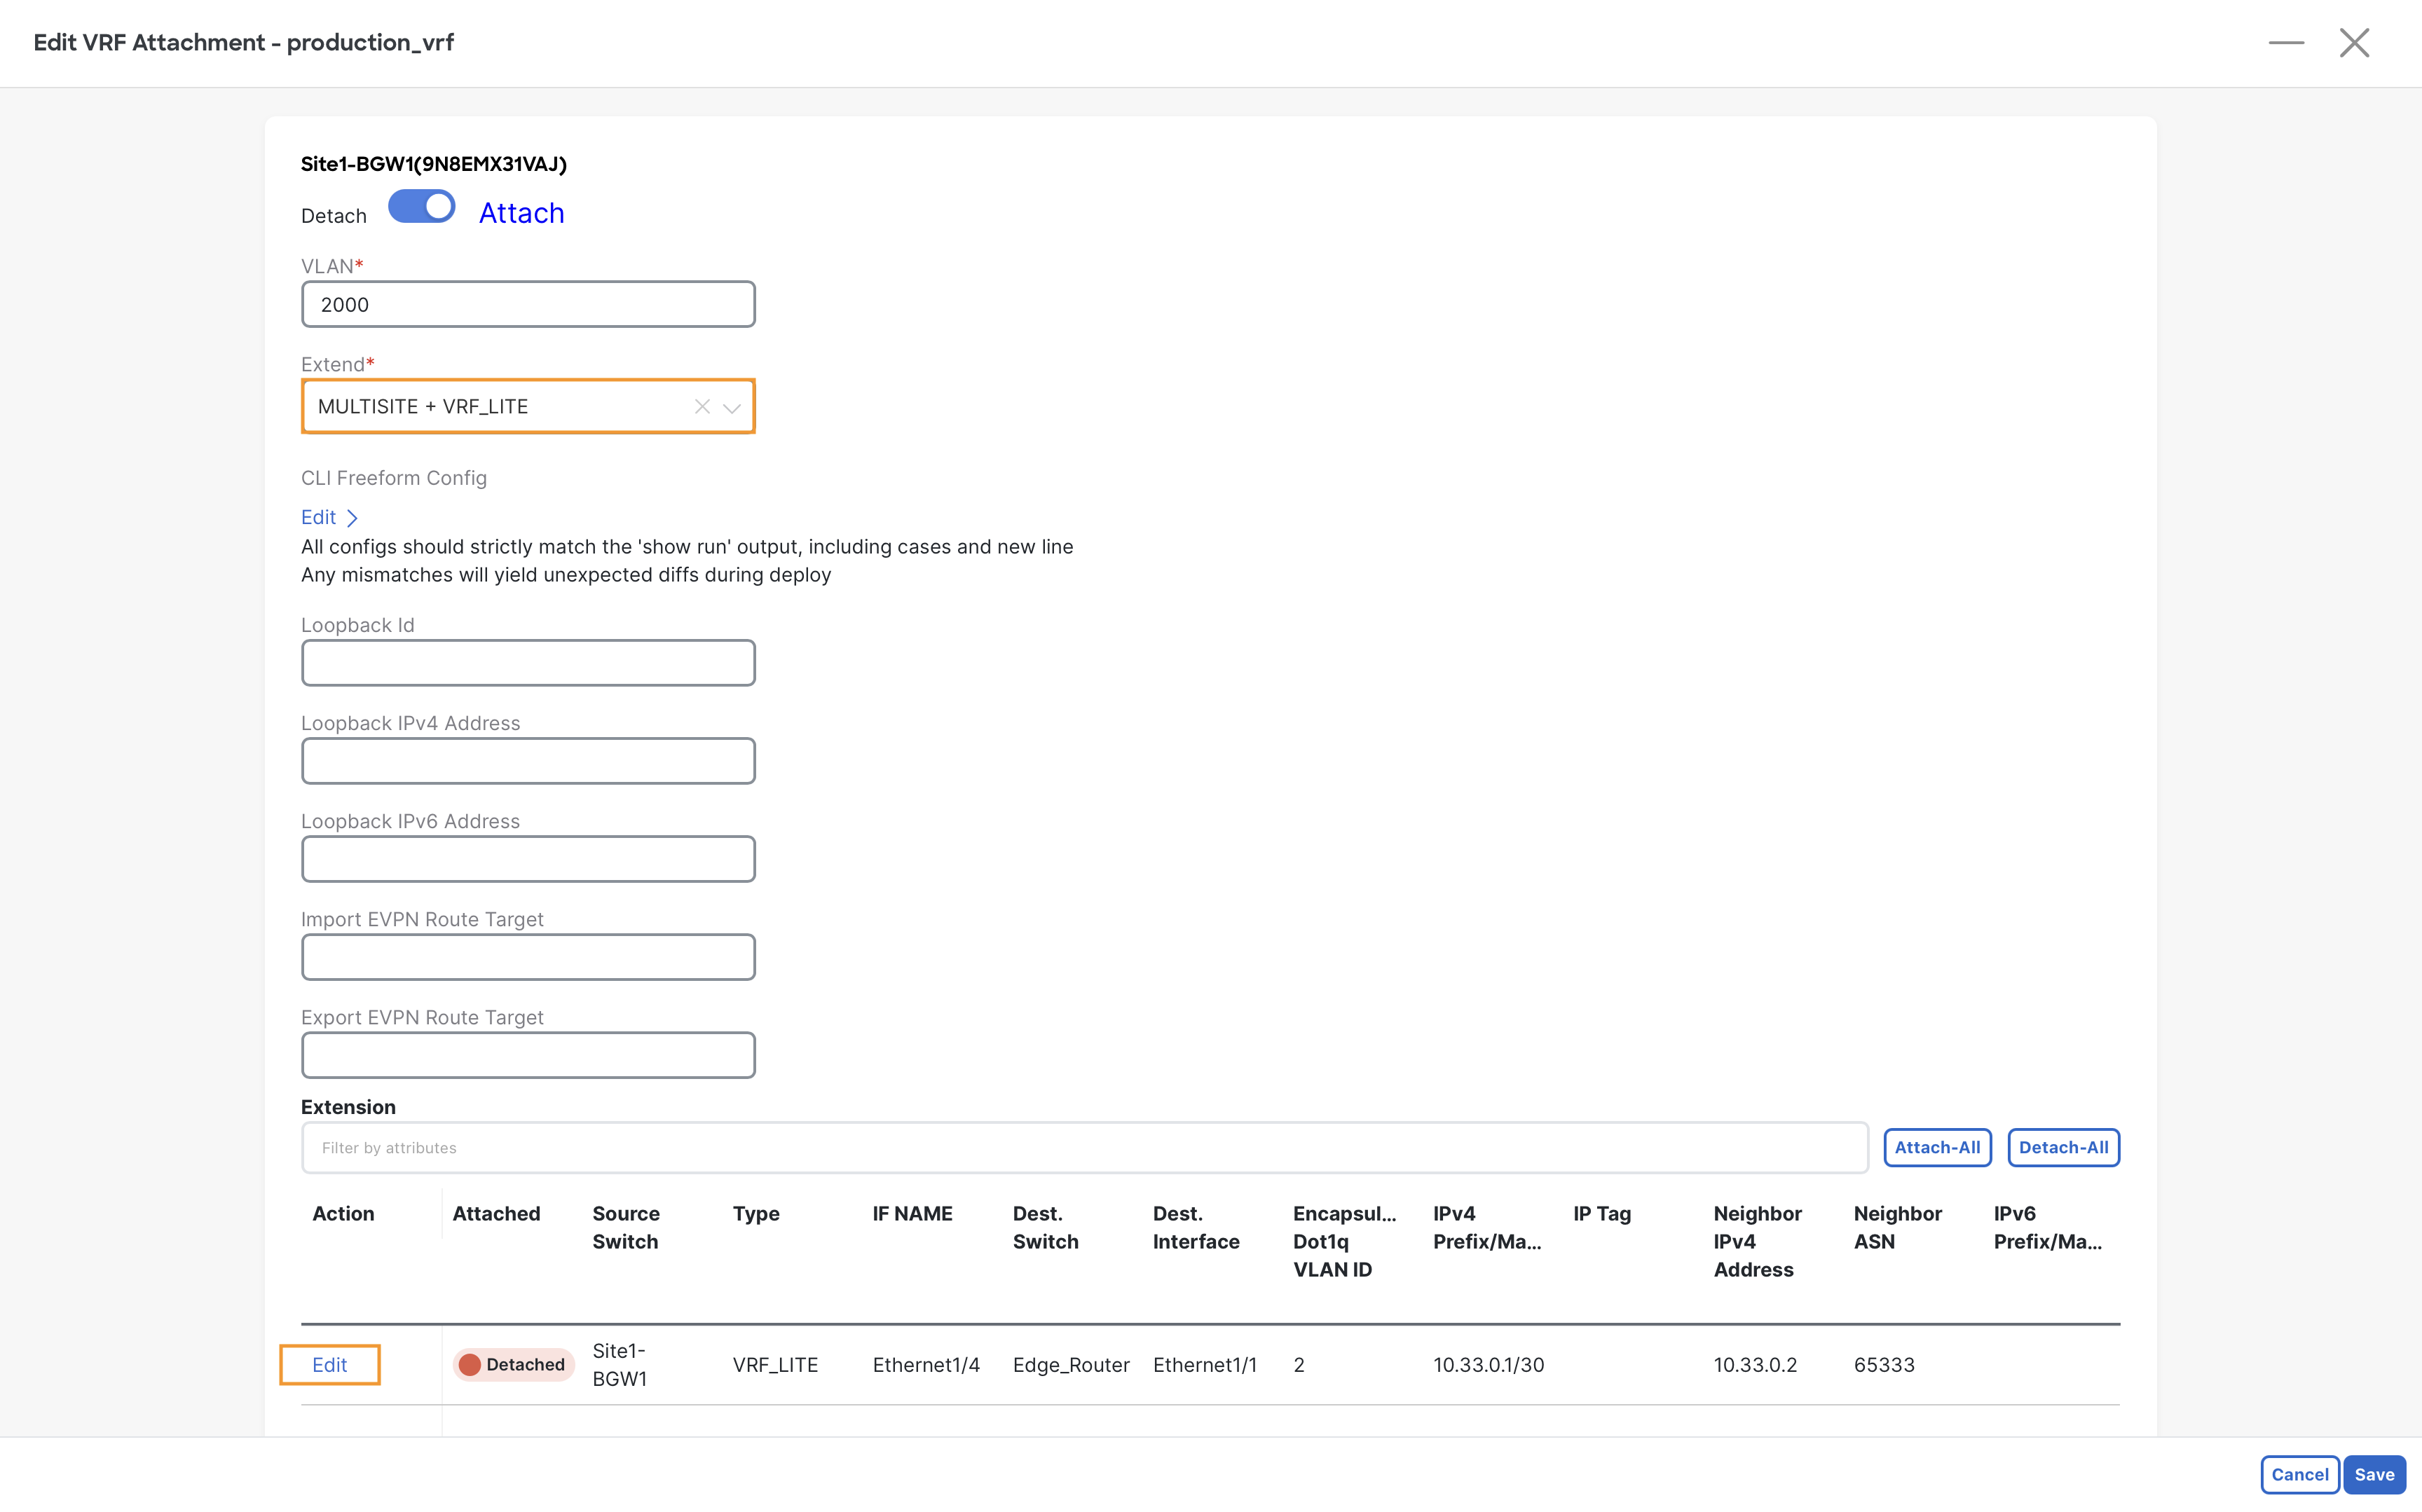
Step 5 – On the Edit Extension Details page, move the slider to Attach
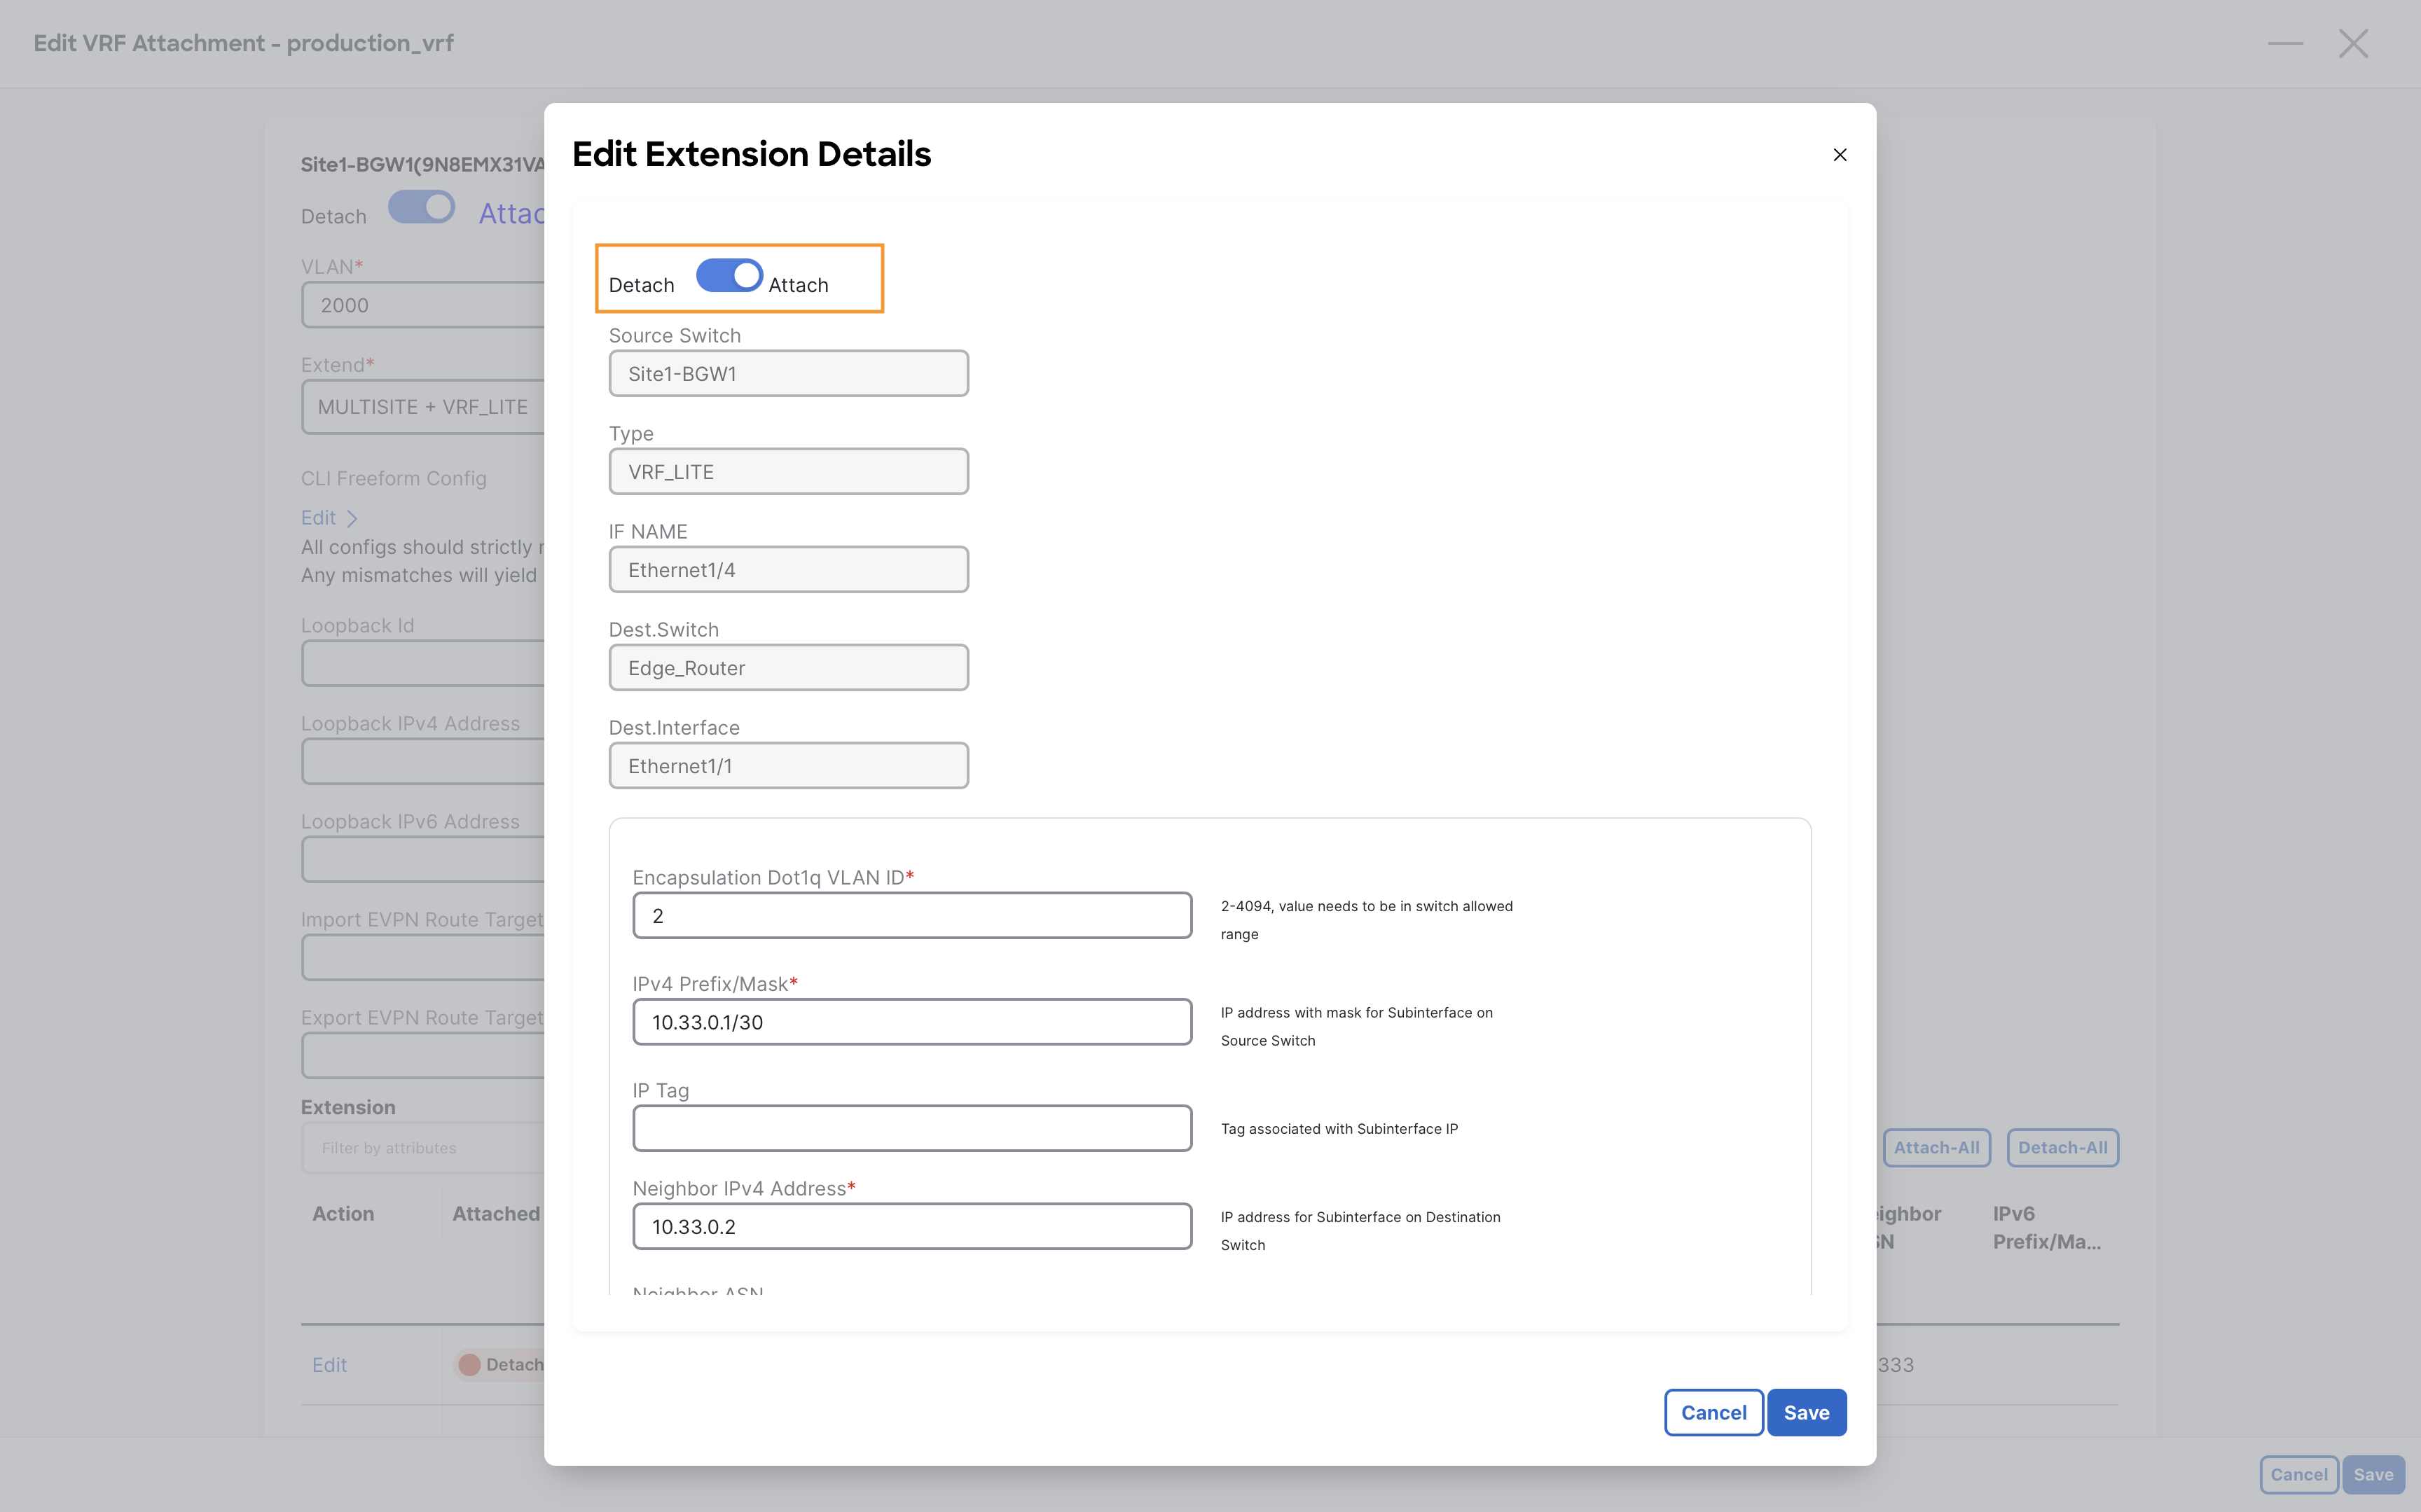
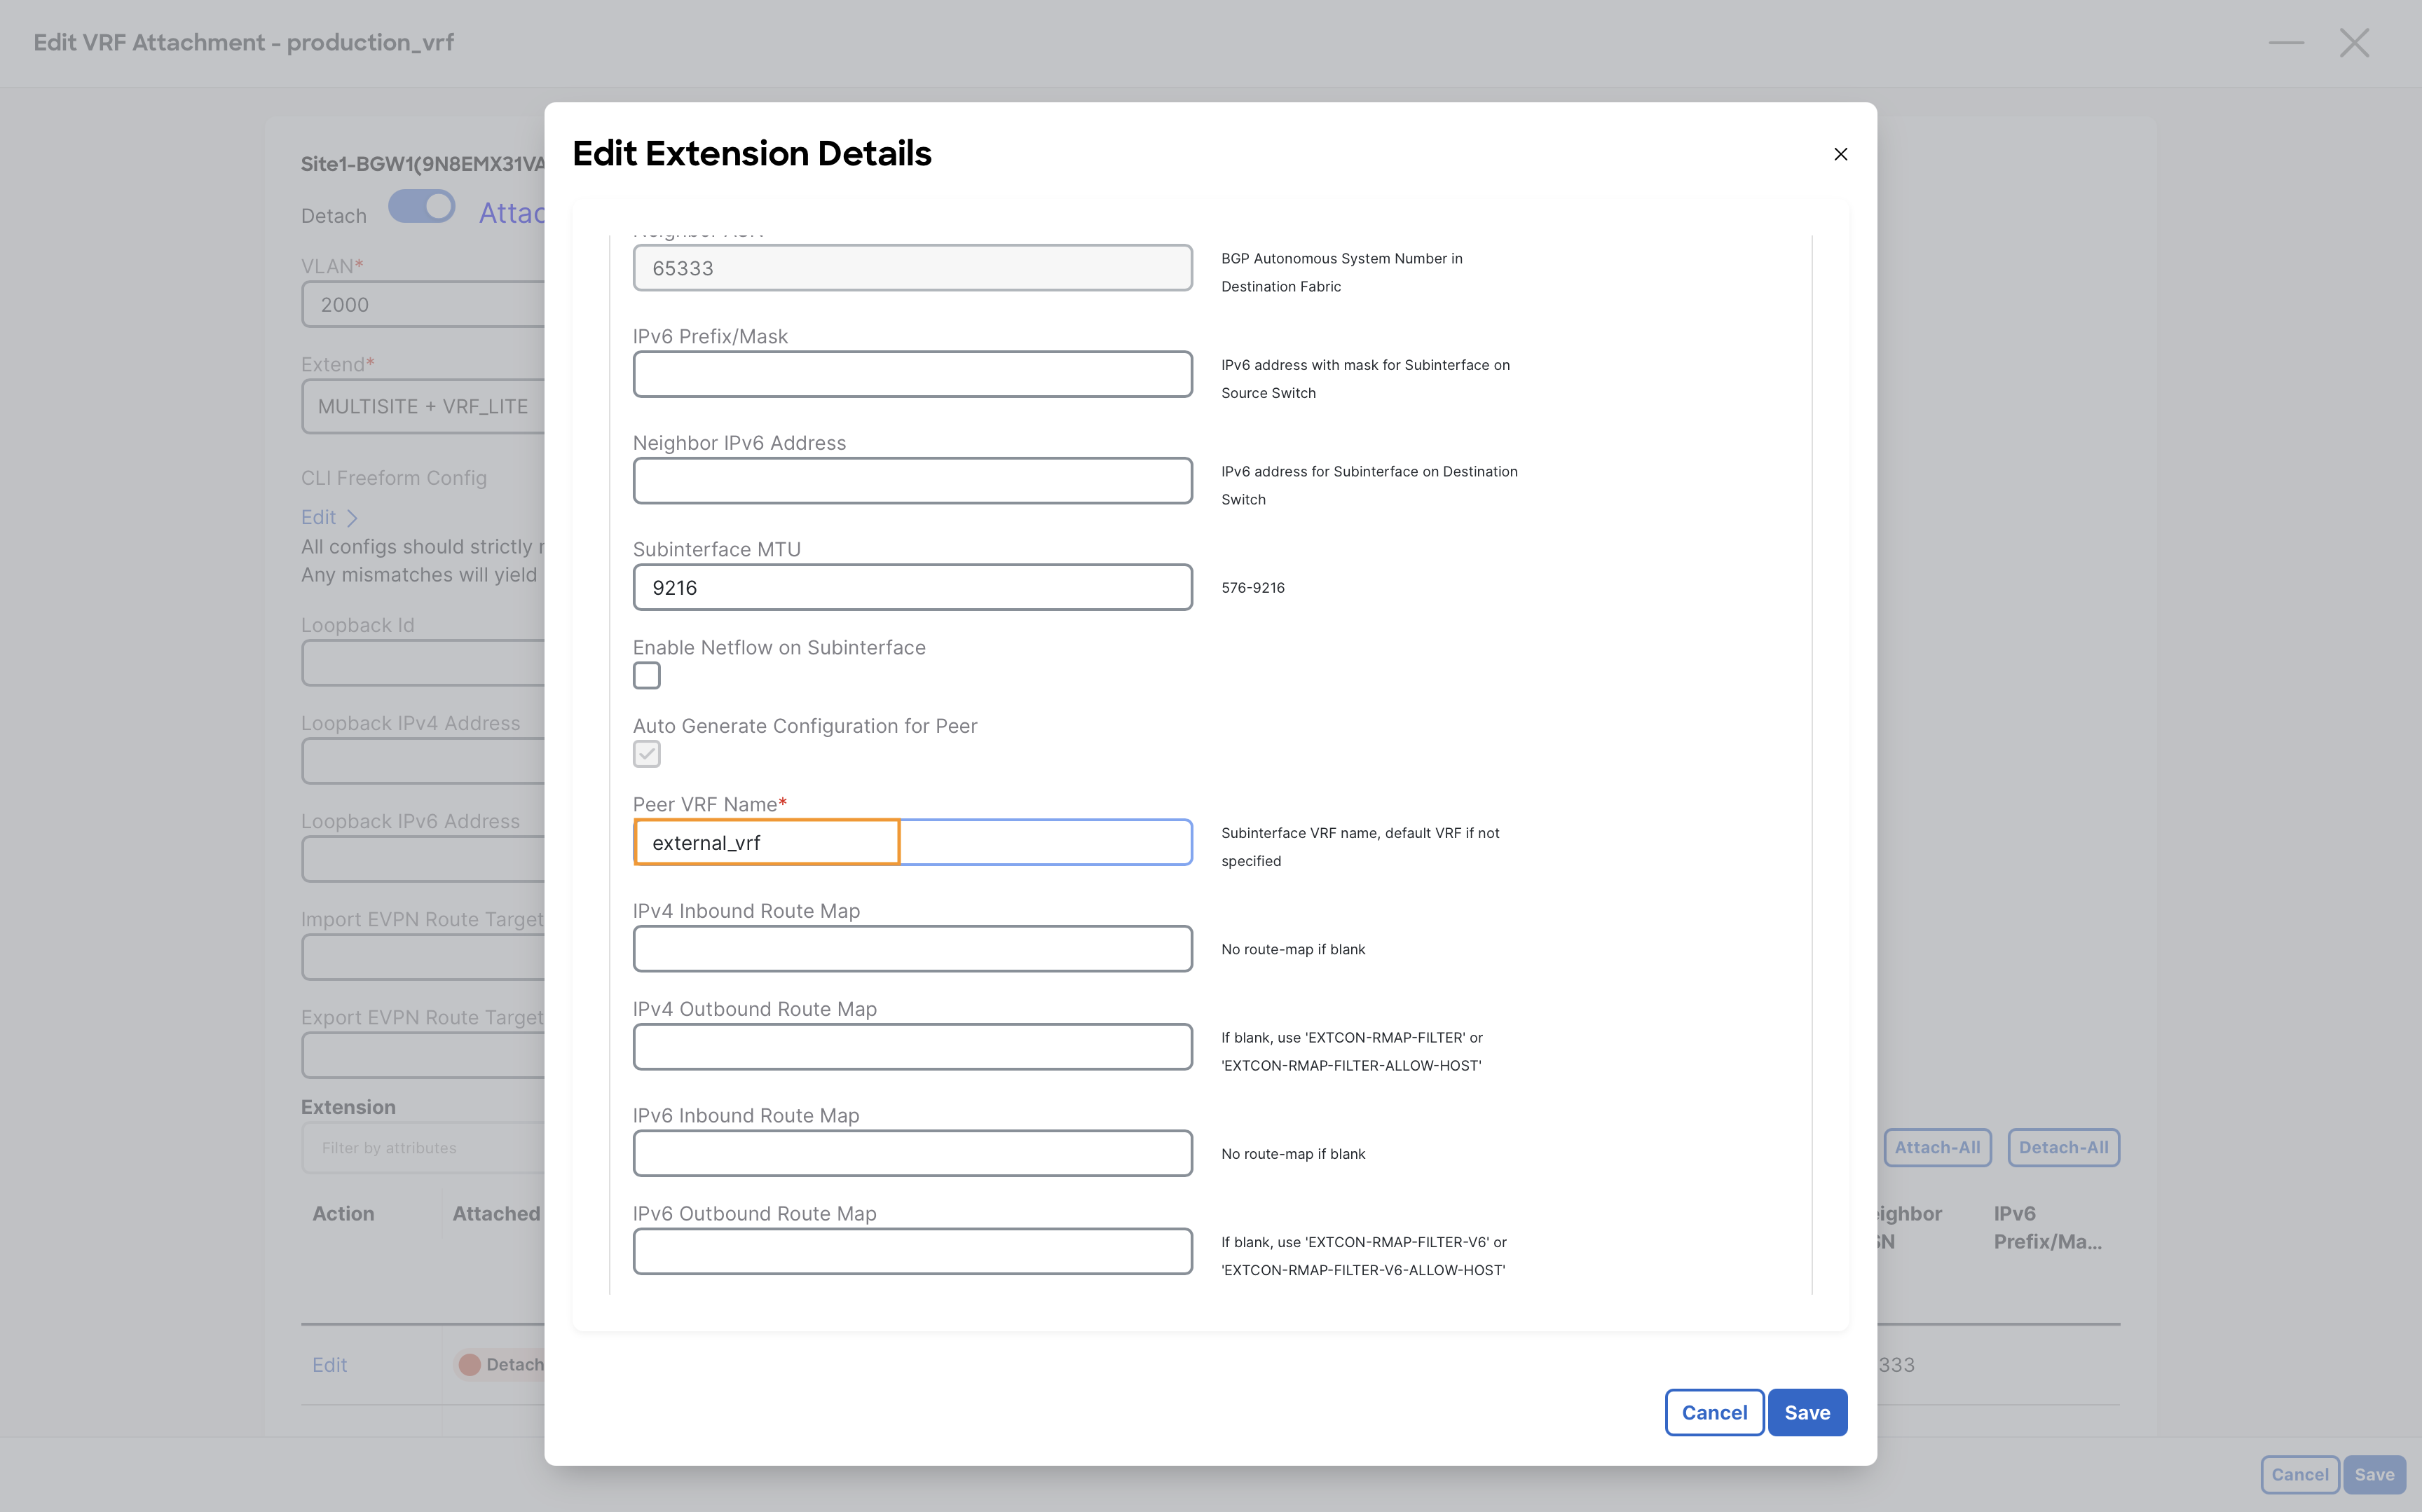
Scroll to the bottom of the Edit Extension Details page and replace production_vrf with external_vrf (which is pre-configured on the External-Router) under the PEER VRF NAME field
Tip
This is to show you that NDFC allows you to select a different VRF name for the edge router. There is no need to keep the same. Not editing the PEER VRF NAME will cause NDFC to configure the production_vrf on the Edge-Router.
Note
Observe that other fields like dot1q tag, IP address, MTU etc are pre-populated by NDFC. They are all carved from the resources that you have seen in the fabric setting.
Click on Save to close this dialog
Step 6 – Notice VRF_LITE on Site1-BGW1 has now changed to Attached status
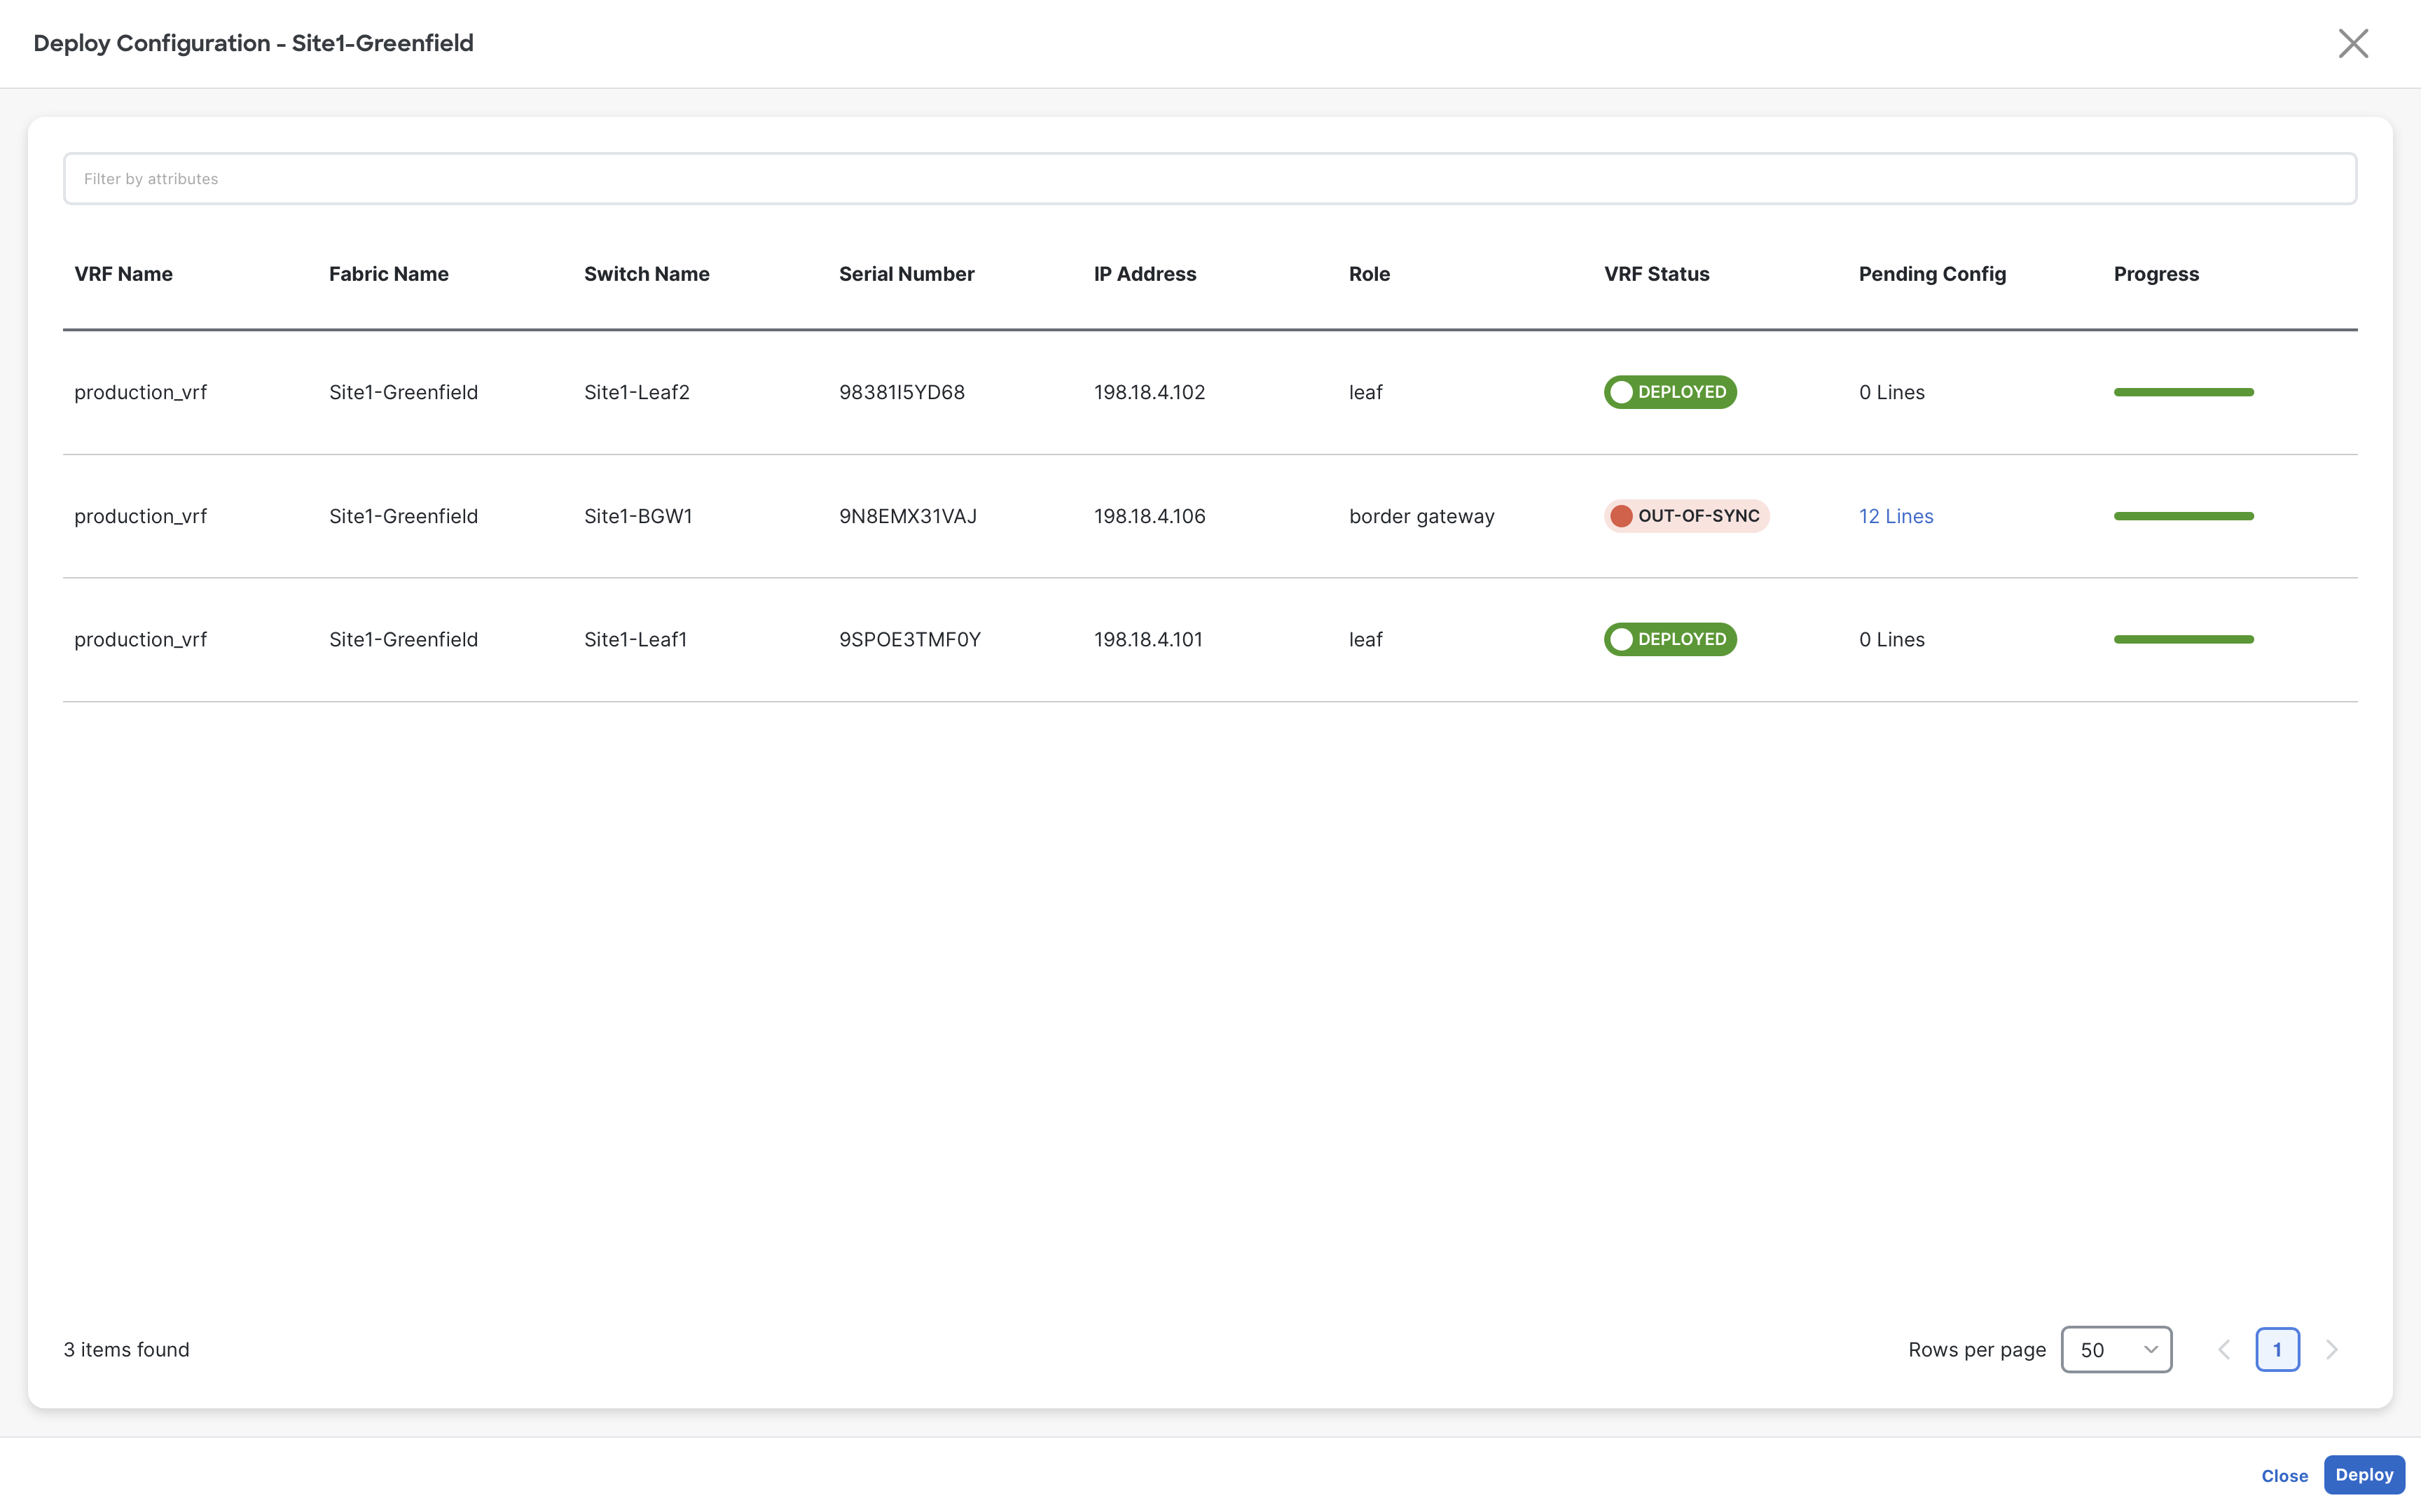
Step 7 – On the VRF Attachments page, select Site1-BGW1 and click Actions > Deploy
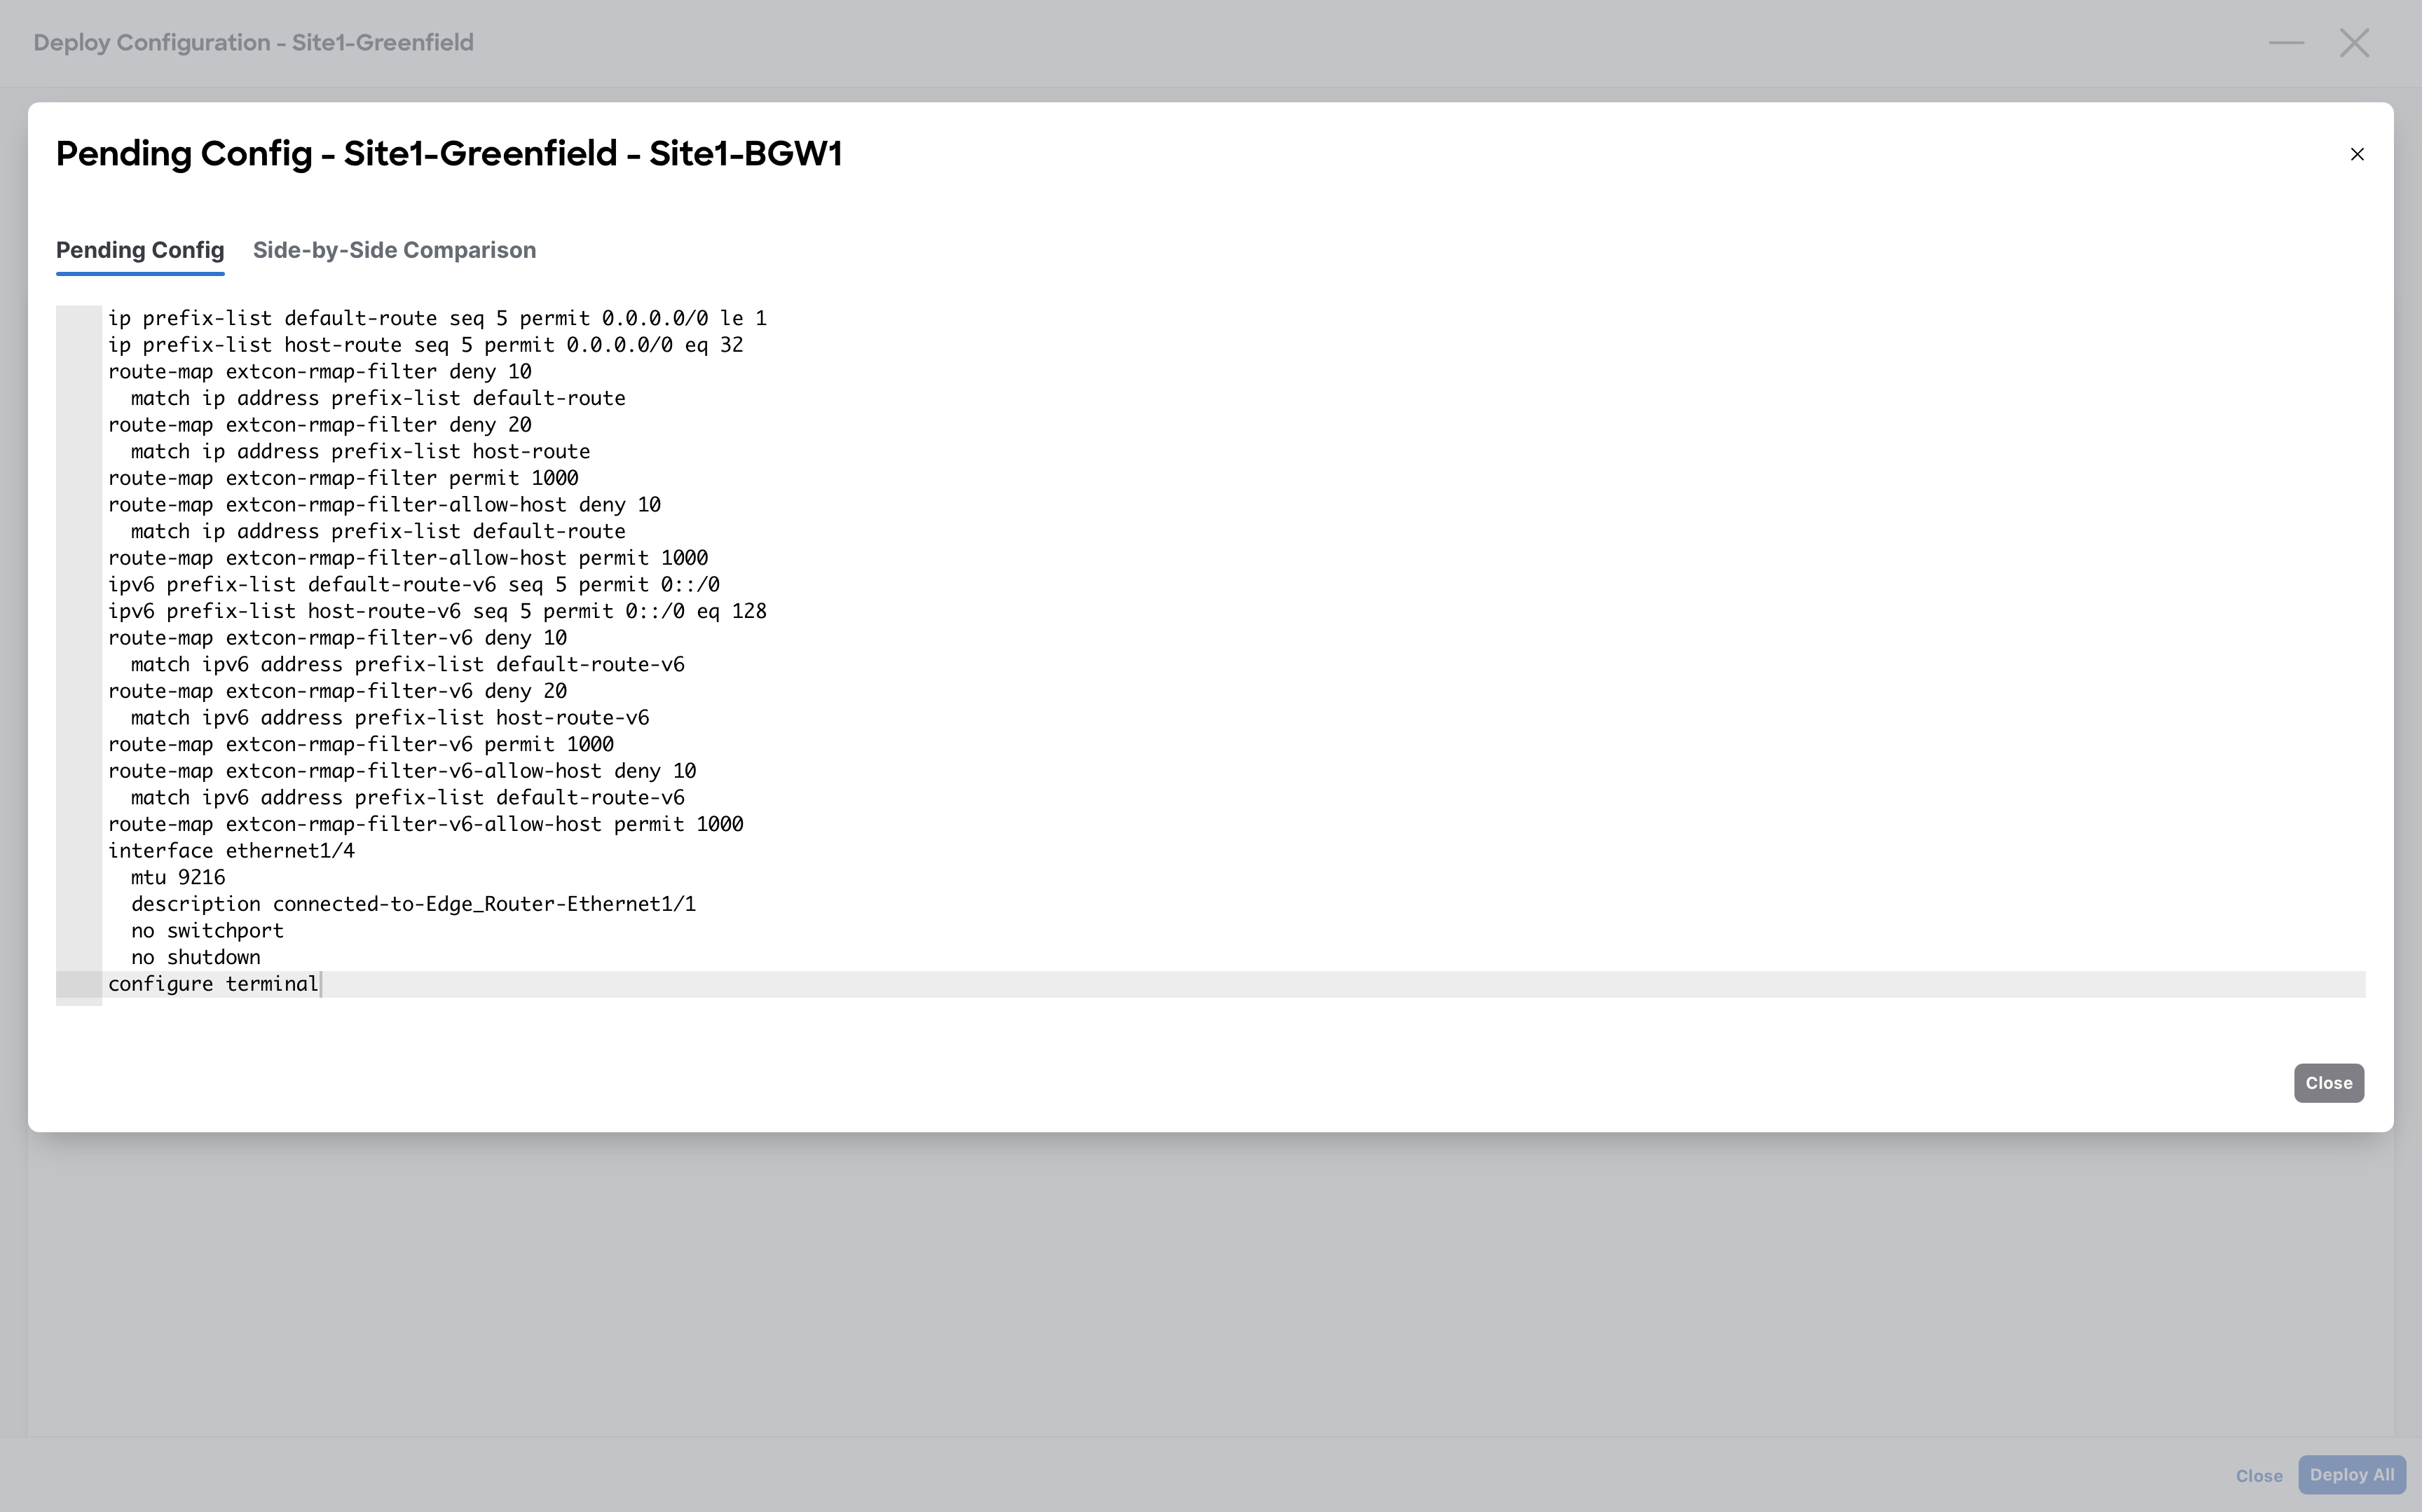
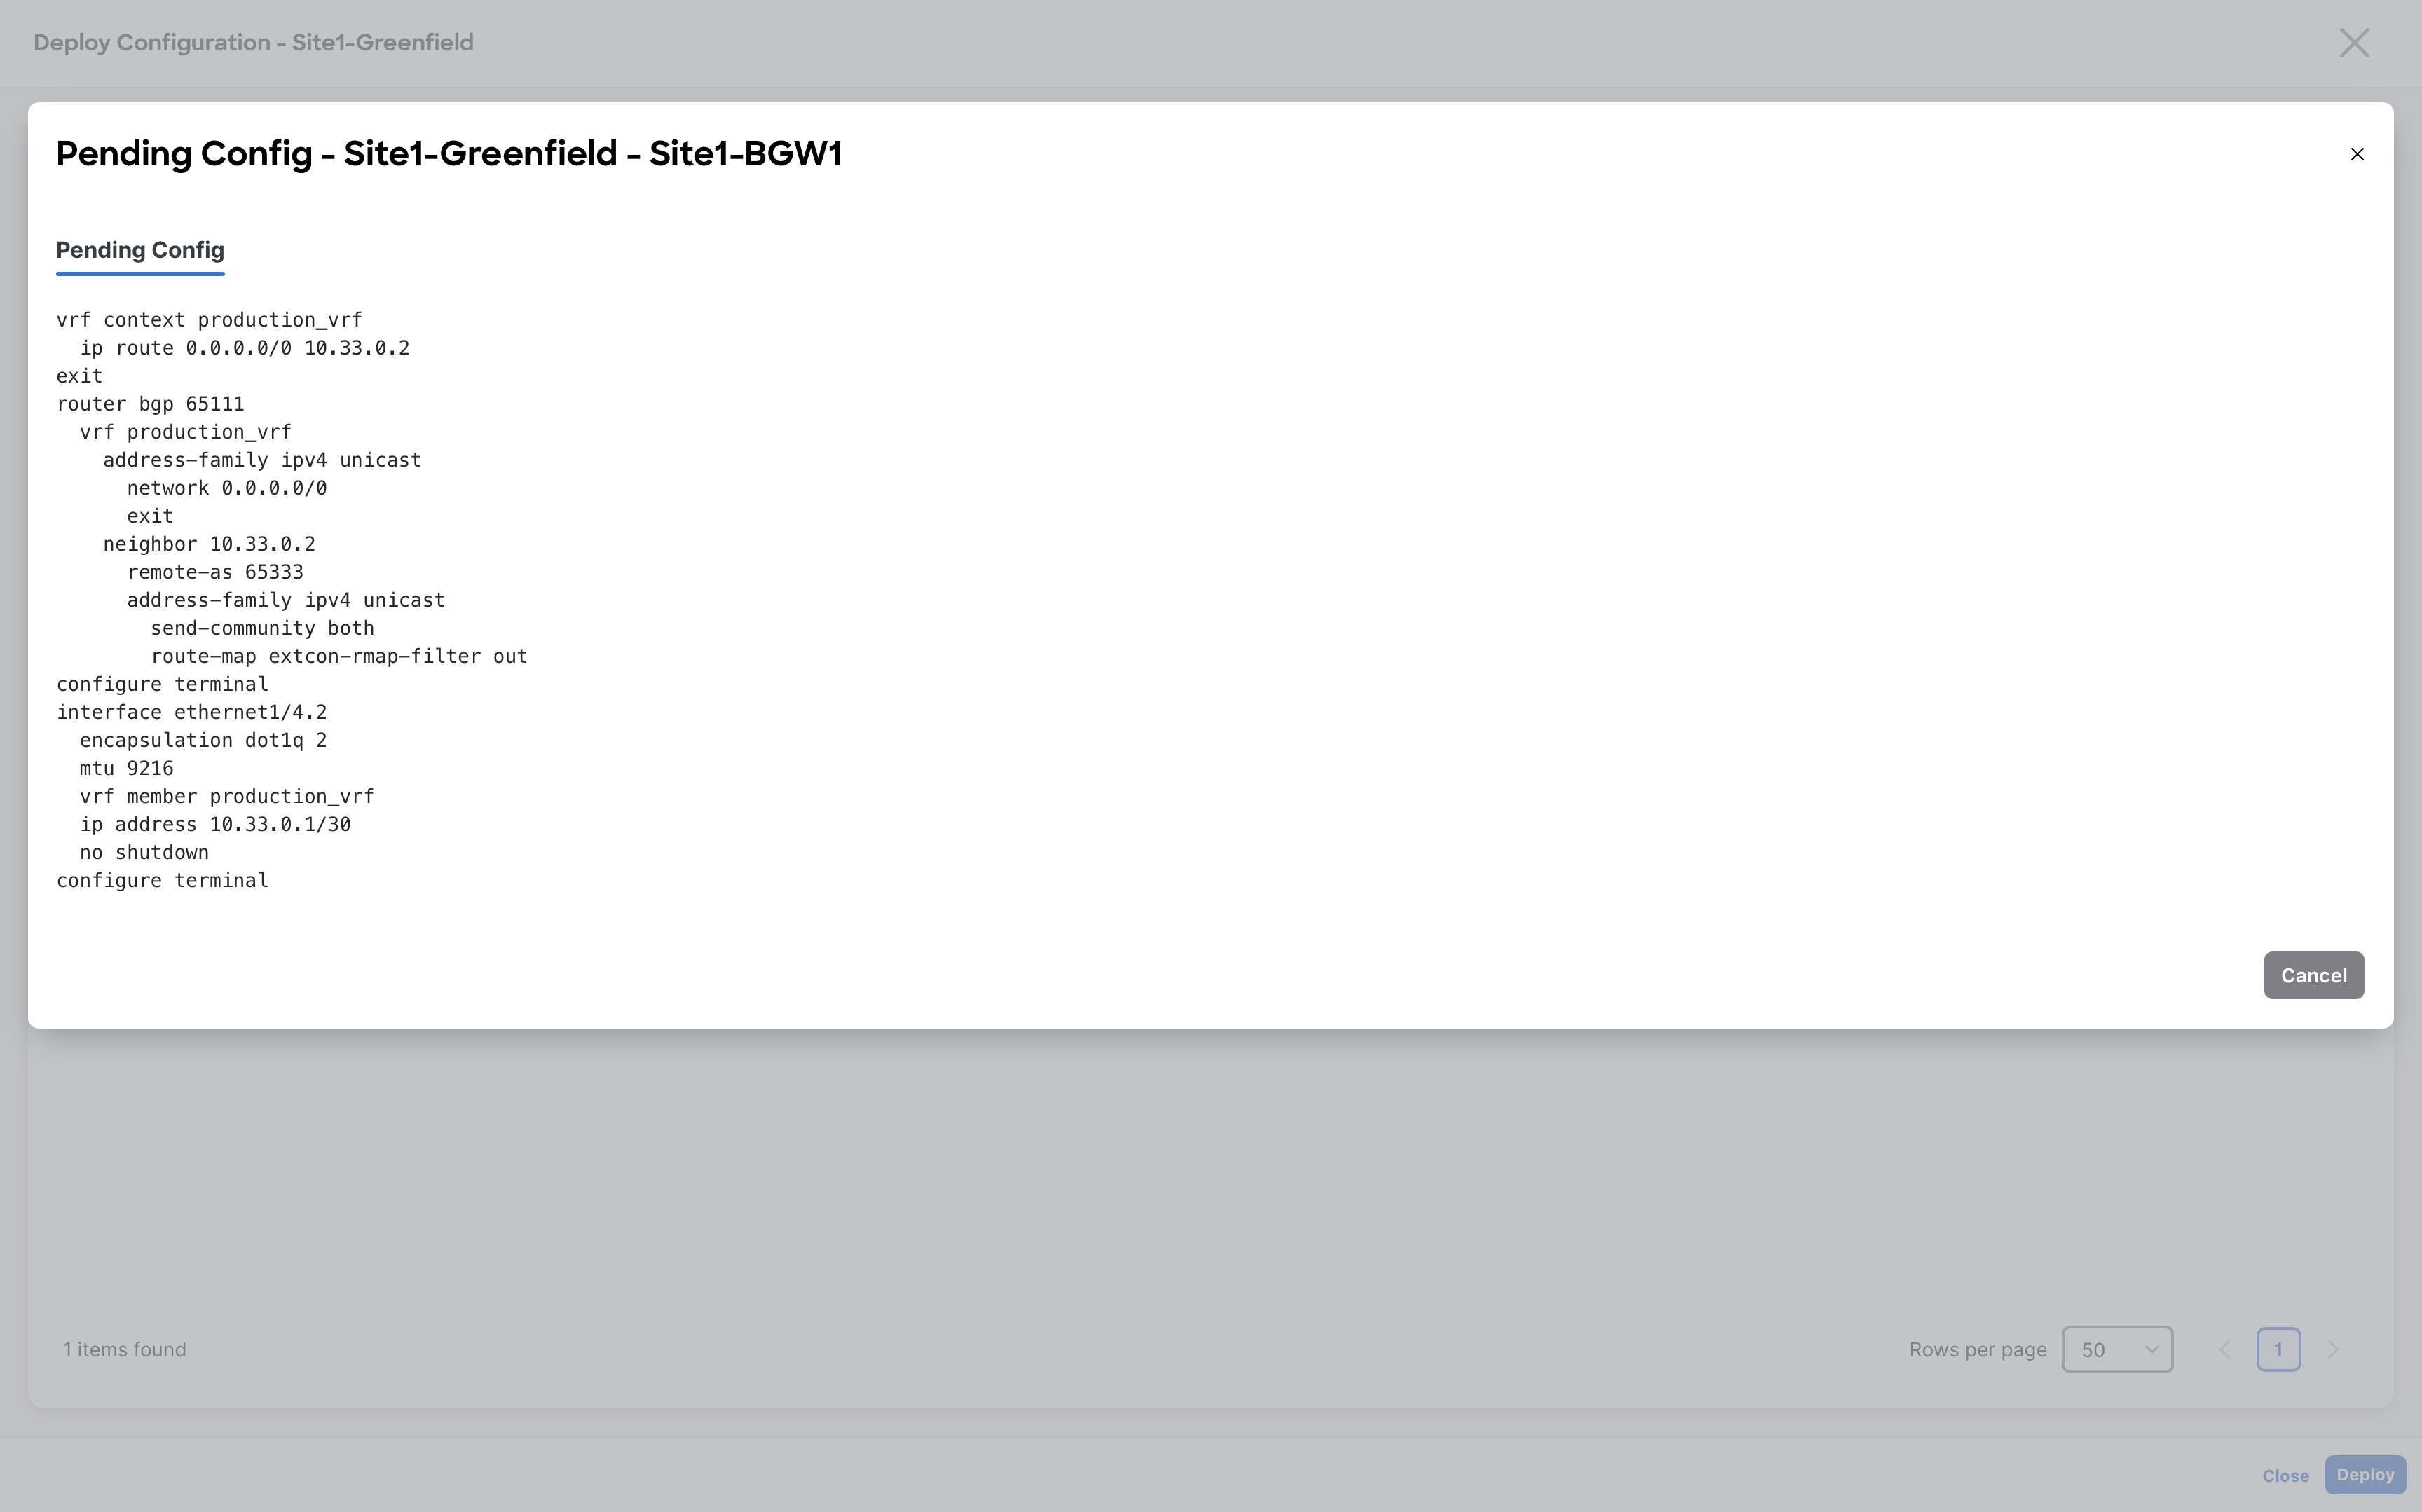
Step 8 – On Deploy Configuration - Site1-Greenfield dialog, click on Deploy for NDFC to deploy the configuration to Site1-BGW1
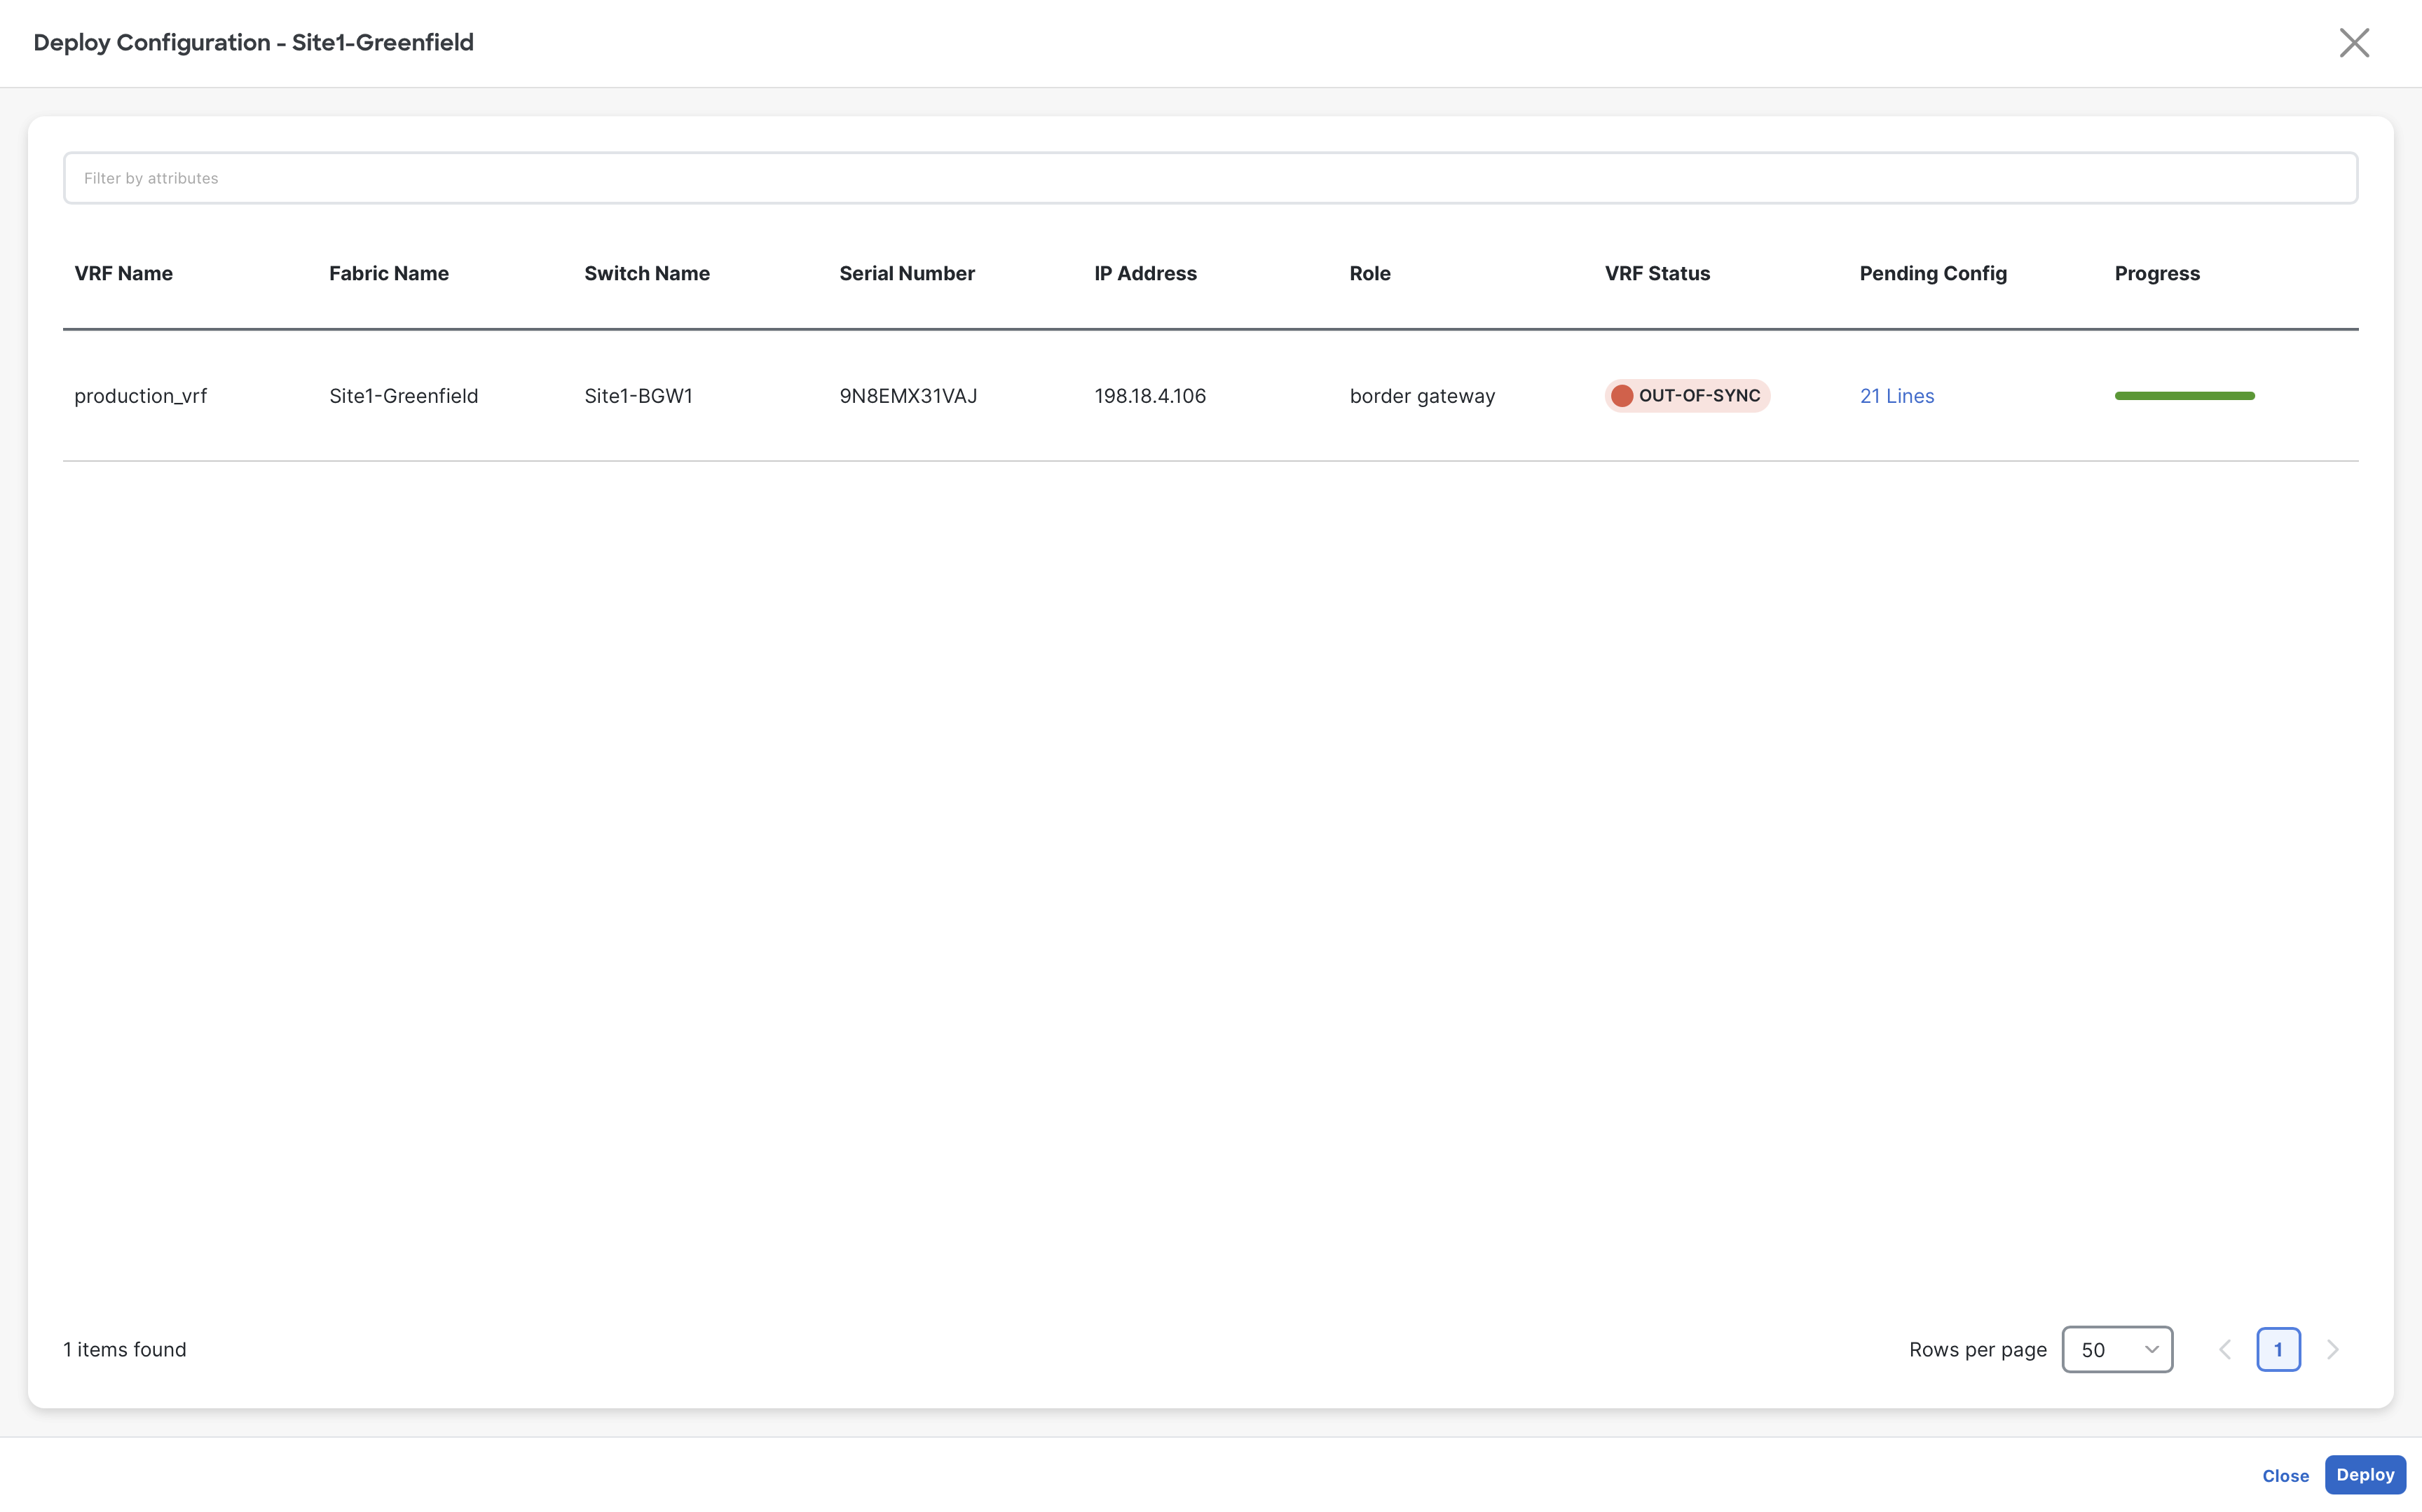
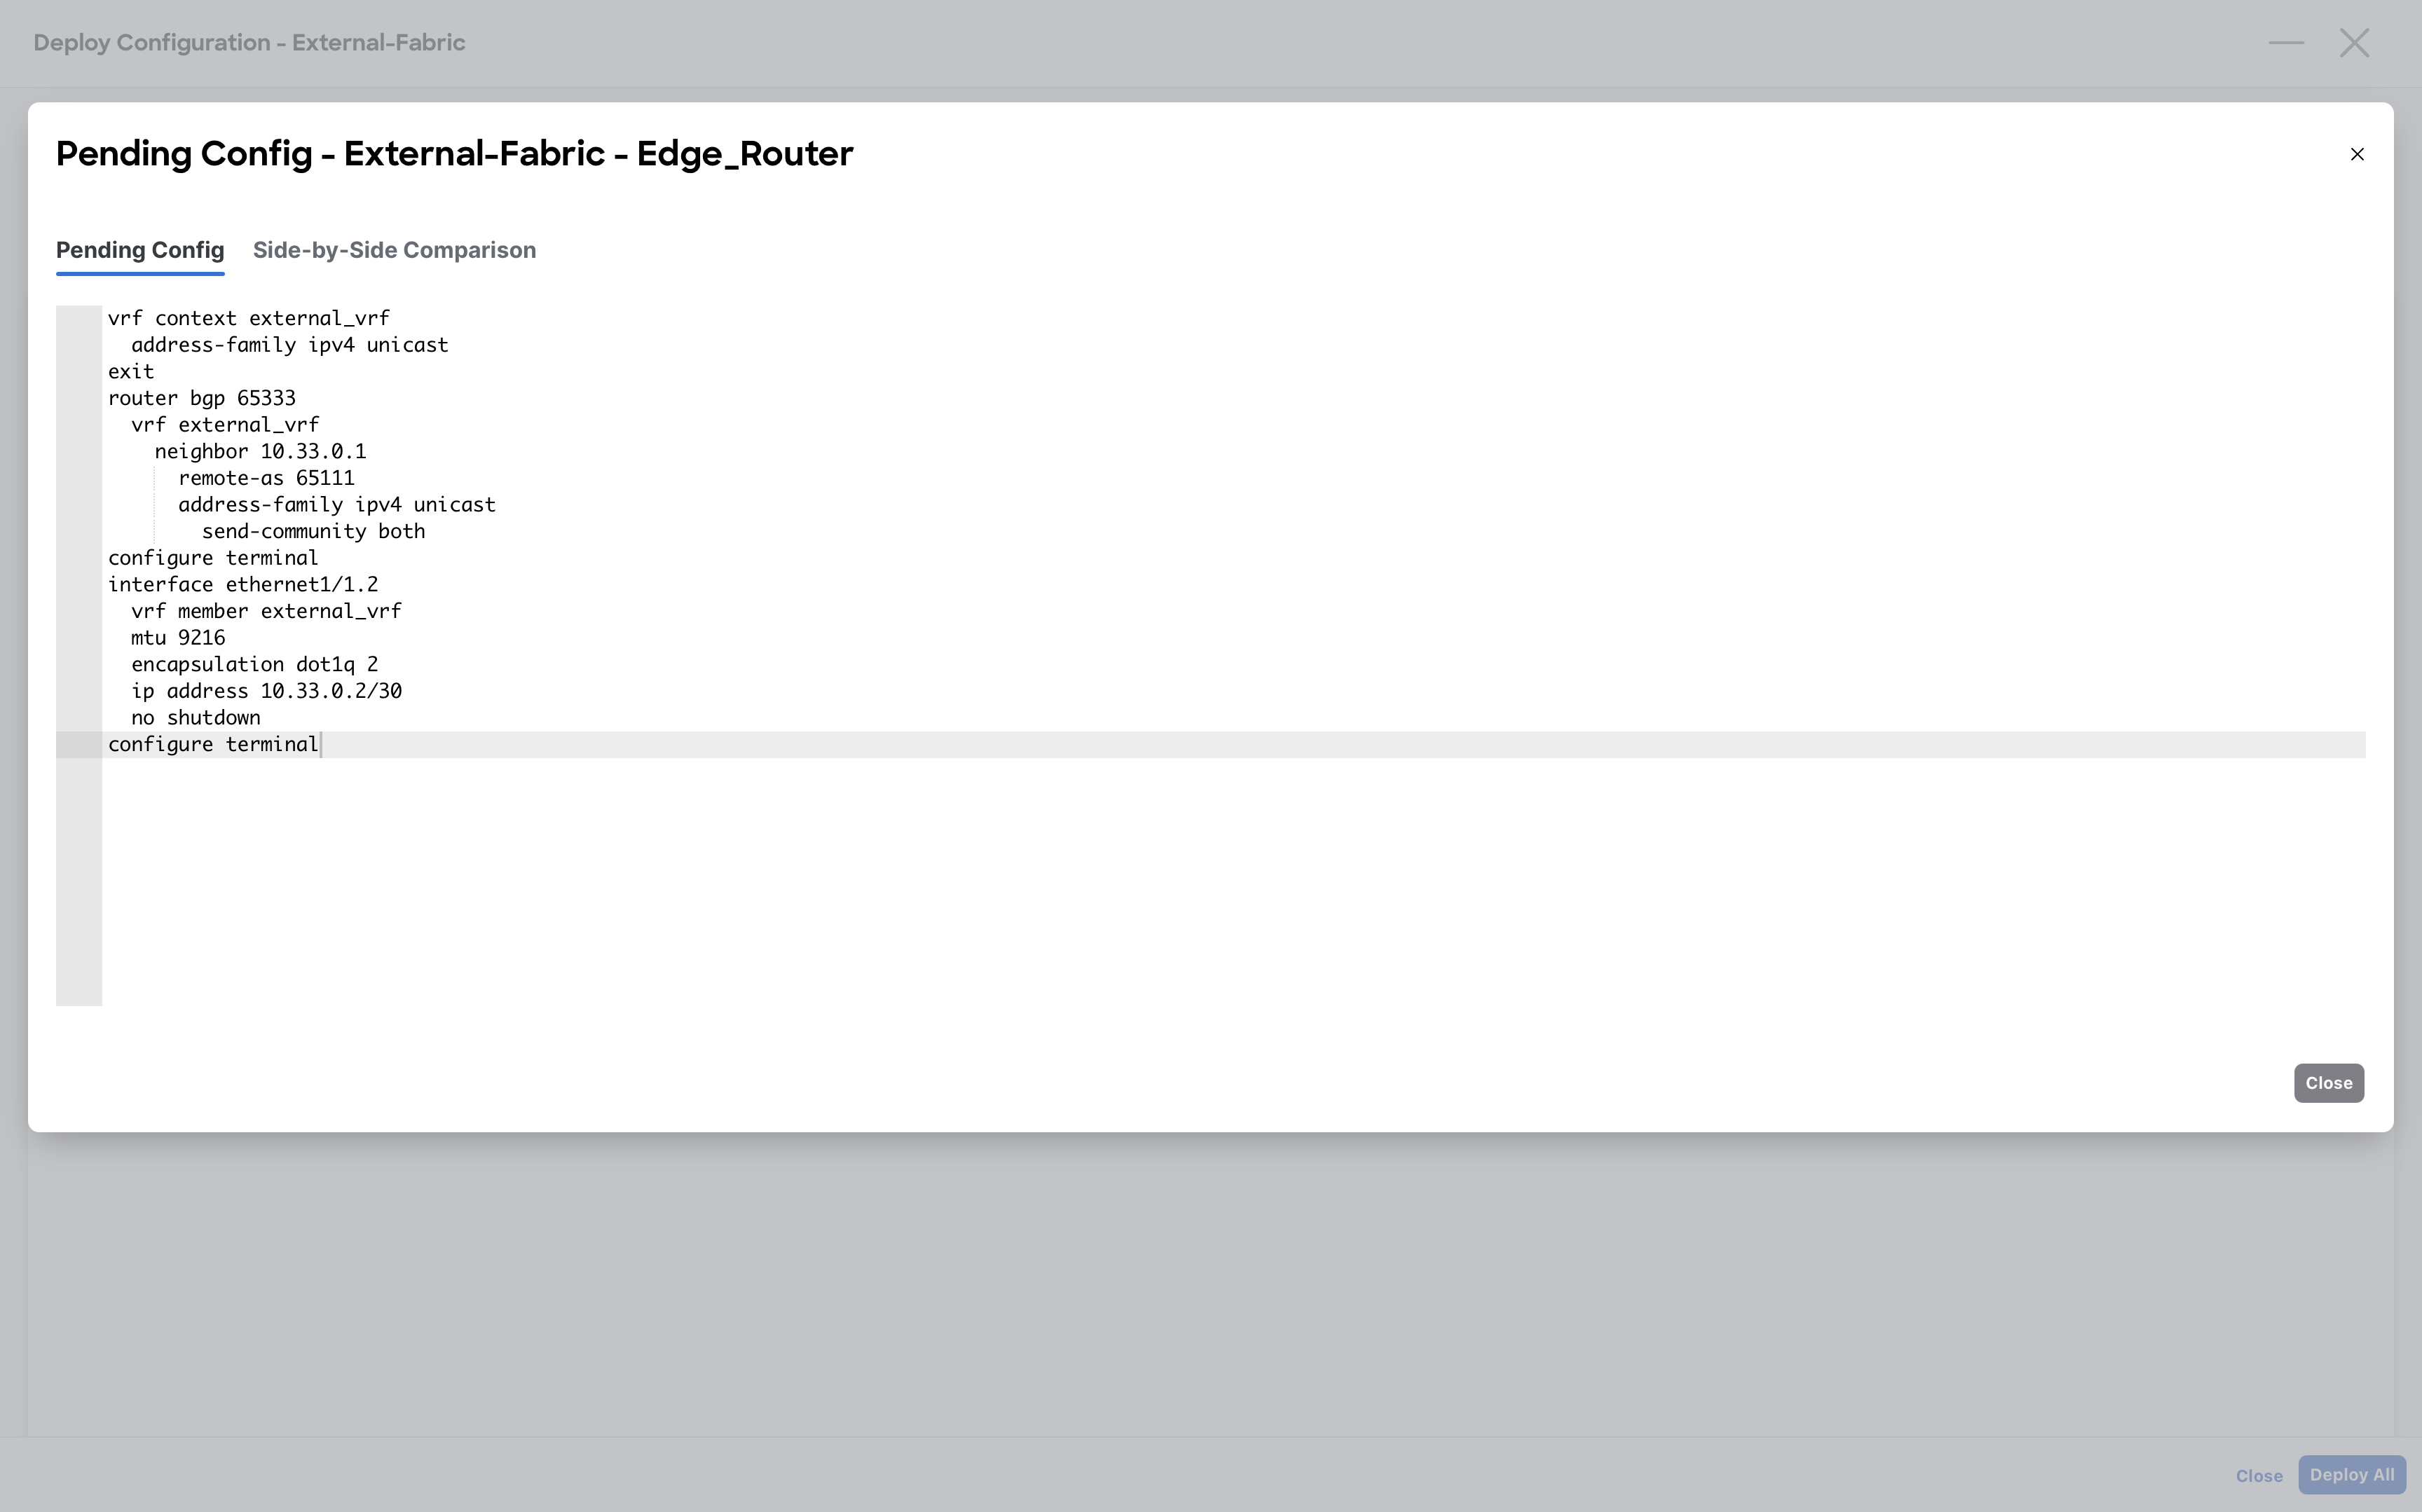
(Optional) You can review the configuration before deploying.
Note
Why are we injecting that default route? That is the default setting for NDFC VRF, you could remove it from the Advanced VRF Settings.
Step 9 – On Fabric Controller page, click Manage > Fabrics and then double click on External-Fabric fabric
This is required as NDFC will not recalculate multiple fabrics at the same time.
Step 10 – Click Actions > Recalculate and Deploy
Click on Deploy All on the Deploy configuration page
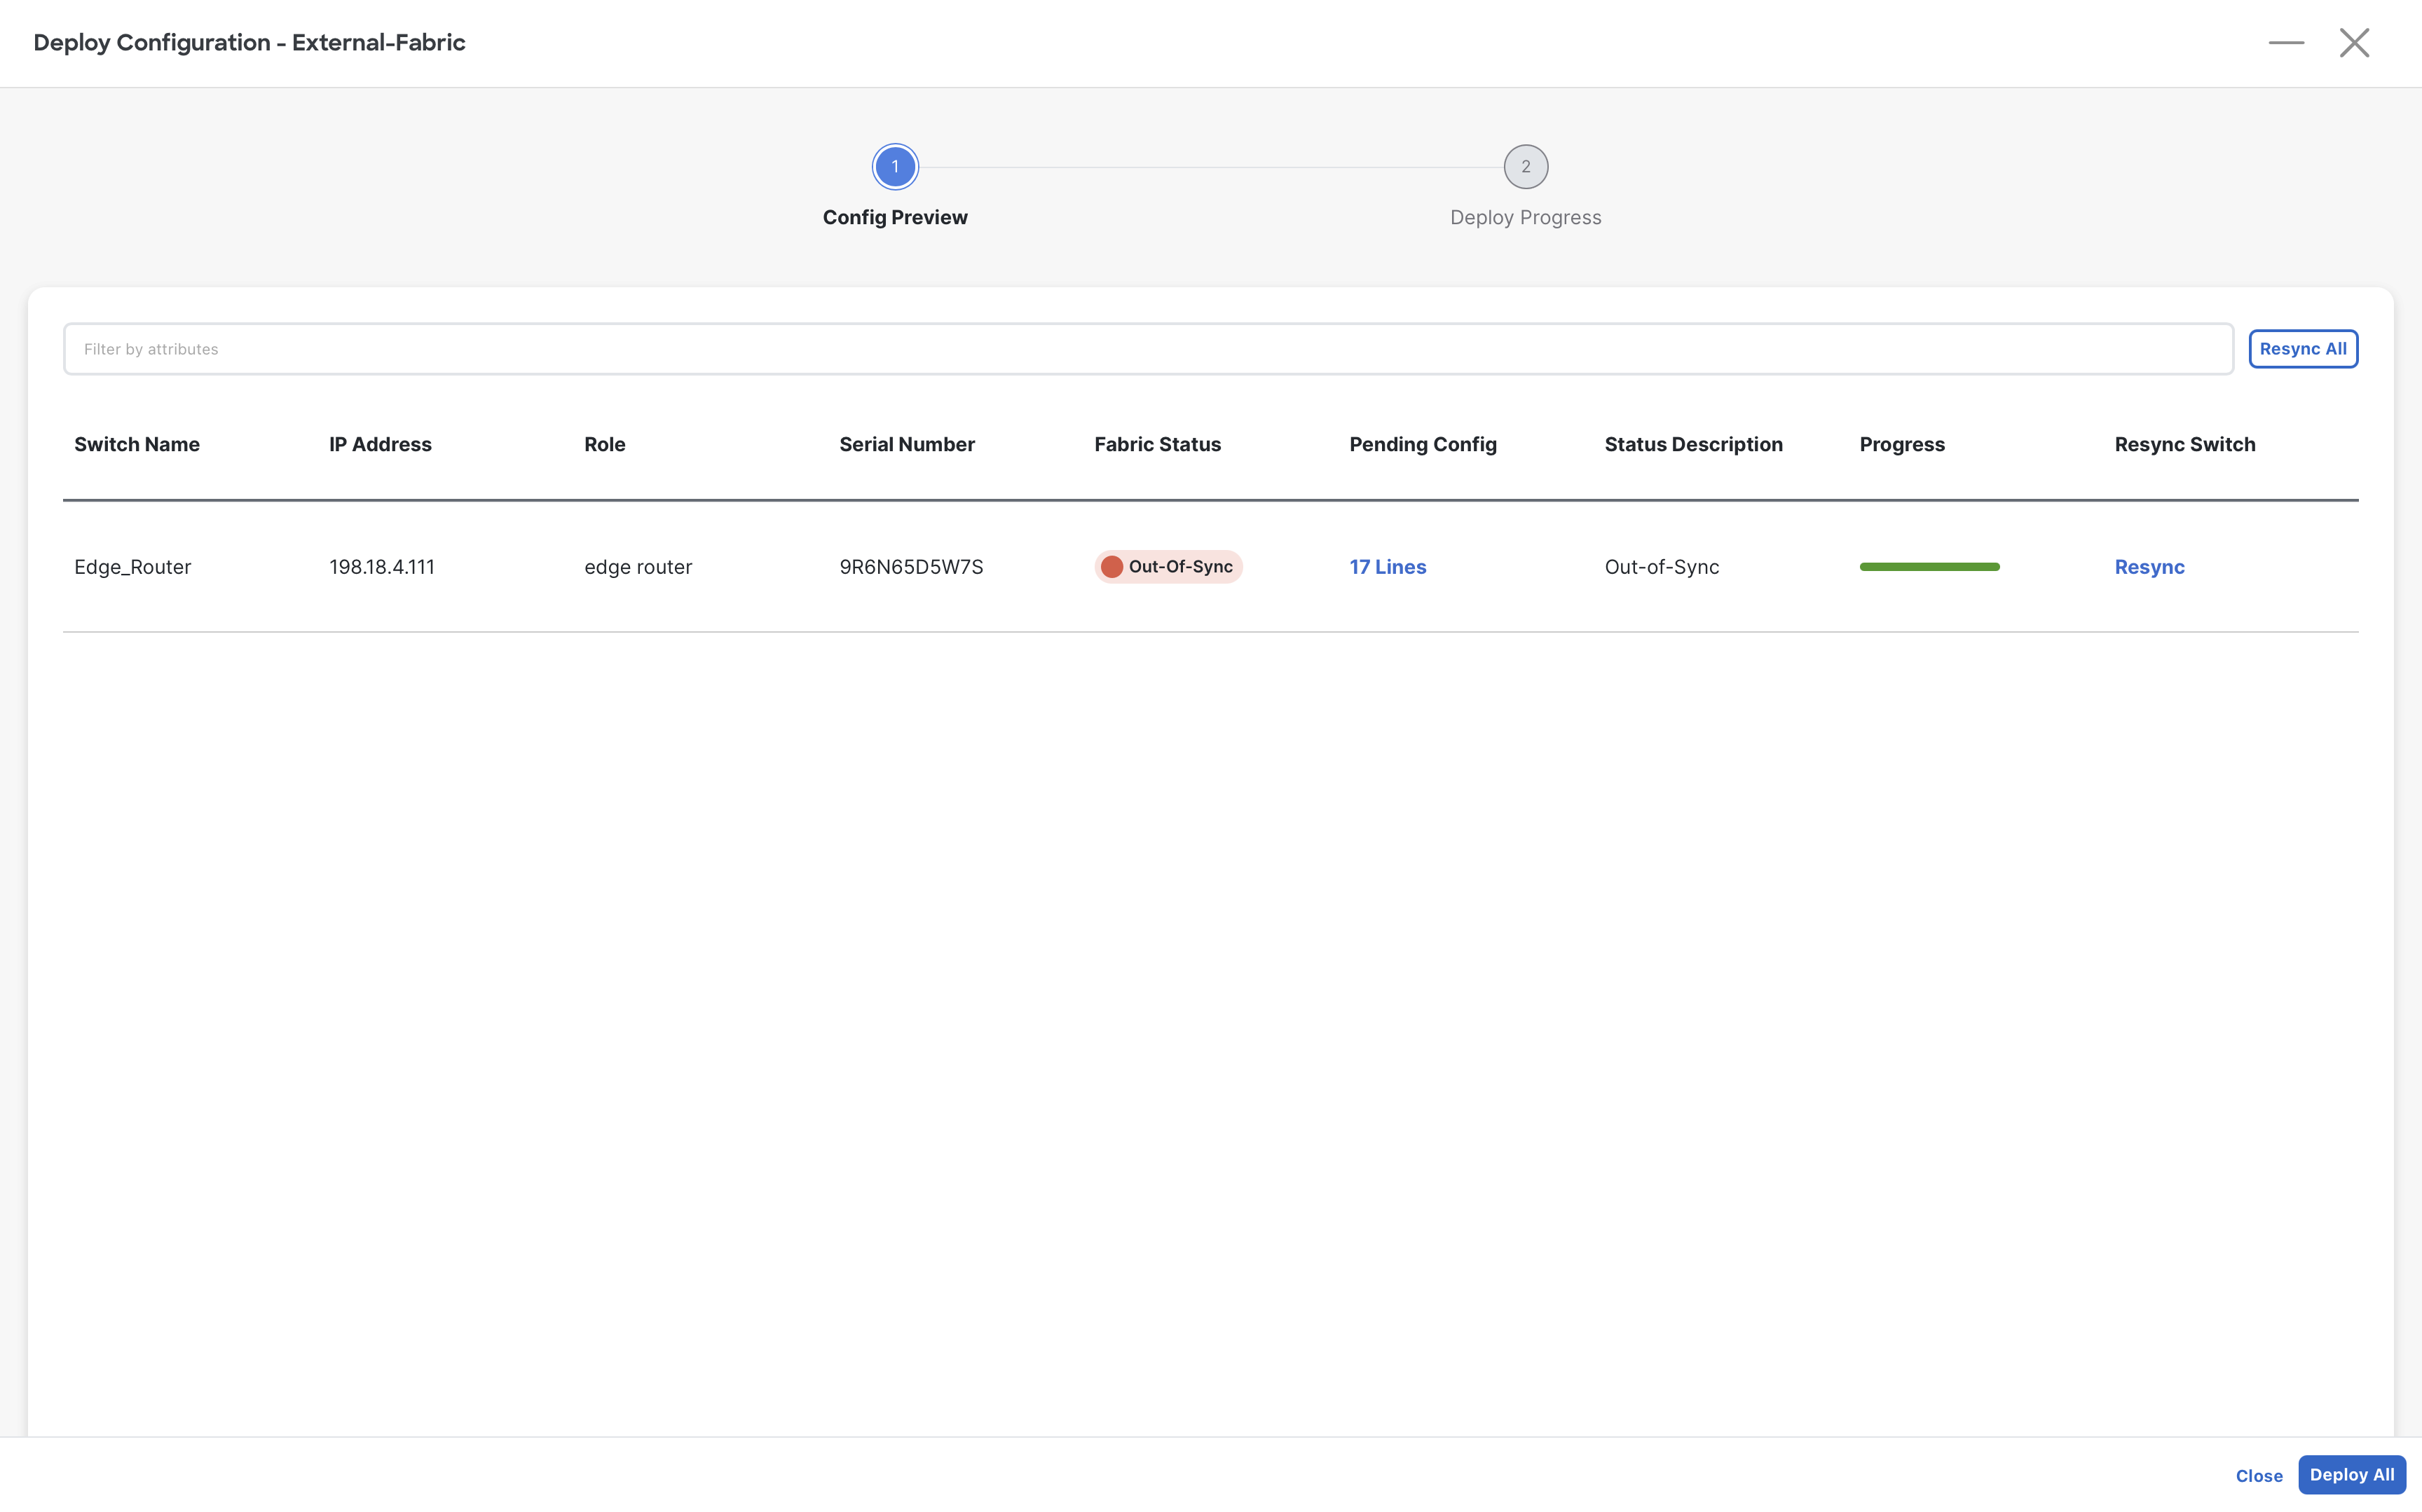
(Optional) You can review the configuration before deploying.
Initial Verification
Step 1 – With the help of Mputty, log in to Site1-BGW1 and verify the status of the BGP adjacency with Edge-Router. You should see one prefix received from the neighbor
Site1-BGW1
show bgp ipv4 unicast summary vrf production_vrf
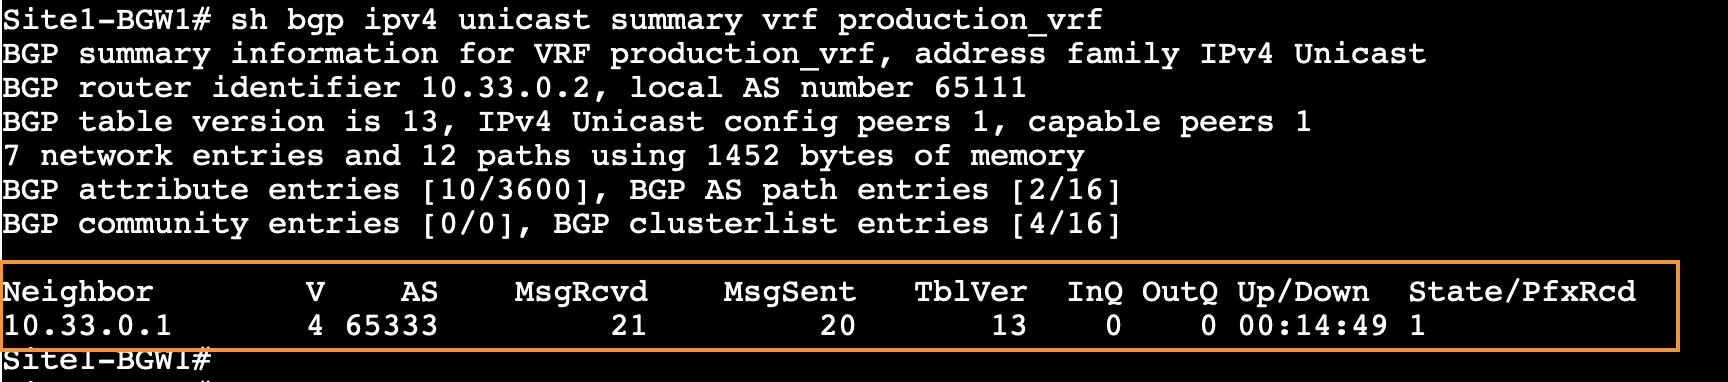
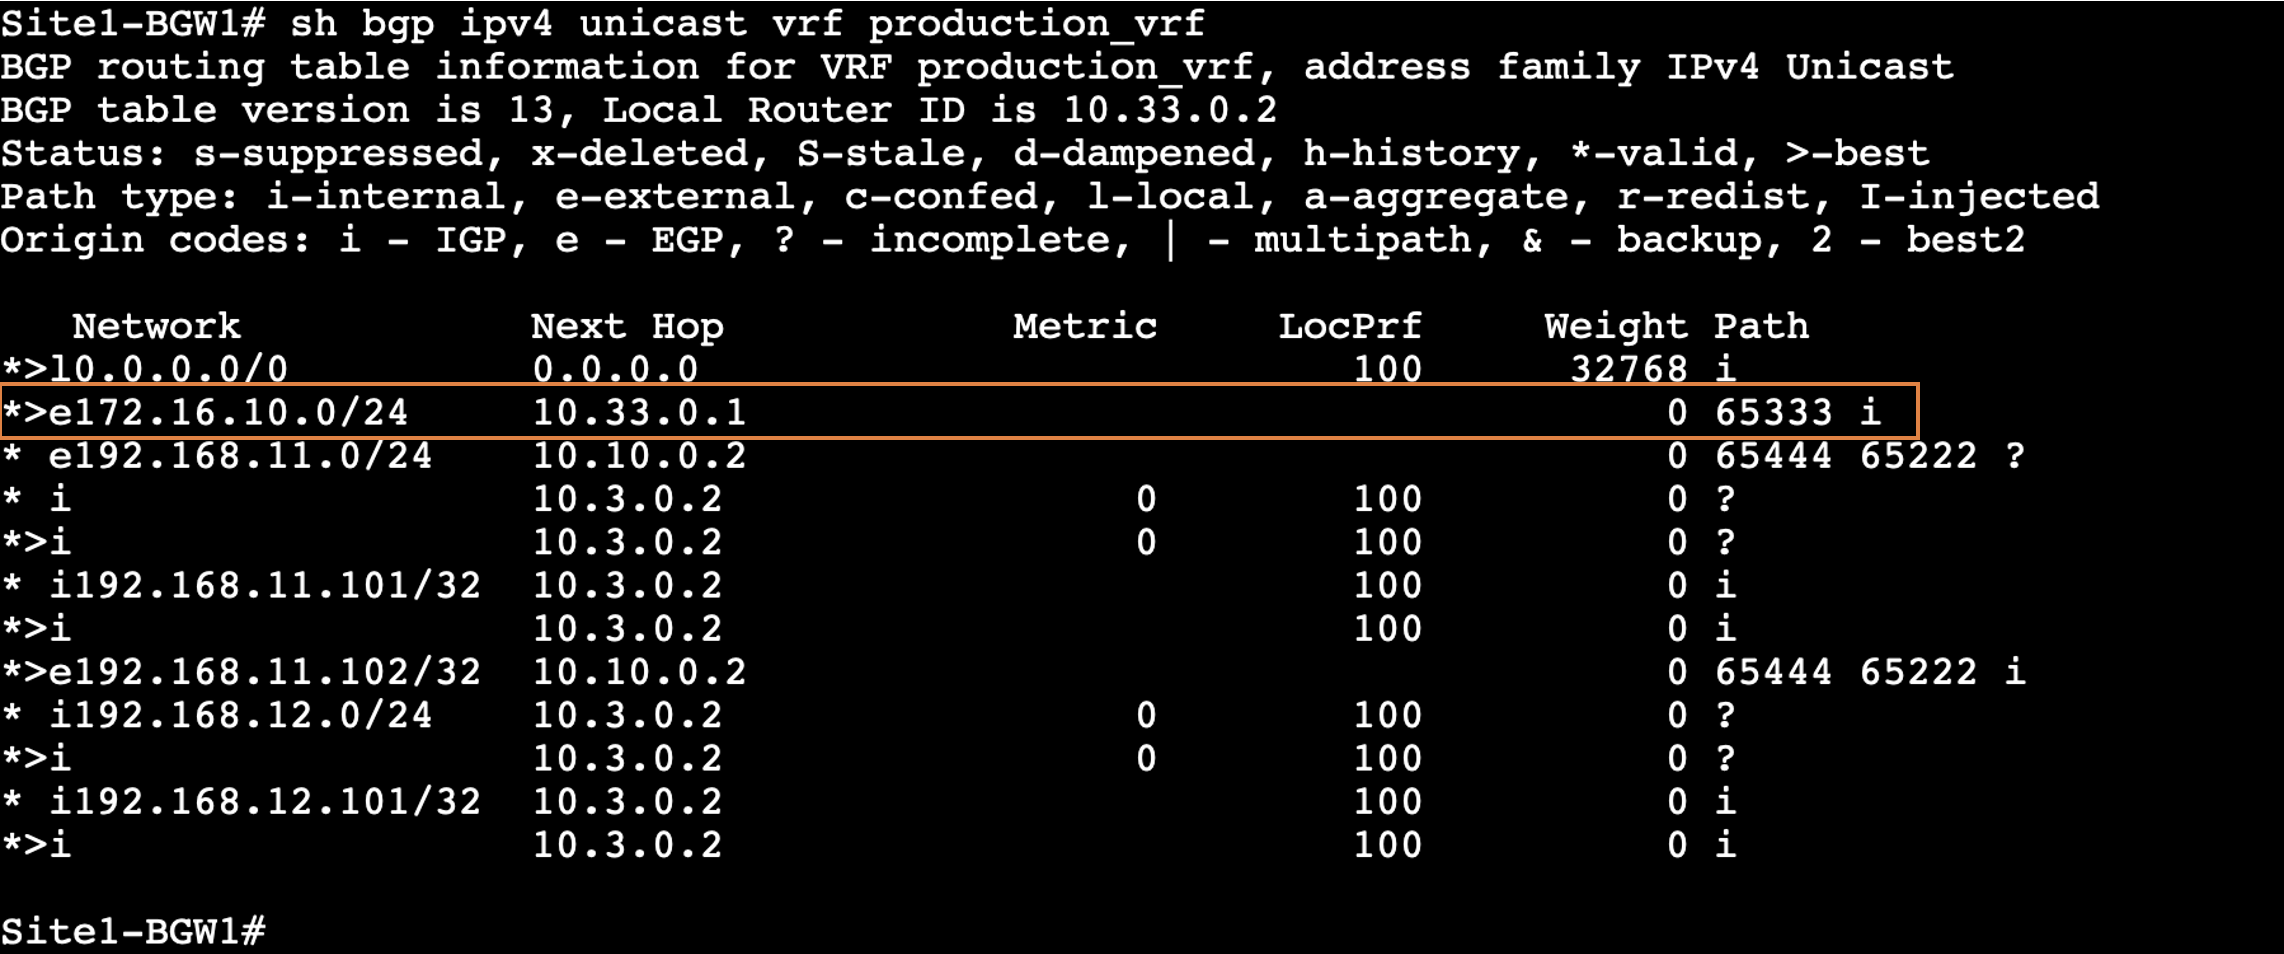
Step 2 – Inspect the production_vrf BGP table of Site1-BGW to see what prefix that is. As per the image below, you should be getting 172.16.10.0/24, and you can recognize it from the AS 65333
Site1-BGW1
show bgp ipv4 unicast vrf production_vrf
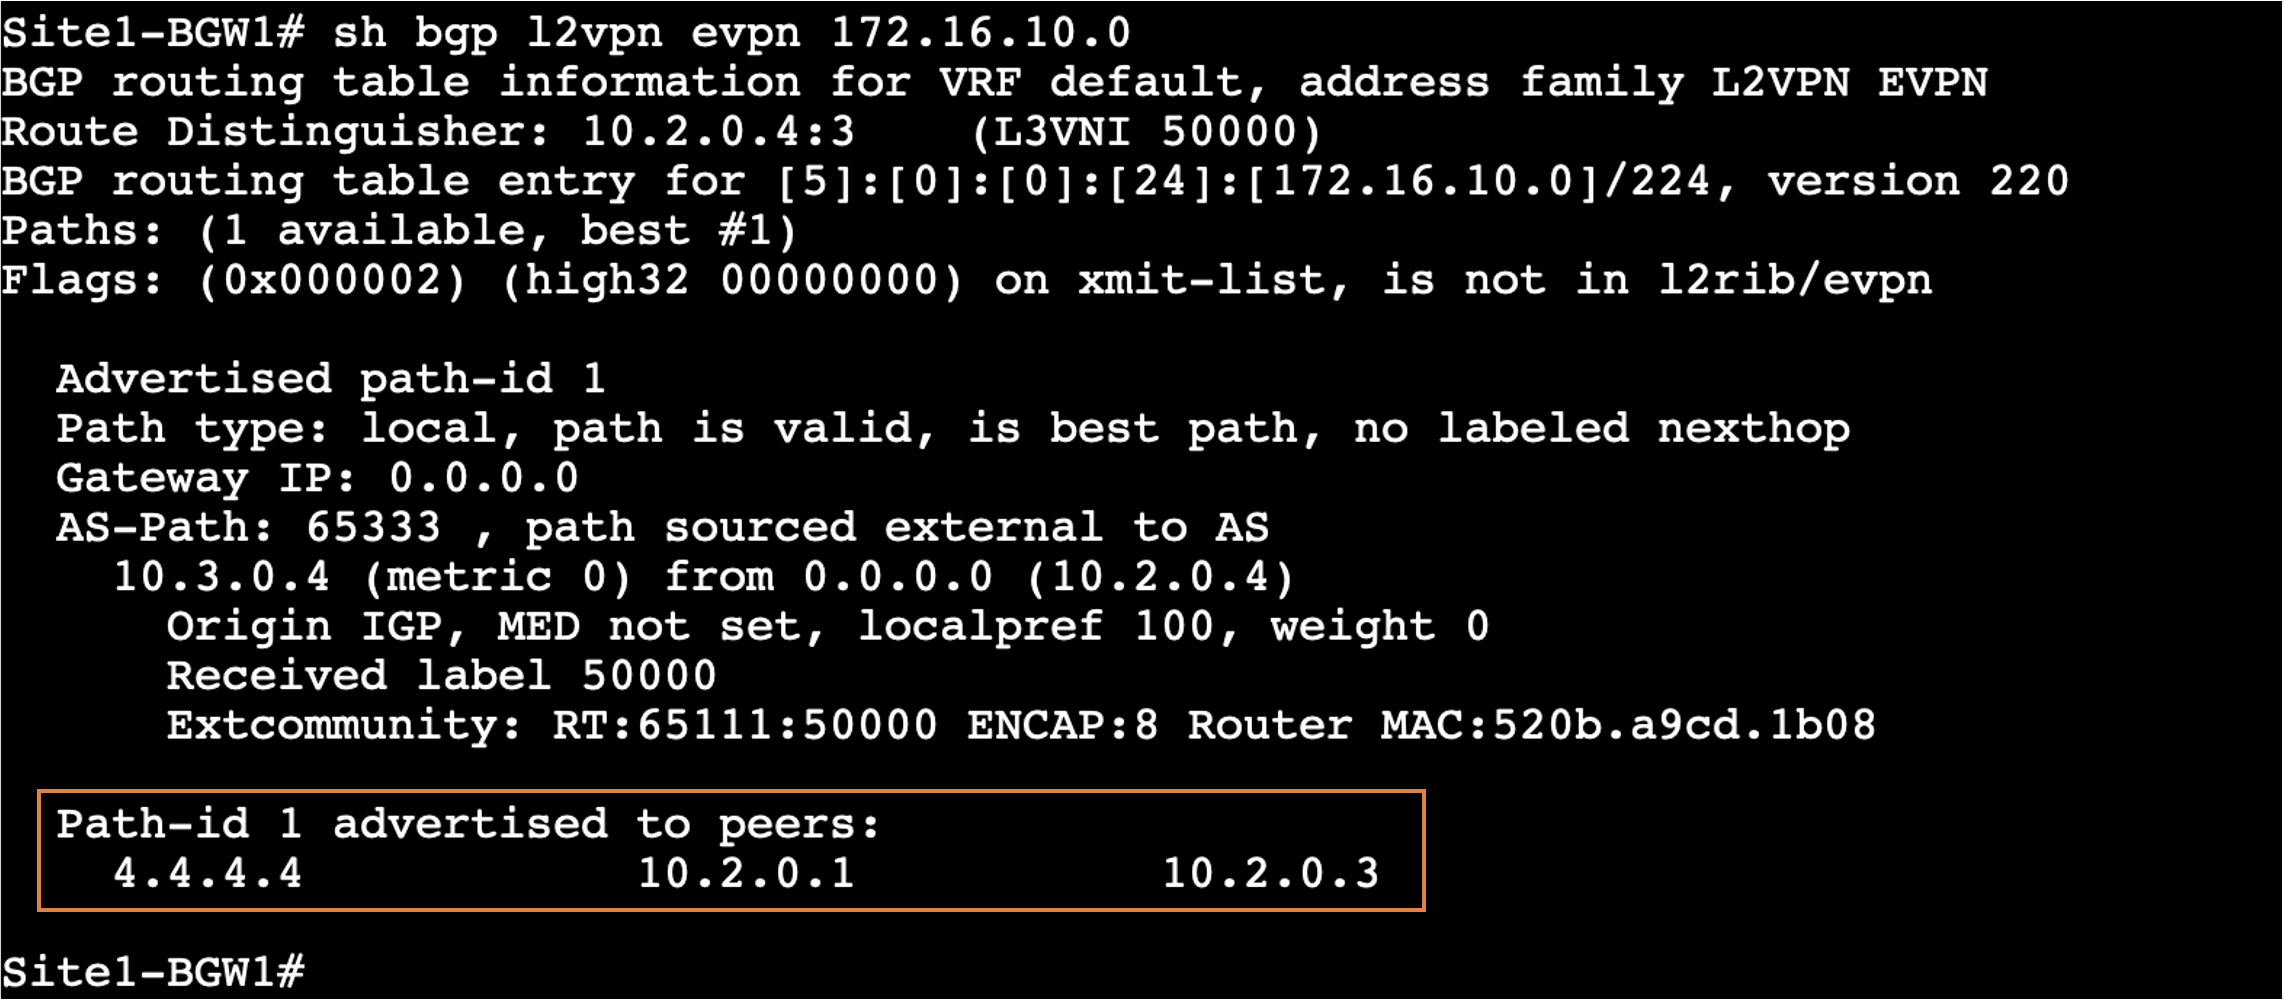
This external prefix (172.16.10.0/24) will be re-originated by Site-BGW1 and advertised to both the spines of Site1-Greefield and also to the ISN router, which means that the external prefix will also be advertised to Site2-Brownfield, allowing Server3 to reach the Server4
Site1-BGW1
show bgp l2vpn evpn 172.16.10.0
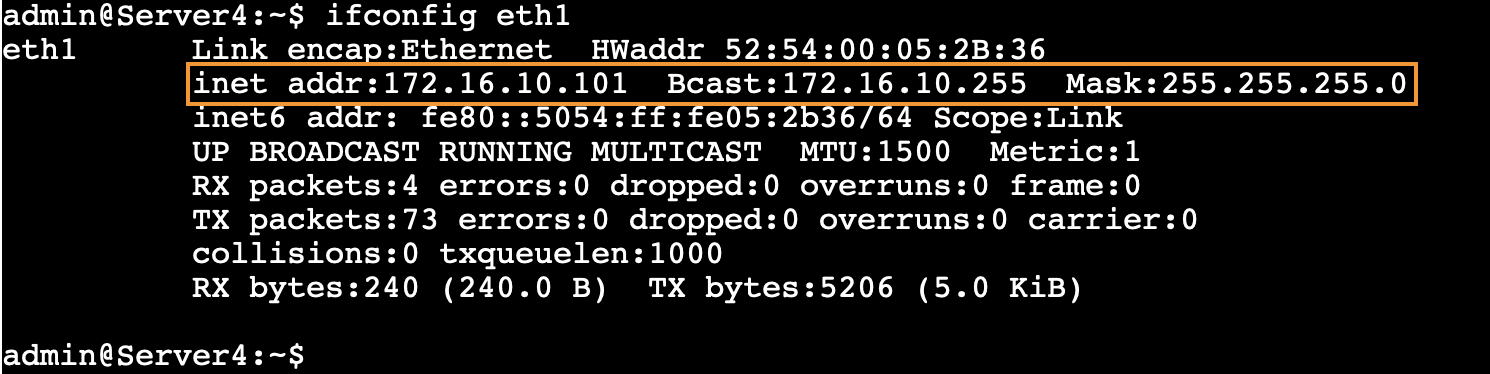
Step 3 – With the help of Mputty, log in to Server4 which is part of external fabric and check its ip address, it should be 172.16.10.101
Server4
ifconfig eth1
Step 4 – Run a ping test from Server4 to Server1 at Site1-Greenfield.
You should see succesfull ping response, thanks to VRF_Lite based external connectivity you have just built.
Server4
ping 192.168.11.101

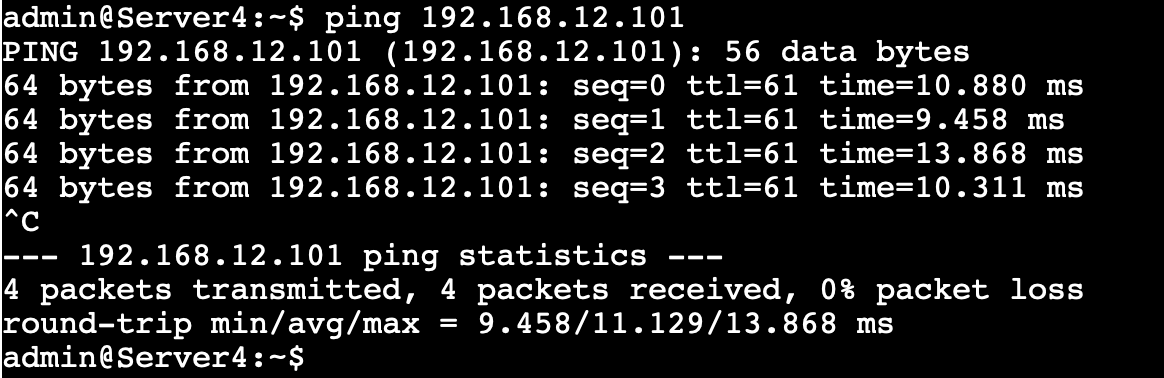
Step 5 – Similarly, run a ping test from Server4 to Server2 at Site1-Greenfield
Server4
ping 192.168.12.101
And, run a ping test from Server4 to Server3 at Site2-Brownfield
Server4
ping 192.168.11.102

Step 6 – Run a traceroute from Server4 to Server3 at Site2-Brownfield
Server4
traceroute -n 192.168.11.102

Question
Ask yourself, what kind of path is this traffic taking? Why is there an undiscovered hop in the middle?
If you think about what you just did you will realize that so far you have provided the connectivity only to Site1-Greenfield. With VXLAN Multi-Site, the EVPN Type-5 routes for external connectivity are automatically exported to the other sites when the VRF is extended. This will allow all the remote fabric to benefit from some additional backup paths.
Nerd Area
In this case, the undiscovered * * * hop is Site2-BGW1. The reason that device is not showing up in the path is due to the fact that it doesn't have any IP interface in the production_vrf. You can check this with "show ip interface brief vrf production_vrf". The only available interface is L3VNI SVI that it will use to route traffic across different networks. We can see Site1-BGW1 in the path as it can use the VRF-Lite interface to source the ICMP TTL expired
Double Nerd Area
Expanding on the above point. The device actually sends an ICMP TTL expired, but because there is not IP to source that packet it uses 0.0.0.0. When the packet arrives at Server4 with source 0.0.0.0 it gets dropped causing the same behavior as a timeout in the traceroute.
Triple Nerd Area
You do not see the ISN hop in the traceroute as VXLAN packets are always originated with TTL equal to 255
Step 8 – Run a traceroute from Server3 at Site2-Brownfield to Server4 -- Just the other way around
Server3
traceroute -n 172.16.10.101

You will notice a similar result, we are still crossing the VRF-Lite between Site1-BGW1 and the Edge-Router (10.33.0.0/30)
OPTIONAL - Extend the External Connectivity via Site2-Brownfield
Step 1 – Since there is direct link present between the Site2-BGW and Edge-Router, let's do exactly the same operations we did in the previous sections but this time we will do it in Site2-Brownfield
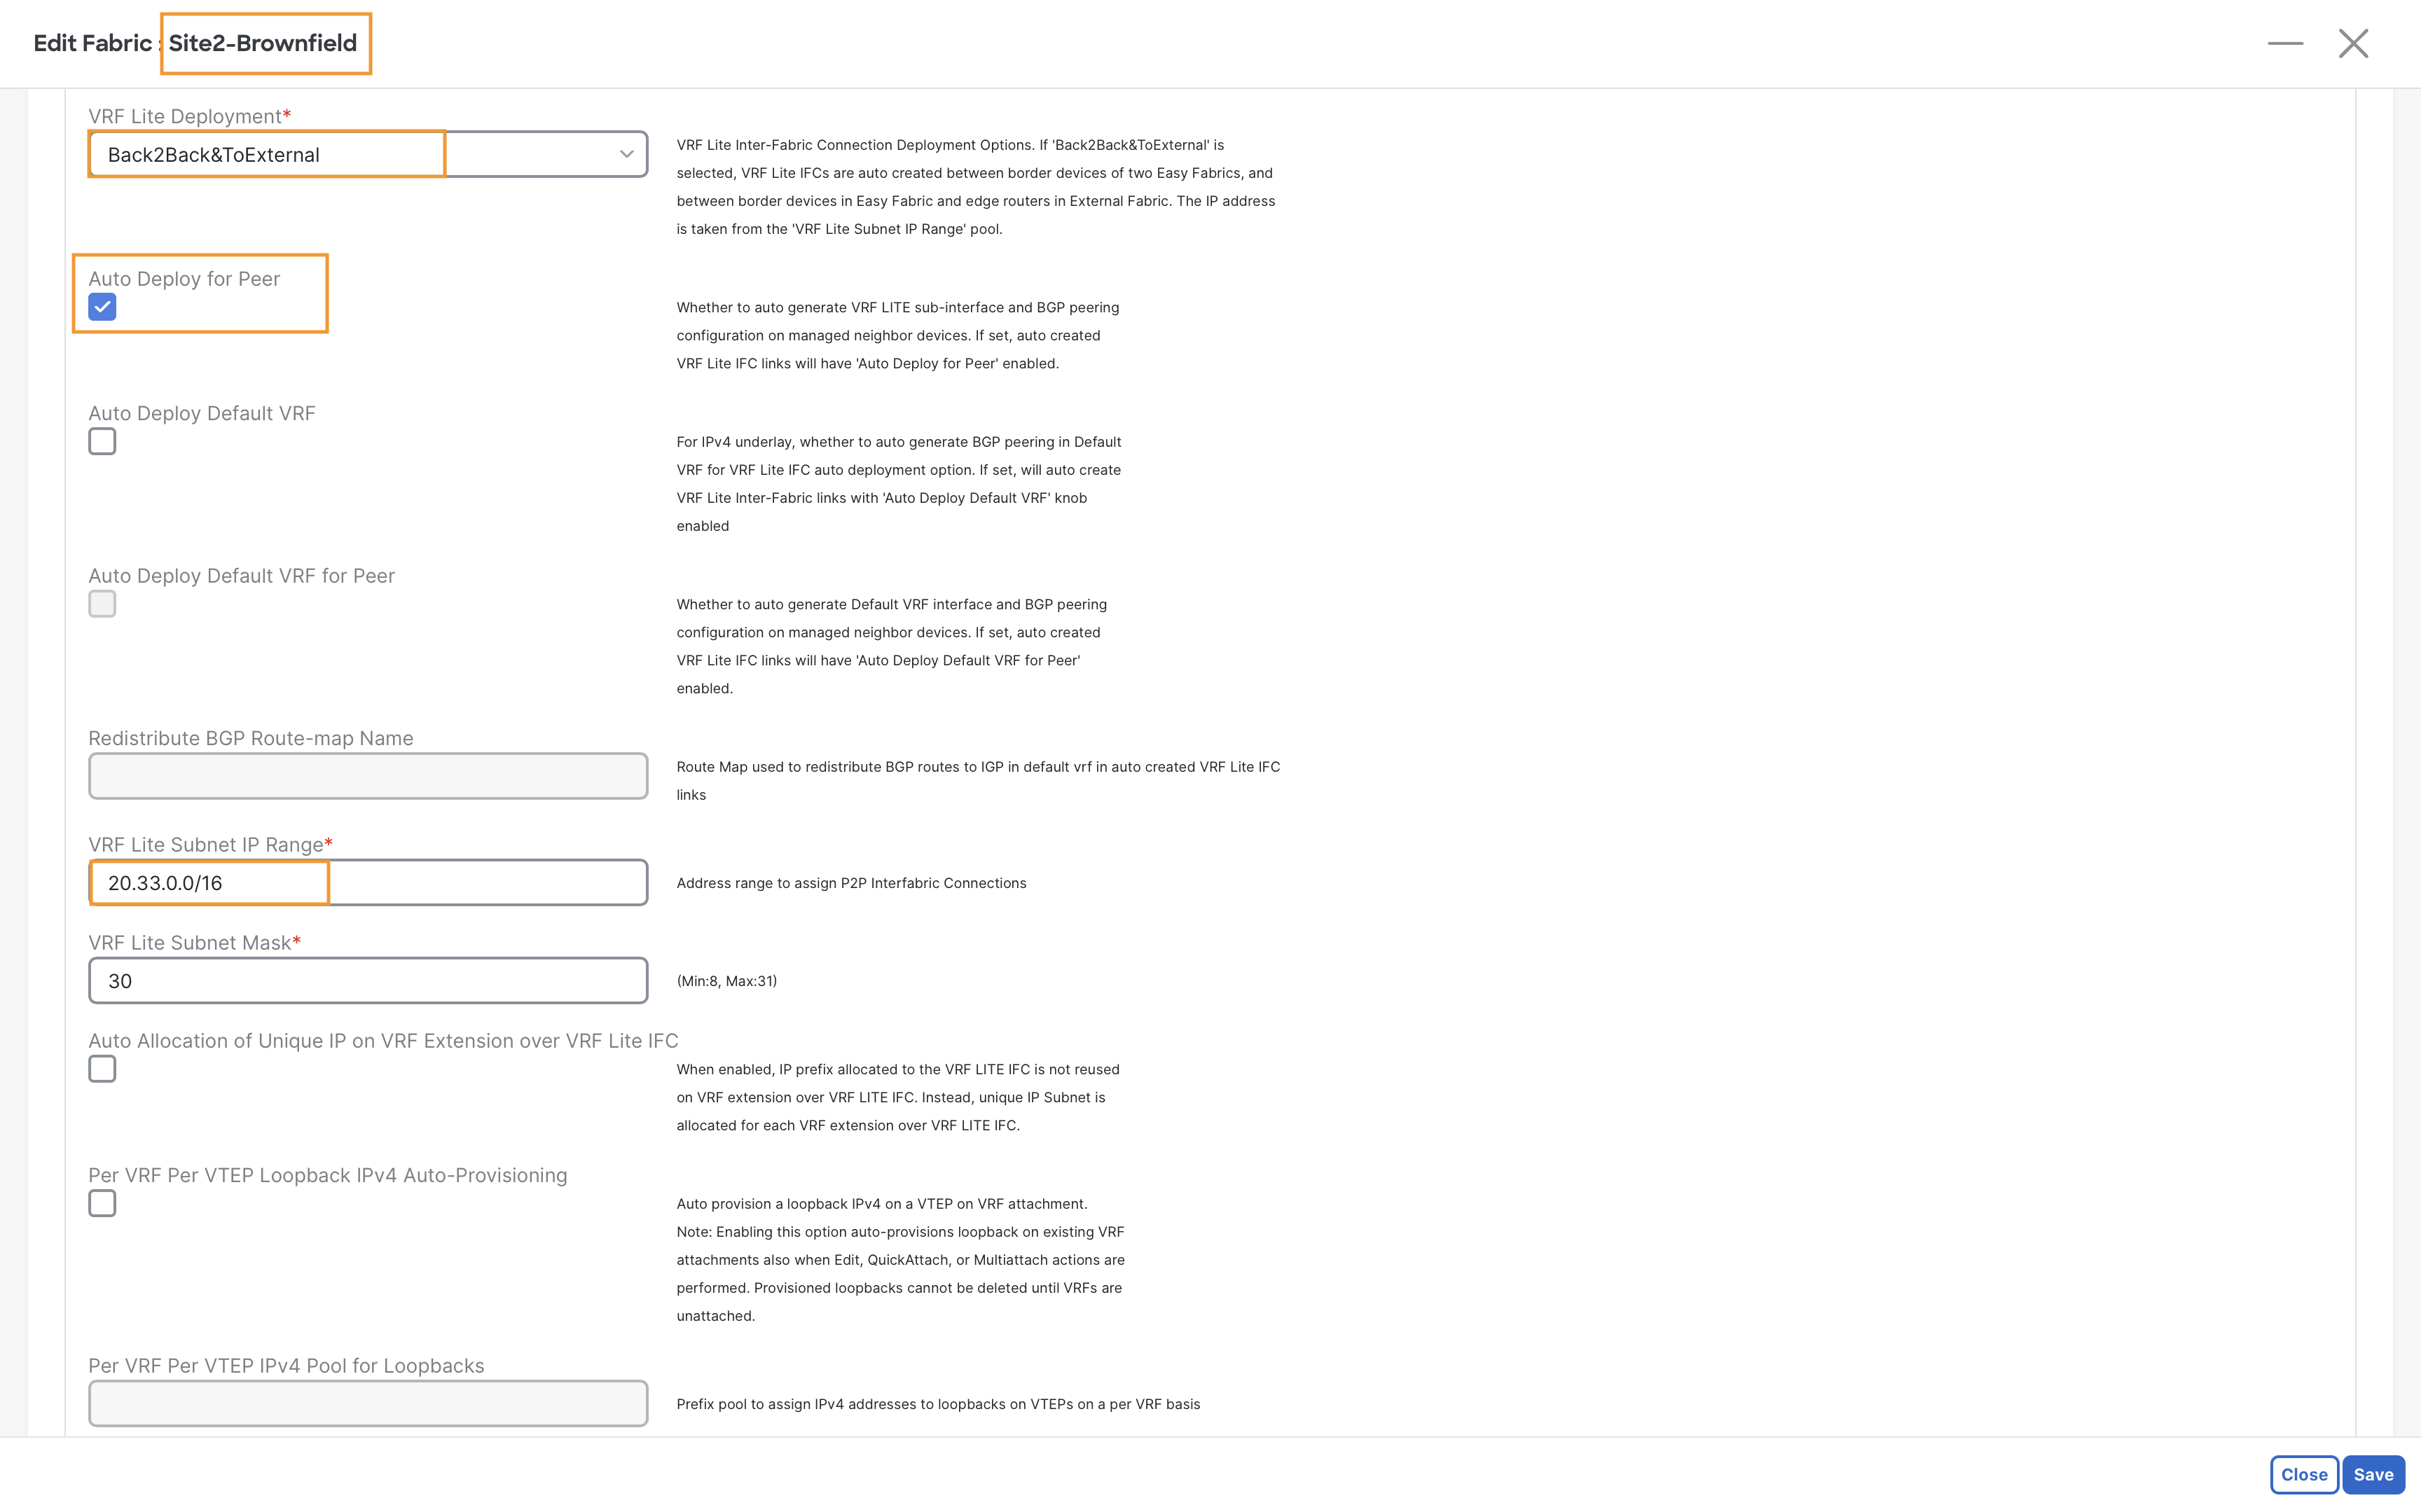
Step 2 – Activate the VRF_Lite in the site setting for Site2-Brownfiled fabric. Perform the following settings as shown in figure and and then Recalculate and Deploy the entire fabric
Warning
The only thing that must be changed to avoid overlapping IP addresses on the Edge-Router is the VRF Lite Subnet IP Range. Use 20.33.0.0/16 this time
Step 3 – Attach the VRF to Site2-BGW1, same procedure as before. Remember to replace the VRF name
Perfrom VRF deployment for Site2-BGW and Recalculate and Deployment for External-Fabric.
OPTIONAL - Check what has changed
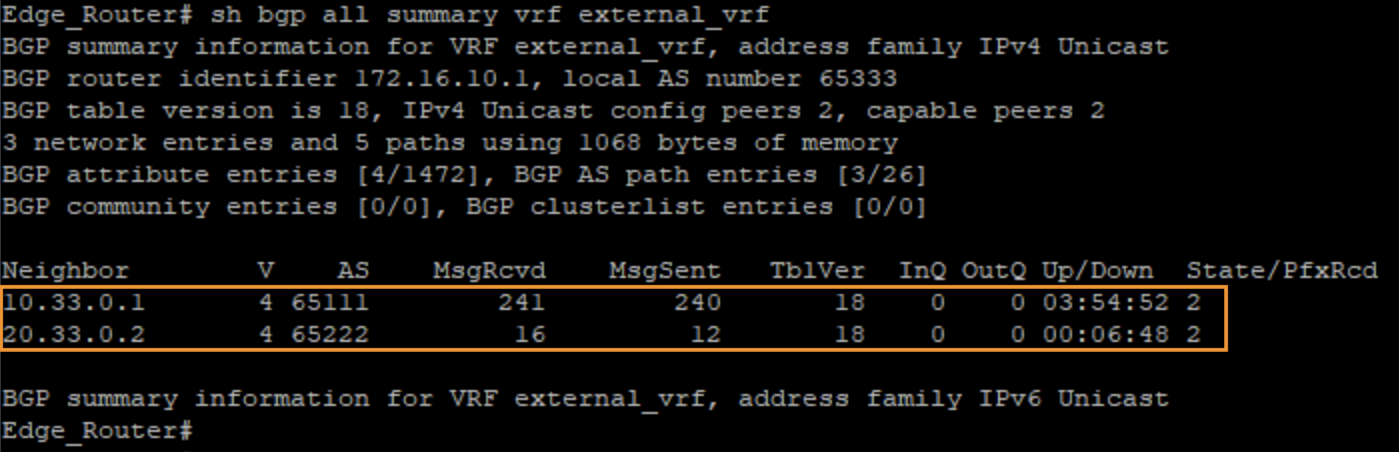
Step 1 – Log in to the Edge-Router and confirm that both BGP sessions have started in the external_vrf
Edge-Router
show bgp ipv4 unicast summary vrf external_vrf
Step 2 – Execute a traceroute from Server4 to Server3 at Site2-Brownfield
Server4
traceroute -n 192.168.11.102

Info
Notice the direct path now via the VRF-Lite 20.33.0.0/30. The traffic no longer passes through the ISN.
Step 3 – Execute a traceroute from Server4 to Server1 at Site1-Greenfield
Server4
traceroute -n 192.168.11.101

Note
In your traceroute, you should see traffic entering Site2-BGW1 (20.33.0.0), then crossing the ISN (you can determine this as after Site2-BGW1, the next IP is Site1-BGW1), and finally reaching the end destination.
Info
This occurs because the brownfield import enables the feature Advertise Host Routes by default, which permits the /32 IPv4 and /128 IPv6 host routes to be advertised out of the VRF-Lite connections. Because of this, the Edge-Router favors the path via Site2 as it receives a better Longest Prefix Match (LPM) from there.
Edge-Router
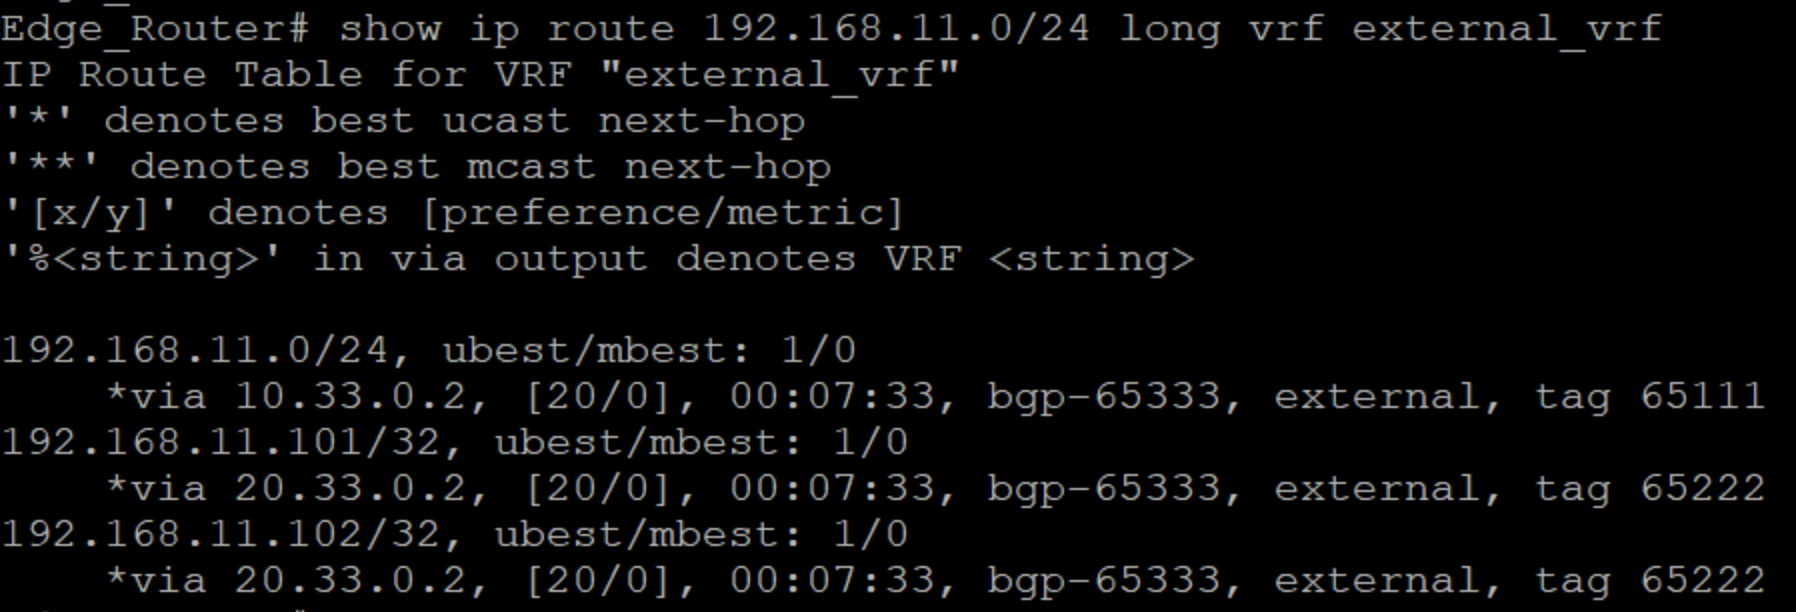
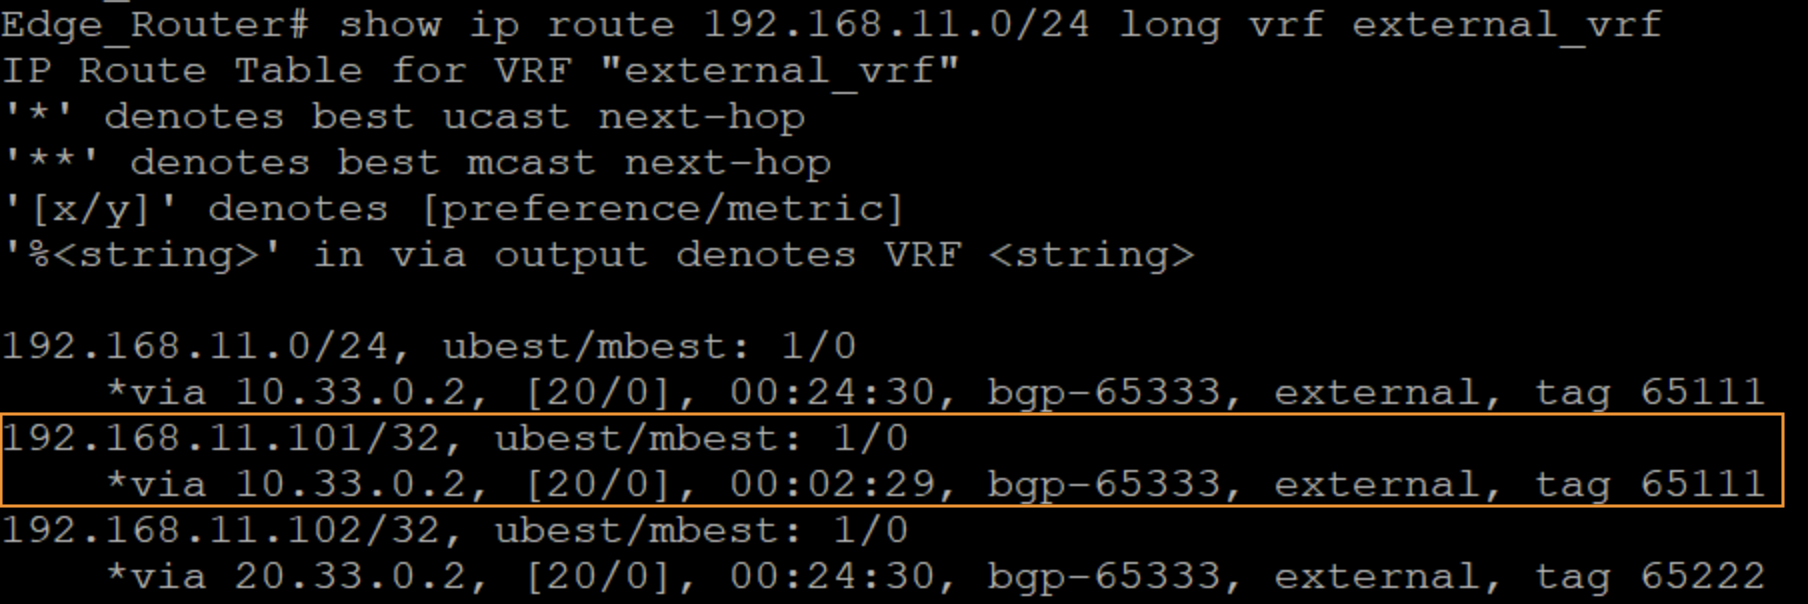
show ip route 192.168.11.0/24 long vrf external_vrf
Note
Observe how the /24 points via the Site1-Greenfield IFC (10.33.0.0) while both /32 point via Site2-Brownfield (20.33.0.0). In an optimized scenario, we should see 192.168.11.101 (Server1) directly via Site1-Greenfield. To fix this, we will enable the Advertise Host Routes feature also in Site1-Greenfield.
Step 4 – On Fabric Controller page, click Manage > Fabrics and double click on Site1-Greenfield and then go to VRF tab
Step 5 – Double-click on production_vrf and then select Actions > Edit
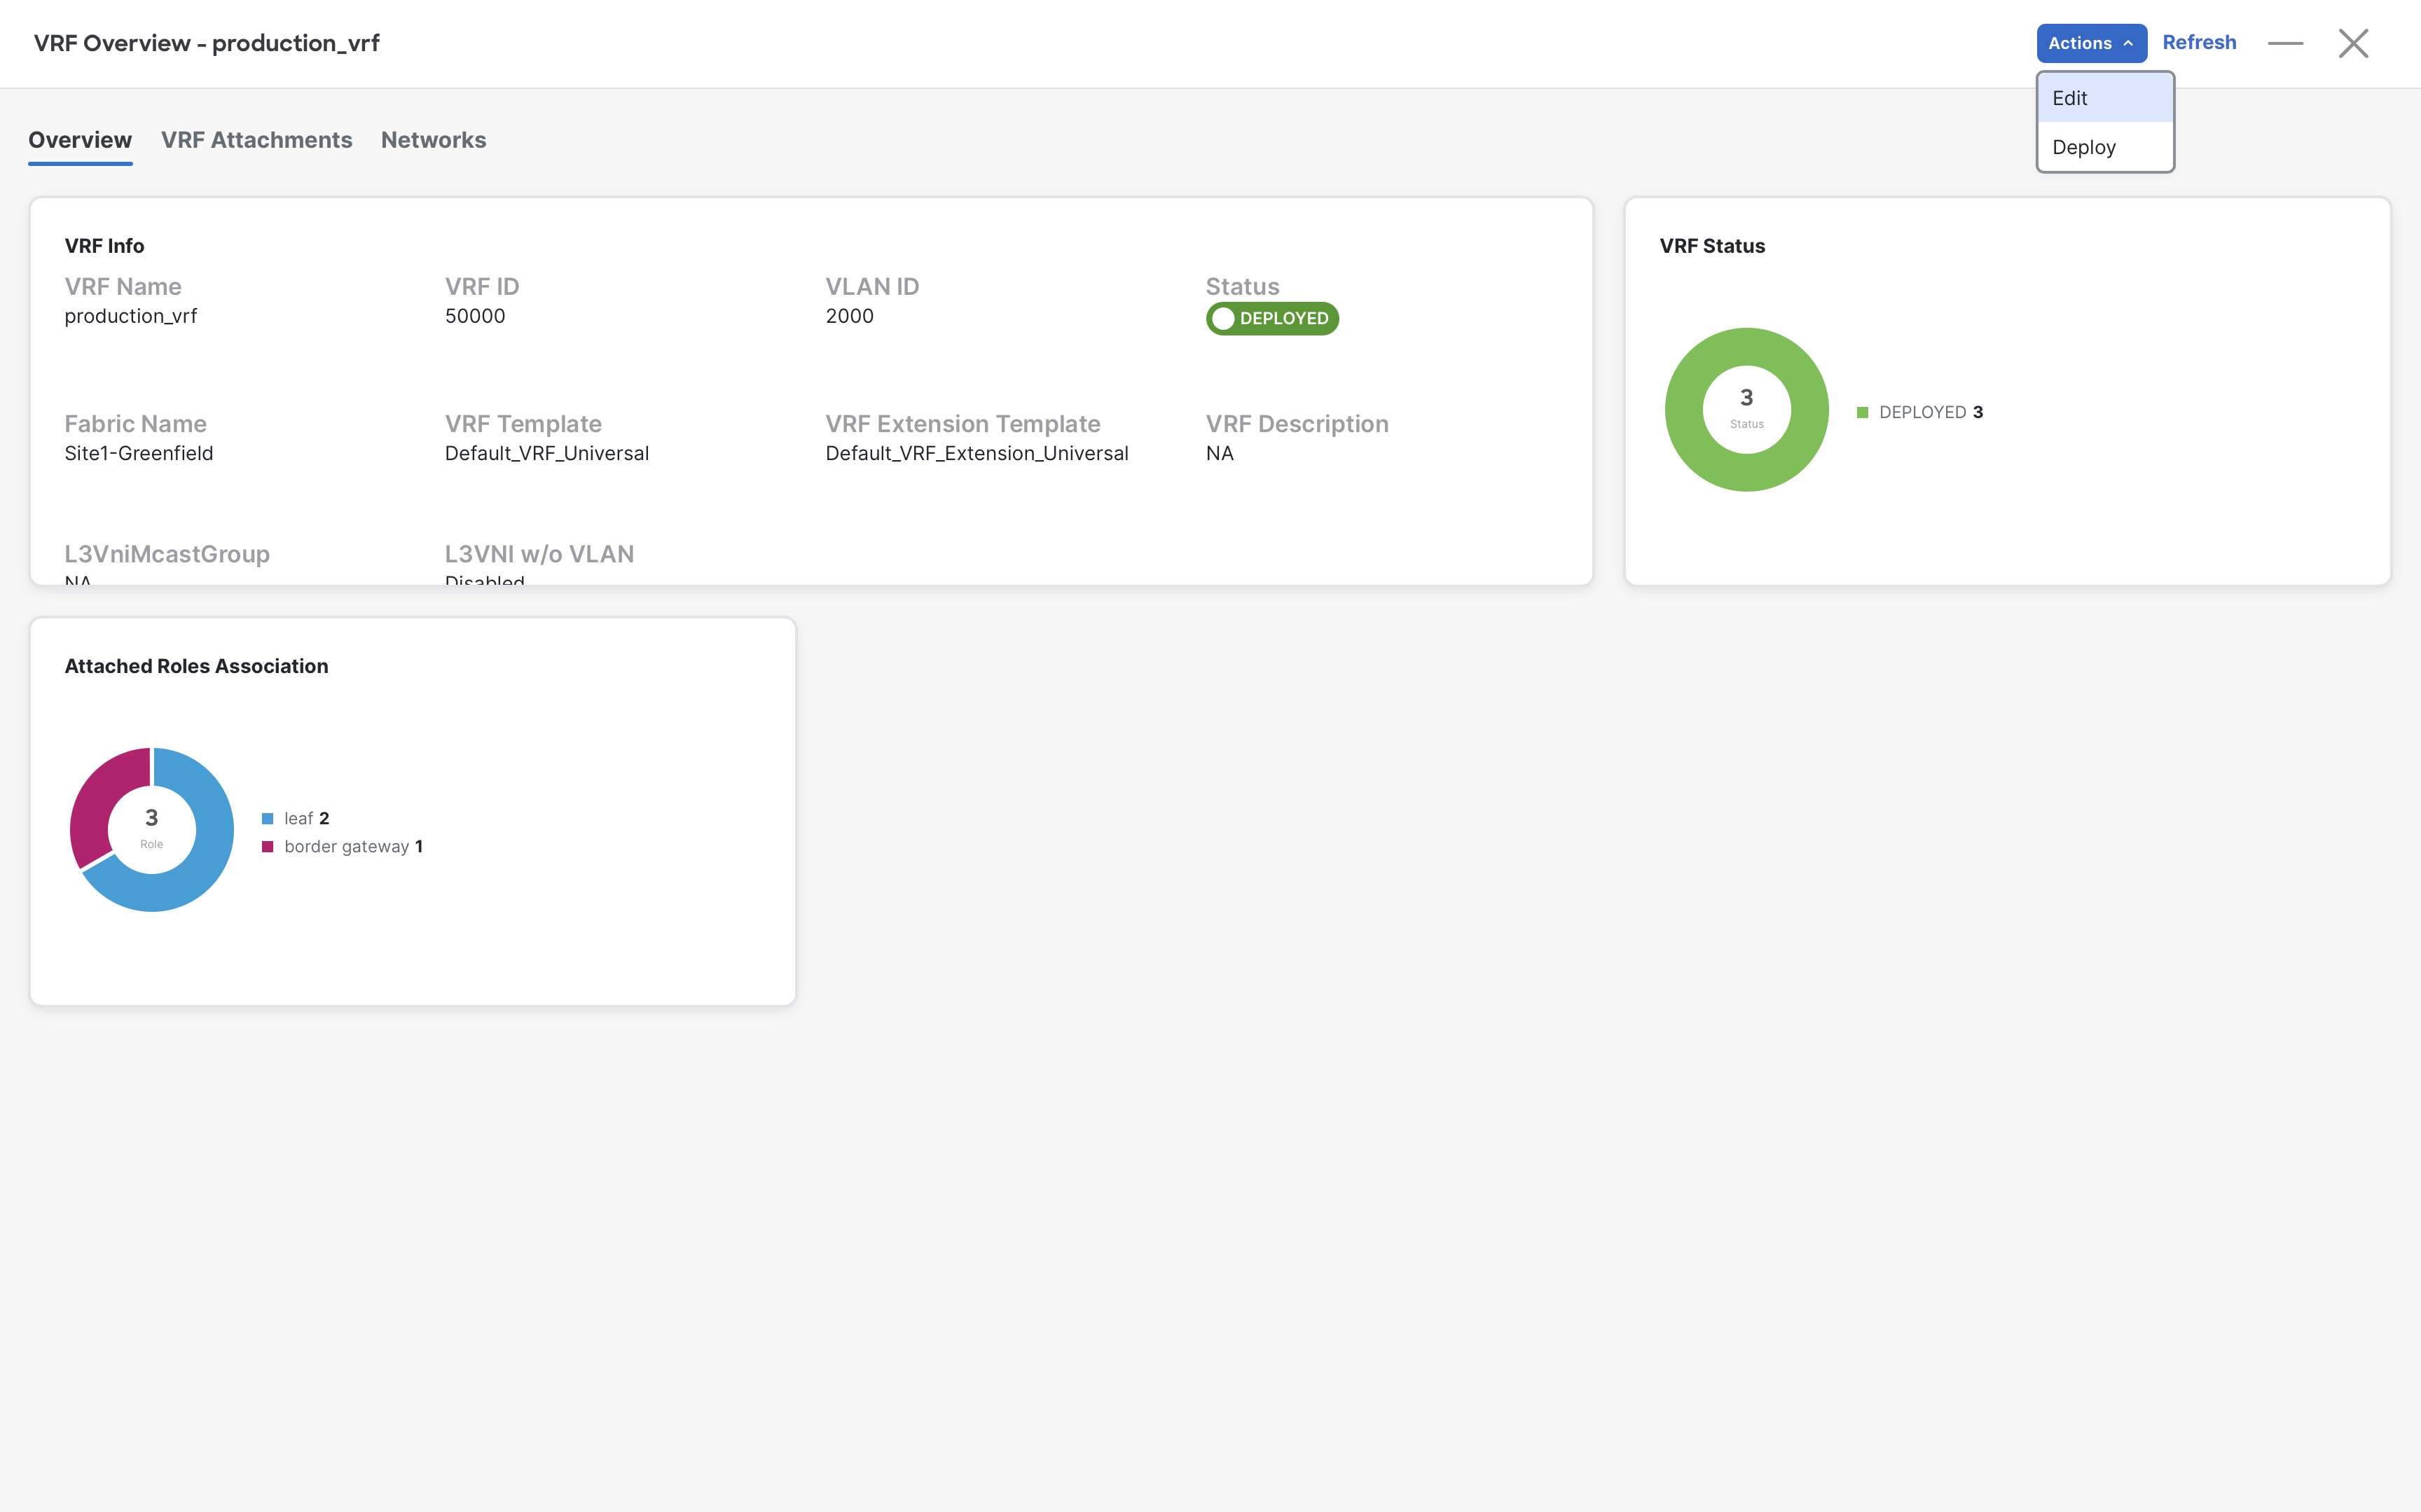
Step 6 – Click on the Advanced section

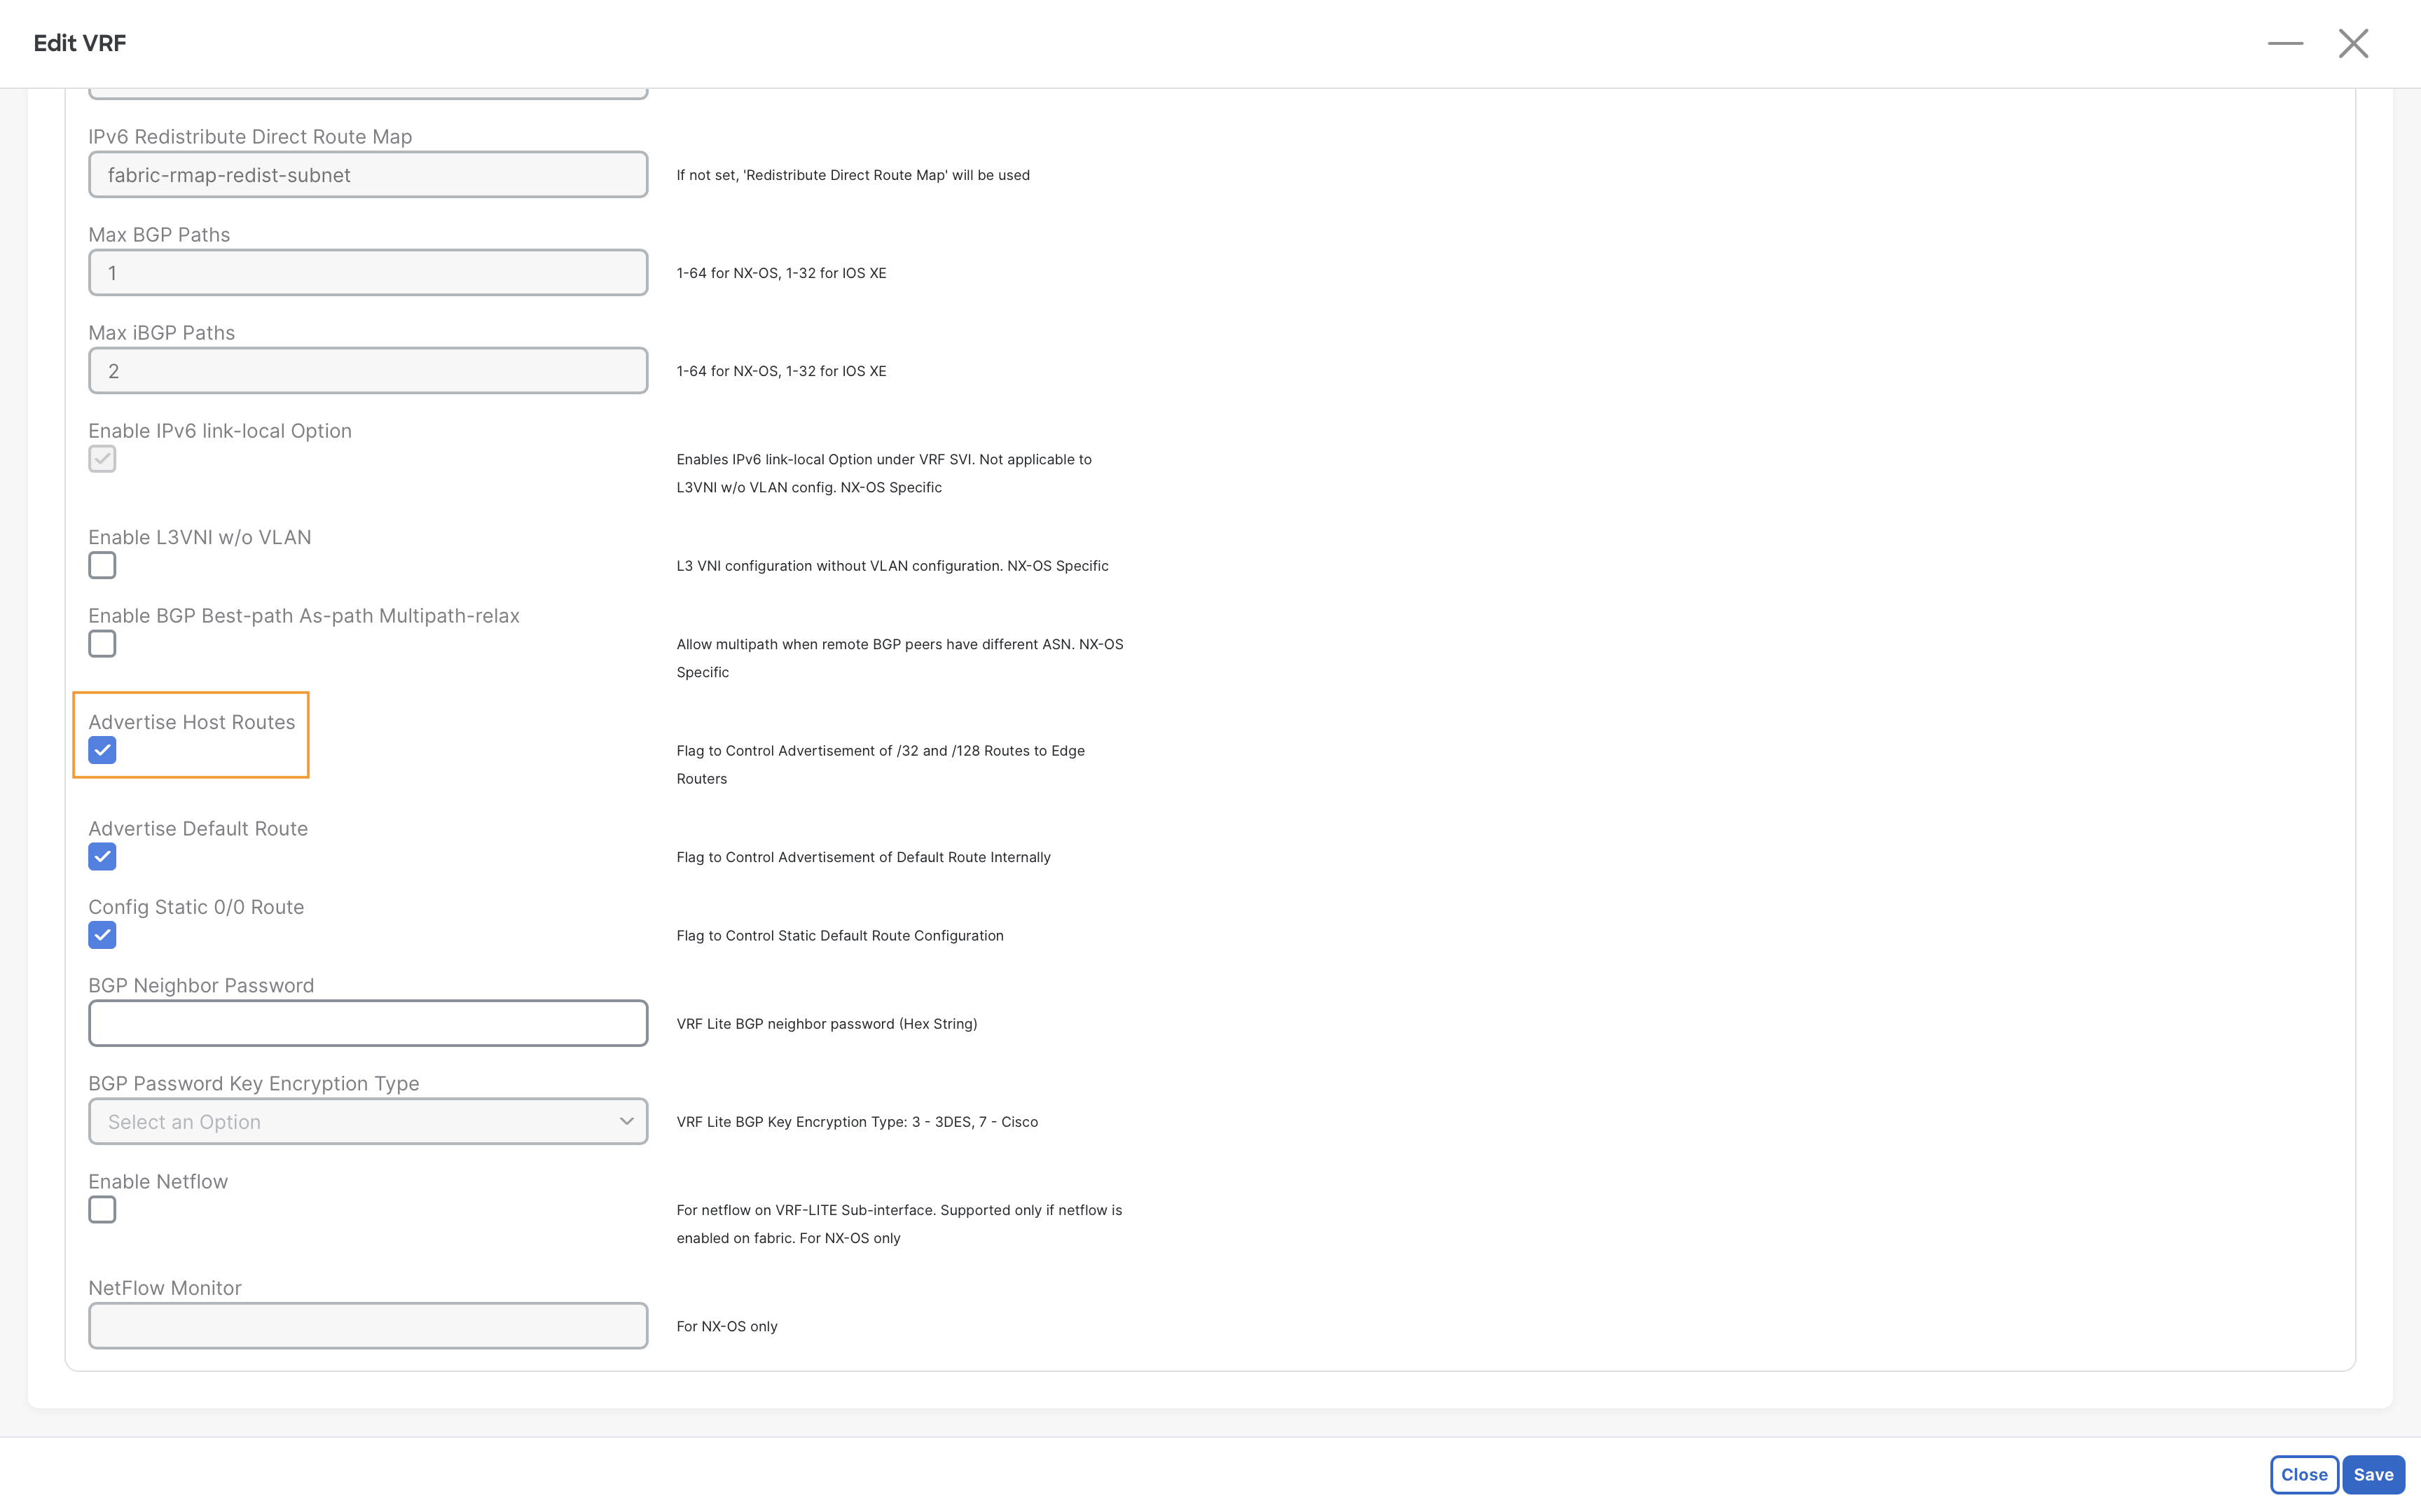
Step 7 – Scroll down until you see the Advertise Host Route option. Enable it and then click Save
Step 8 – In the VRF Overview, click Actions > Deploy
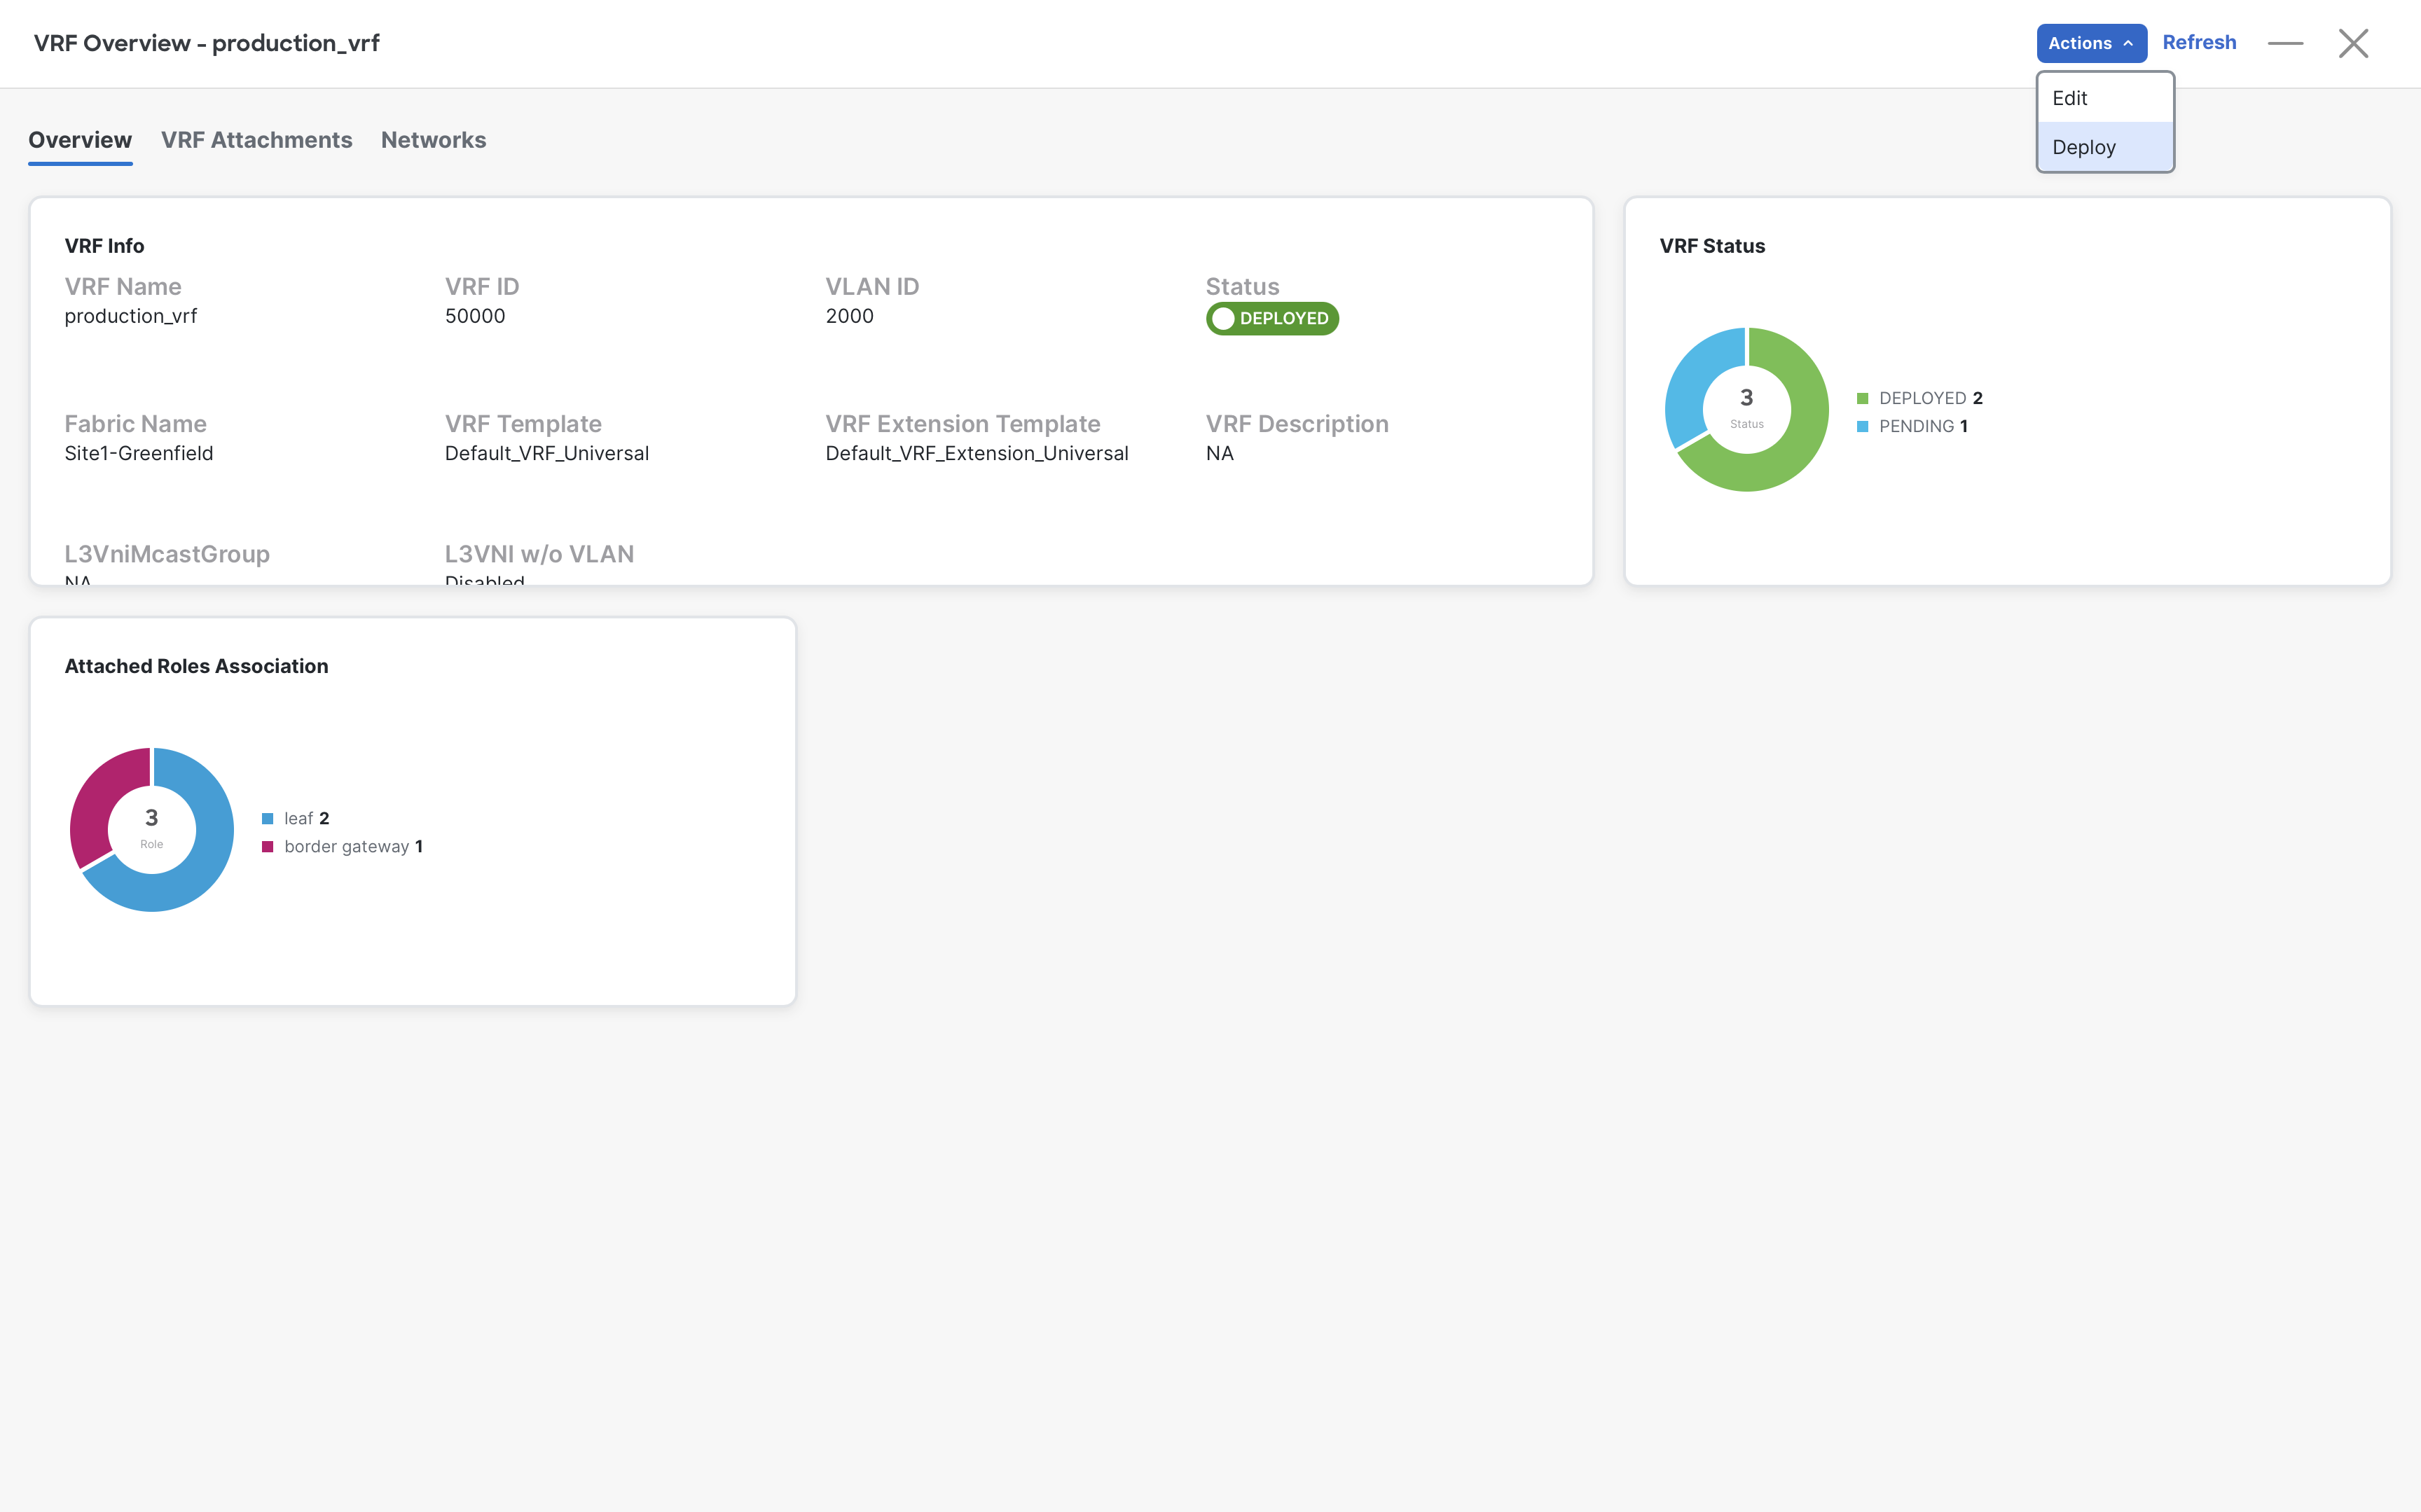
Step 9 – After reviewing the pending configuration, click on Deploy
Info
As you may have noticed from the pending configurations, to allow the advertisement of /32 and /128, we simply change the route-map attached to the VRF-Lite neighbor.
Step 10 – Now check the Edge-Router using the same command as before
Edge-Router
show ip route 192.168.11.0/24 long vrf external_vrf
Note
The IP 192.168.11.101 (Server1) now points directly to Site1-Greenfield
You can continue now with Task #5