Skip to content

Task 2 - Creating a Branch Enterprise Agent

A user in a remote location has been complaining about voice quality issues on both Webex and Teams. In this task you will add ThousandEyes Enterprise Agents from the the HQ and Branch networks to gain full-service delivery path visibility from one of your locations.

Step 1: Configure the Enterprise Agent

You have submitted a change request to your compute team to deploy virtual Enterprise Agent OVAs at both the San Diego Head End and the Remote Branch that is having issues.

  1. Make sure you are still in your LAB # account group. If you are unsure, look at the top right and you should see your Lab User # and LAB #.

  2. The compute team finished the task of deploying the virtual agent. They have provided you this table with the domain names they configured for each agent. Your task is to go configure the Head End and Branch agent for your LAB environment. Find your matching LAB Number below and click both links to open the HQ and Branch Enterprise Agent GUIs and move to Step 3.

    Note: These are self signed certificates, if you are using chrome you may have to type: thisisunsafe to proceed.

    Lab Number HQ Agent Branch Agent Username Password
    LAB 1 https://lab1.hq.te-lab.net https://lab1.branch.te-lab.net admin welcomeLAB1
    LAB 2 https://lab2.hq.te-lab.net https://lab2.branch.te-lab.net admin welcomeLAB2
    LAB 3 https://lab3.hq.te-lab.net https://lab3.branch.te-lab.net admin welcomeLAB3
    LAB 4 https://lab4.hq.te-lab.net https://lab4.branch.te-lab.net admin welcomeLAB4
    LAB 5 https://lab5.hq.te-lab.net https://lab5.branch.te-lab.net admin welcomeLAB5
    LAB 6 https://lab6.hq.te-lab.net https://lab6.branch.te-lab.net admin welcomeLAB6
    LAB 7 https://lab7.hq.te-lab.net https://lab7.branch.te-lab.net admin welcomeLAB7
    LAB 8 https://lab8.hq.te-lab.net https://lab8.branch.te-lab.net admin welcomeLAB8
    LAB 9 https://lab9.hq.te-lab.net https://lab9.branch.te-lab.net admin welcomeLAB9
    LAB 10 https://lab10.hq.te-lab.net https://lab10.branch.te-lab.net admin welcomeLAB10
    LAB 11 https://lab11.hq.te-lab.net https://lab11.branch.te-lab.net admin welcomeLAB11
    LAB 12 https://lab12.hq.te-lab.net https://lab12.branch.te-lab.net admin welcomeLAB12
    LAB 13 https://lab13.hq.te-lab.net https://lab13.branch.te-lab.net admin welcomeLAB13
    LAB 14 https://lab14.hq.te-lab.net https://lab14.branch.te-lab.net admin welcomeLAB14
    LAB 15 https://lab15.hq.te-lab.net https://lab15.branch.te-lab.net admin welcomeLAB15
    LAB 16 https://lab16.hq.te-lab.net https://lab16.branch.te-lab.net admin welcomeLAB16
    LAB 17 https://lab17.hq.te-lab.net https://lab17.branch.te-lab.net admin welcomeLAB17
    LAB 18 https://lab18.hq.te-lab.net https://lab18.branch.te-lab.net admin welcomeLAB18
    LAB 19 https://lab19.hq.te-lab.net https://lab19.branch.te-lab.net admin welcomeLAB19
    LAB 20 https://lab20.hq.te-lab.net https://lab20.branch.te-lab.net admin welcomeLAB20
    LAB 21 https://lab21.hq.te-lab.net https://lab21.branch.te-lab.net admin welcomeLAB21
    LAB 22 https://lab22.hq.te-lab.net https://lab22.branch.te-lab.net admin welcomeLAB22
    LAB 23 https://lab23.hq.te-lab.net https://lab23.branch.te-lab.net admin welcomeLAB23
    LAB 24 https://lab24.hq.te-lab.net https://lab24.branch.te-lab.net admin welcomeLAB24
    LAB 25 https://lab25.hq.te-lab.net https://lab25.branch.te-lab.net admin welcomeLAB25
    LAB 26 https://lab26.hq.te-lab.net https://lab26.branch.te-lab.net admin welcomeLAB26
    LAB 27 https://lab27.hq.te-lab.net https://lab27.branch.te-lab.net admin welcomeLAB27
    LAB 28 https://lab28.hq.te-lab.net https://lab28.branch.te-lab.net admin welcomeLAB28
    LAB 29 https://lab29.hq.te-lab.net https://lab29.branch.te-lab.net admin welcomeLAB29
    LAB 30 https://lab30.hq.te-lab.net https://lab30.branch.te-lab.net admin welcomeLAB30
  3. In ThousandEyes, navigate to Network & App Synthetics > Agent Settings and click the blue Add New Enterprise Agent button. You should get this pop out window. Make sure you are in your Lab Account Group. Copy the Account Group Token.
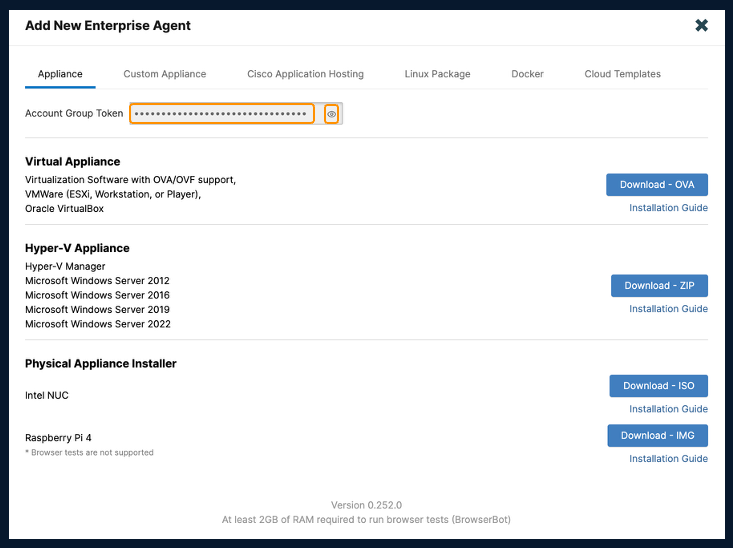
    Step1.4.2

  4. Navigate back to the HQ Enterprise Agent and login with the information in the table. Once you are logged in, for identification purposes update the Hostname.
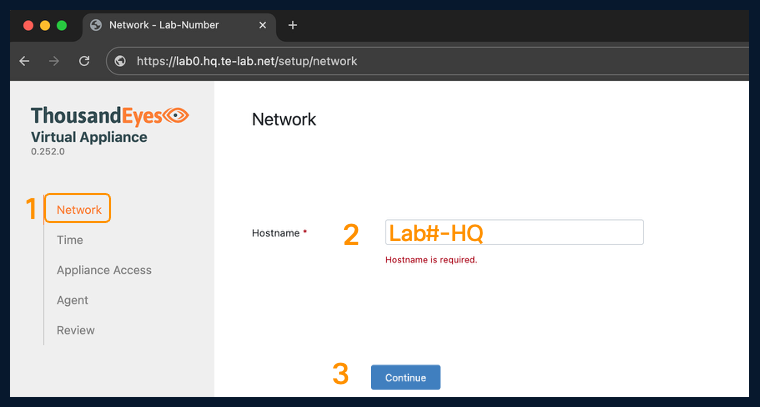
    Step1.5

  5. Add the account group token you copied in step 3 to the Agent tab.
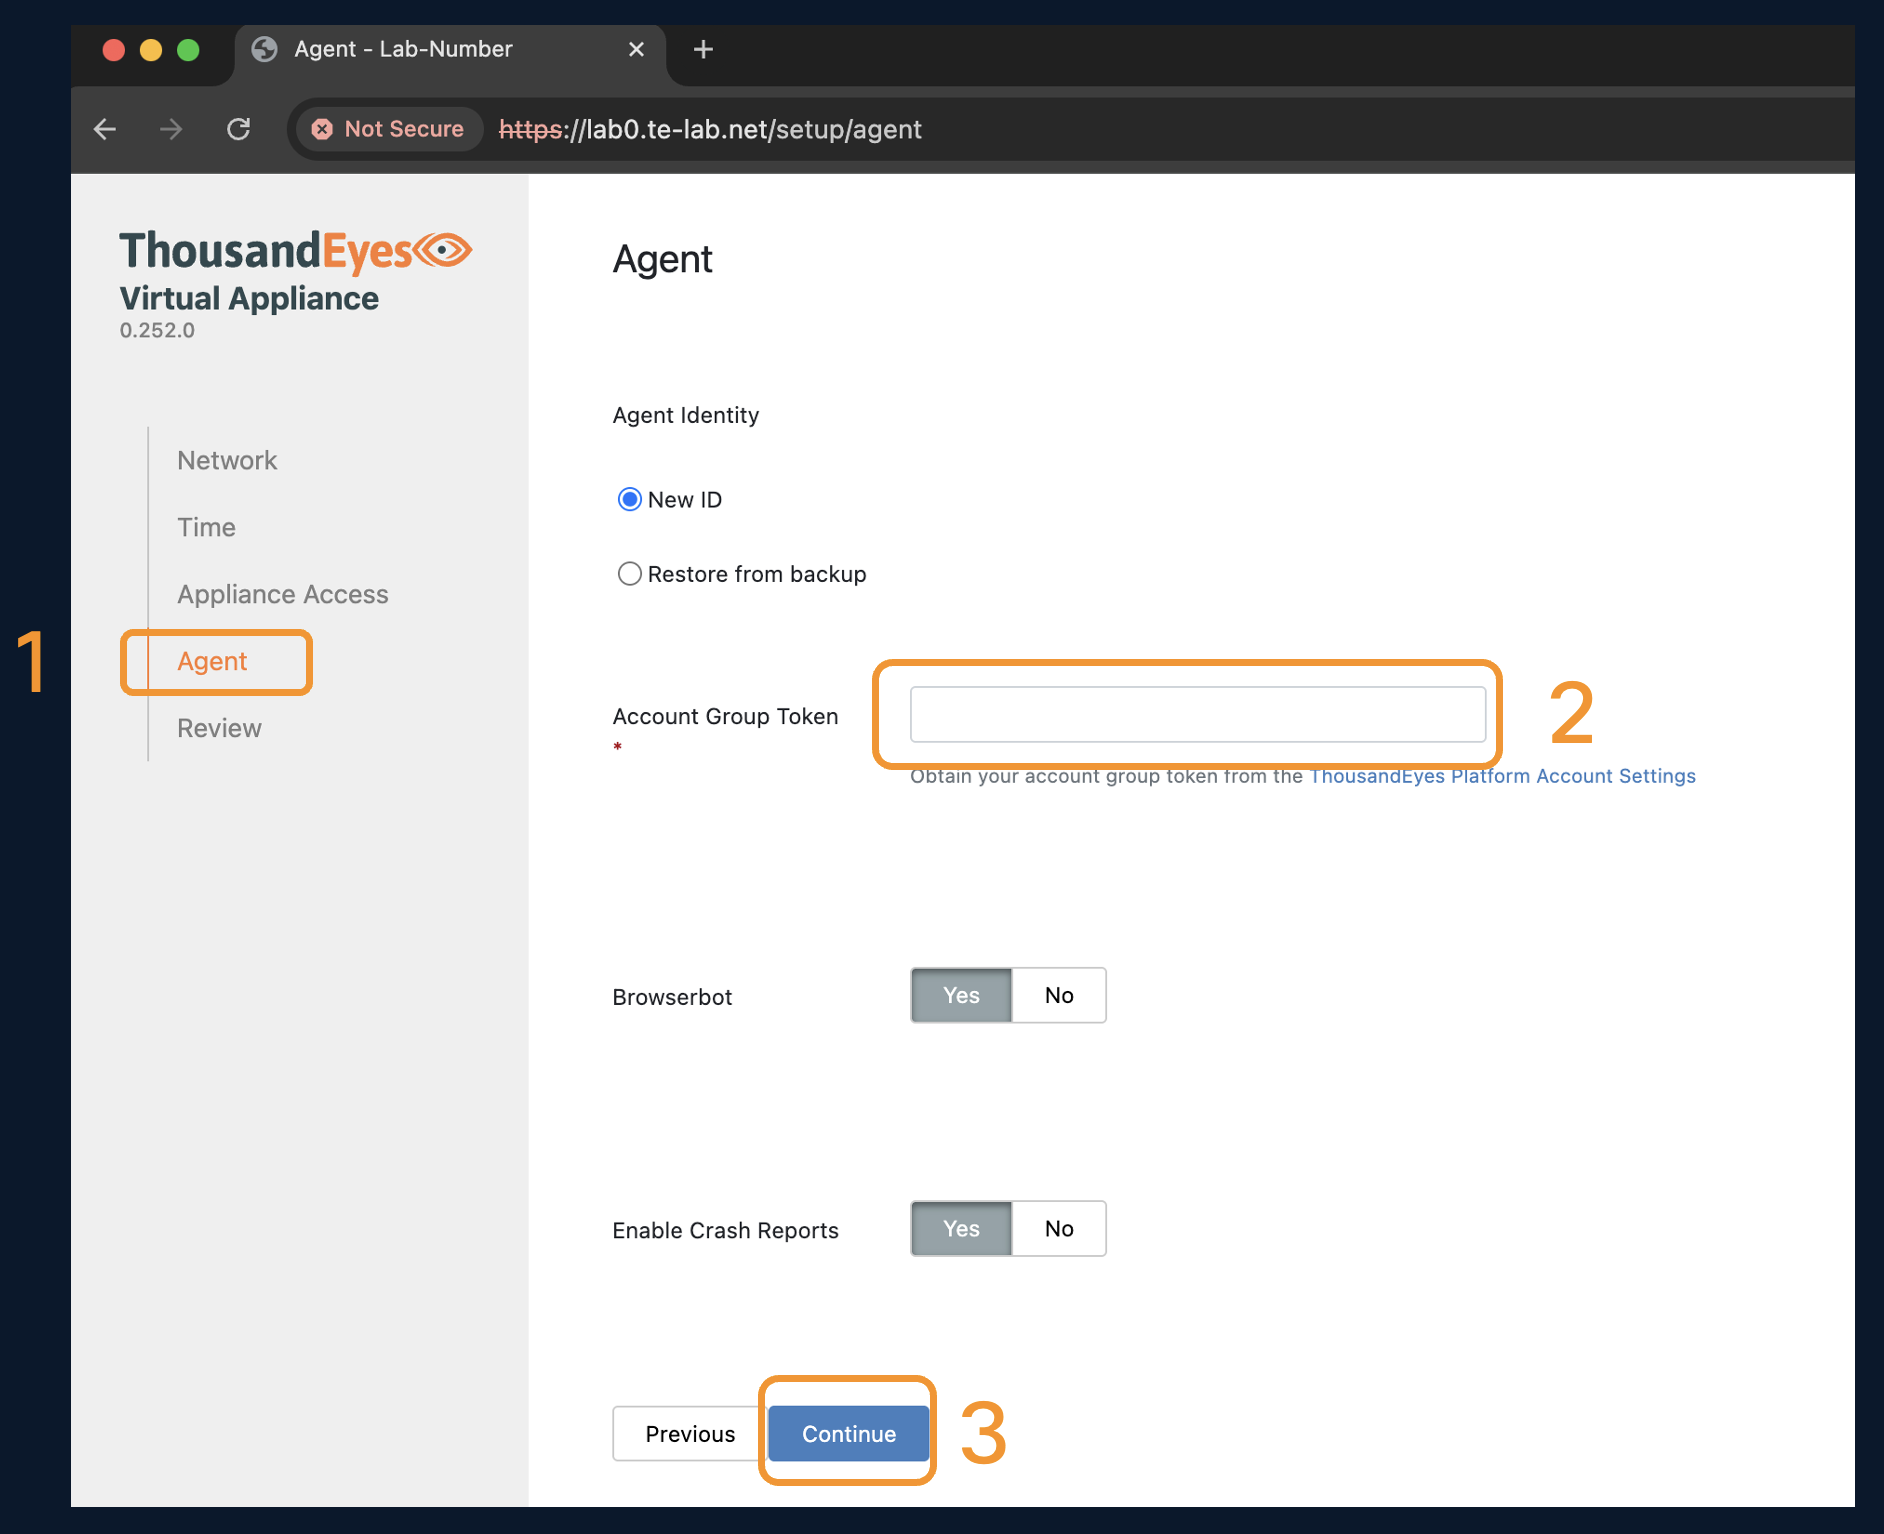
    Step1.5

  6. Repeat Steps 4 and 5 for the Branch Agent. Just like in step 4, the hostname should reflect your lab number. ie. Lab#_Branch.

Step 2: Verify Connectivity in Dashboard

  1. If you were successful in deploying the Enterprise Agents, you should see both the San Diego HQ and Branch Agents checked in to your dashboard. Navigate to Network & App Synthetics > Agent Settings. You should see both agents in your LAB Account are displayed successfully!
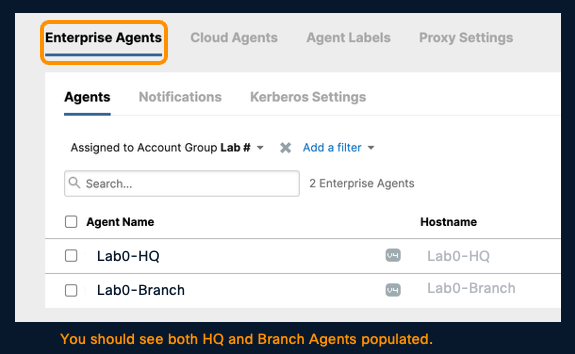
Step2.1

Step 3: Create Agent Labels for Easy Reference Later

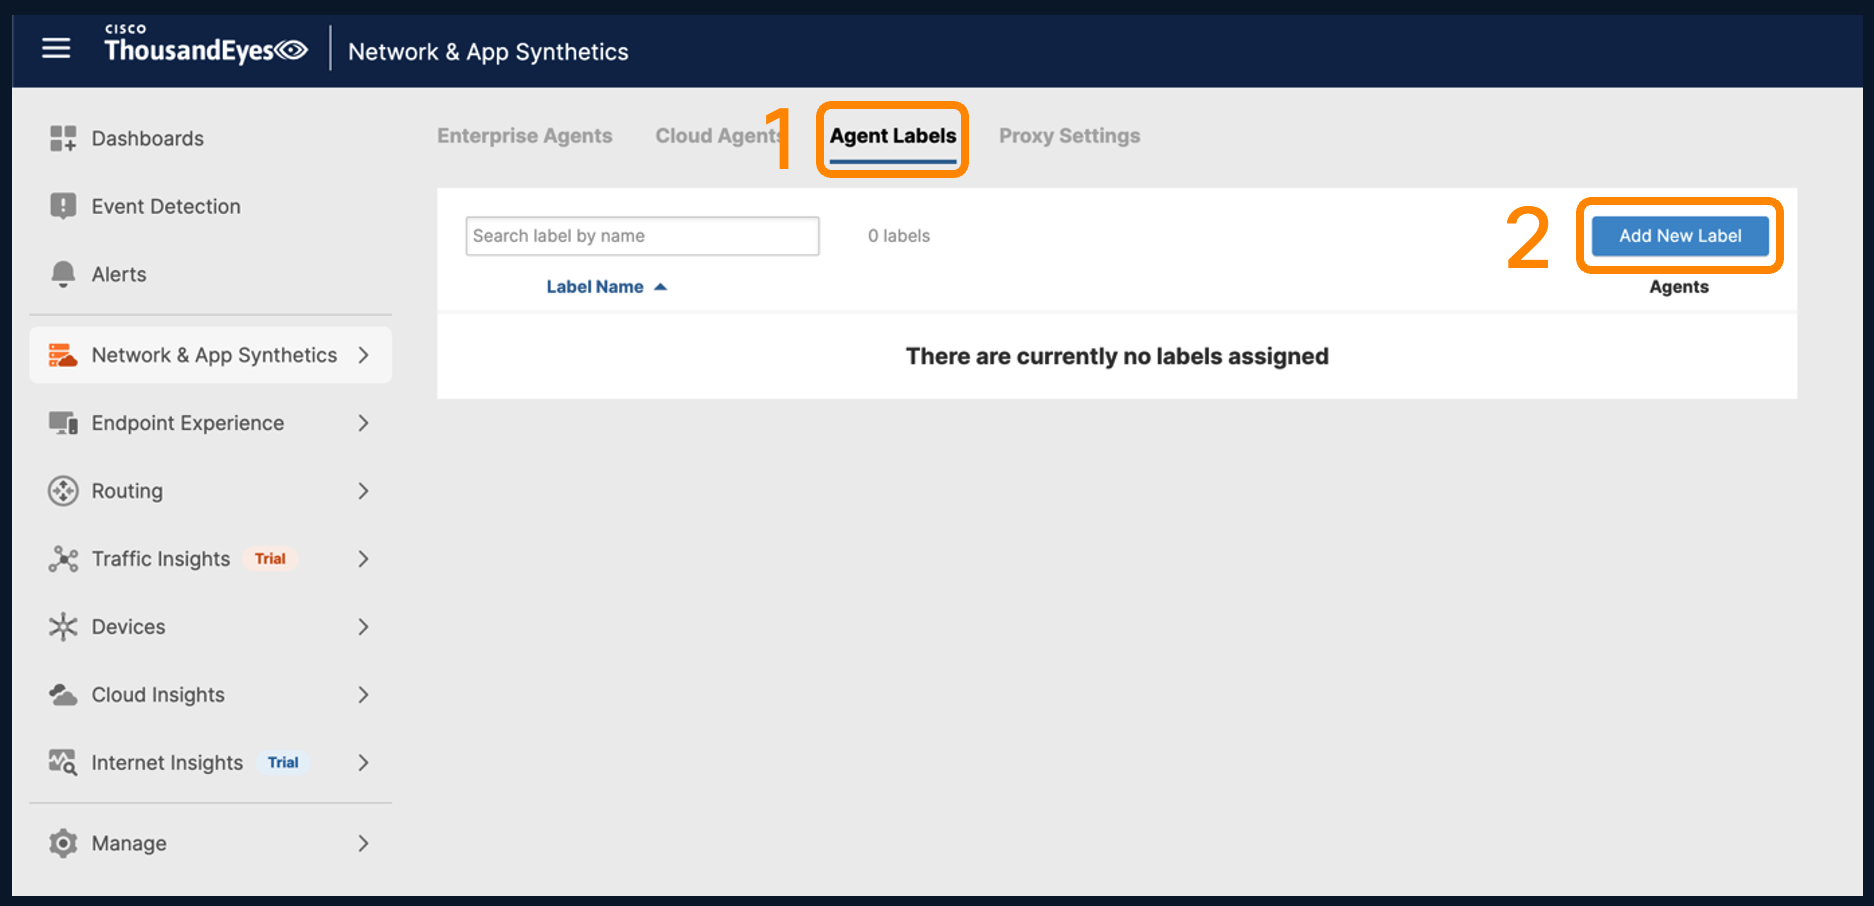
  1. Navigate to Network & App Synthetics > Agent Settings > Agent Labels > Click Add New Label.
    Step3.1

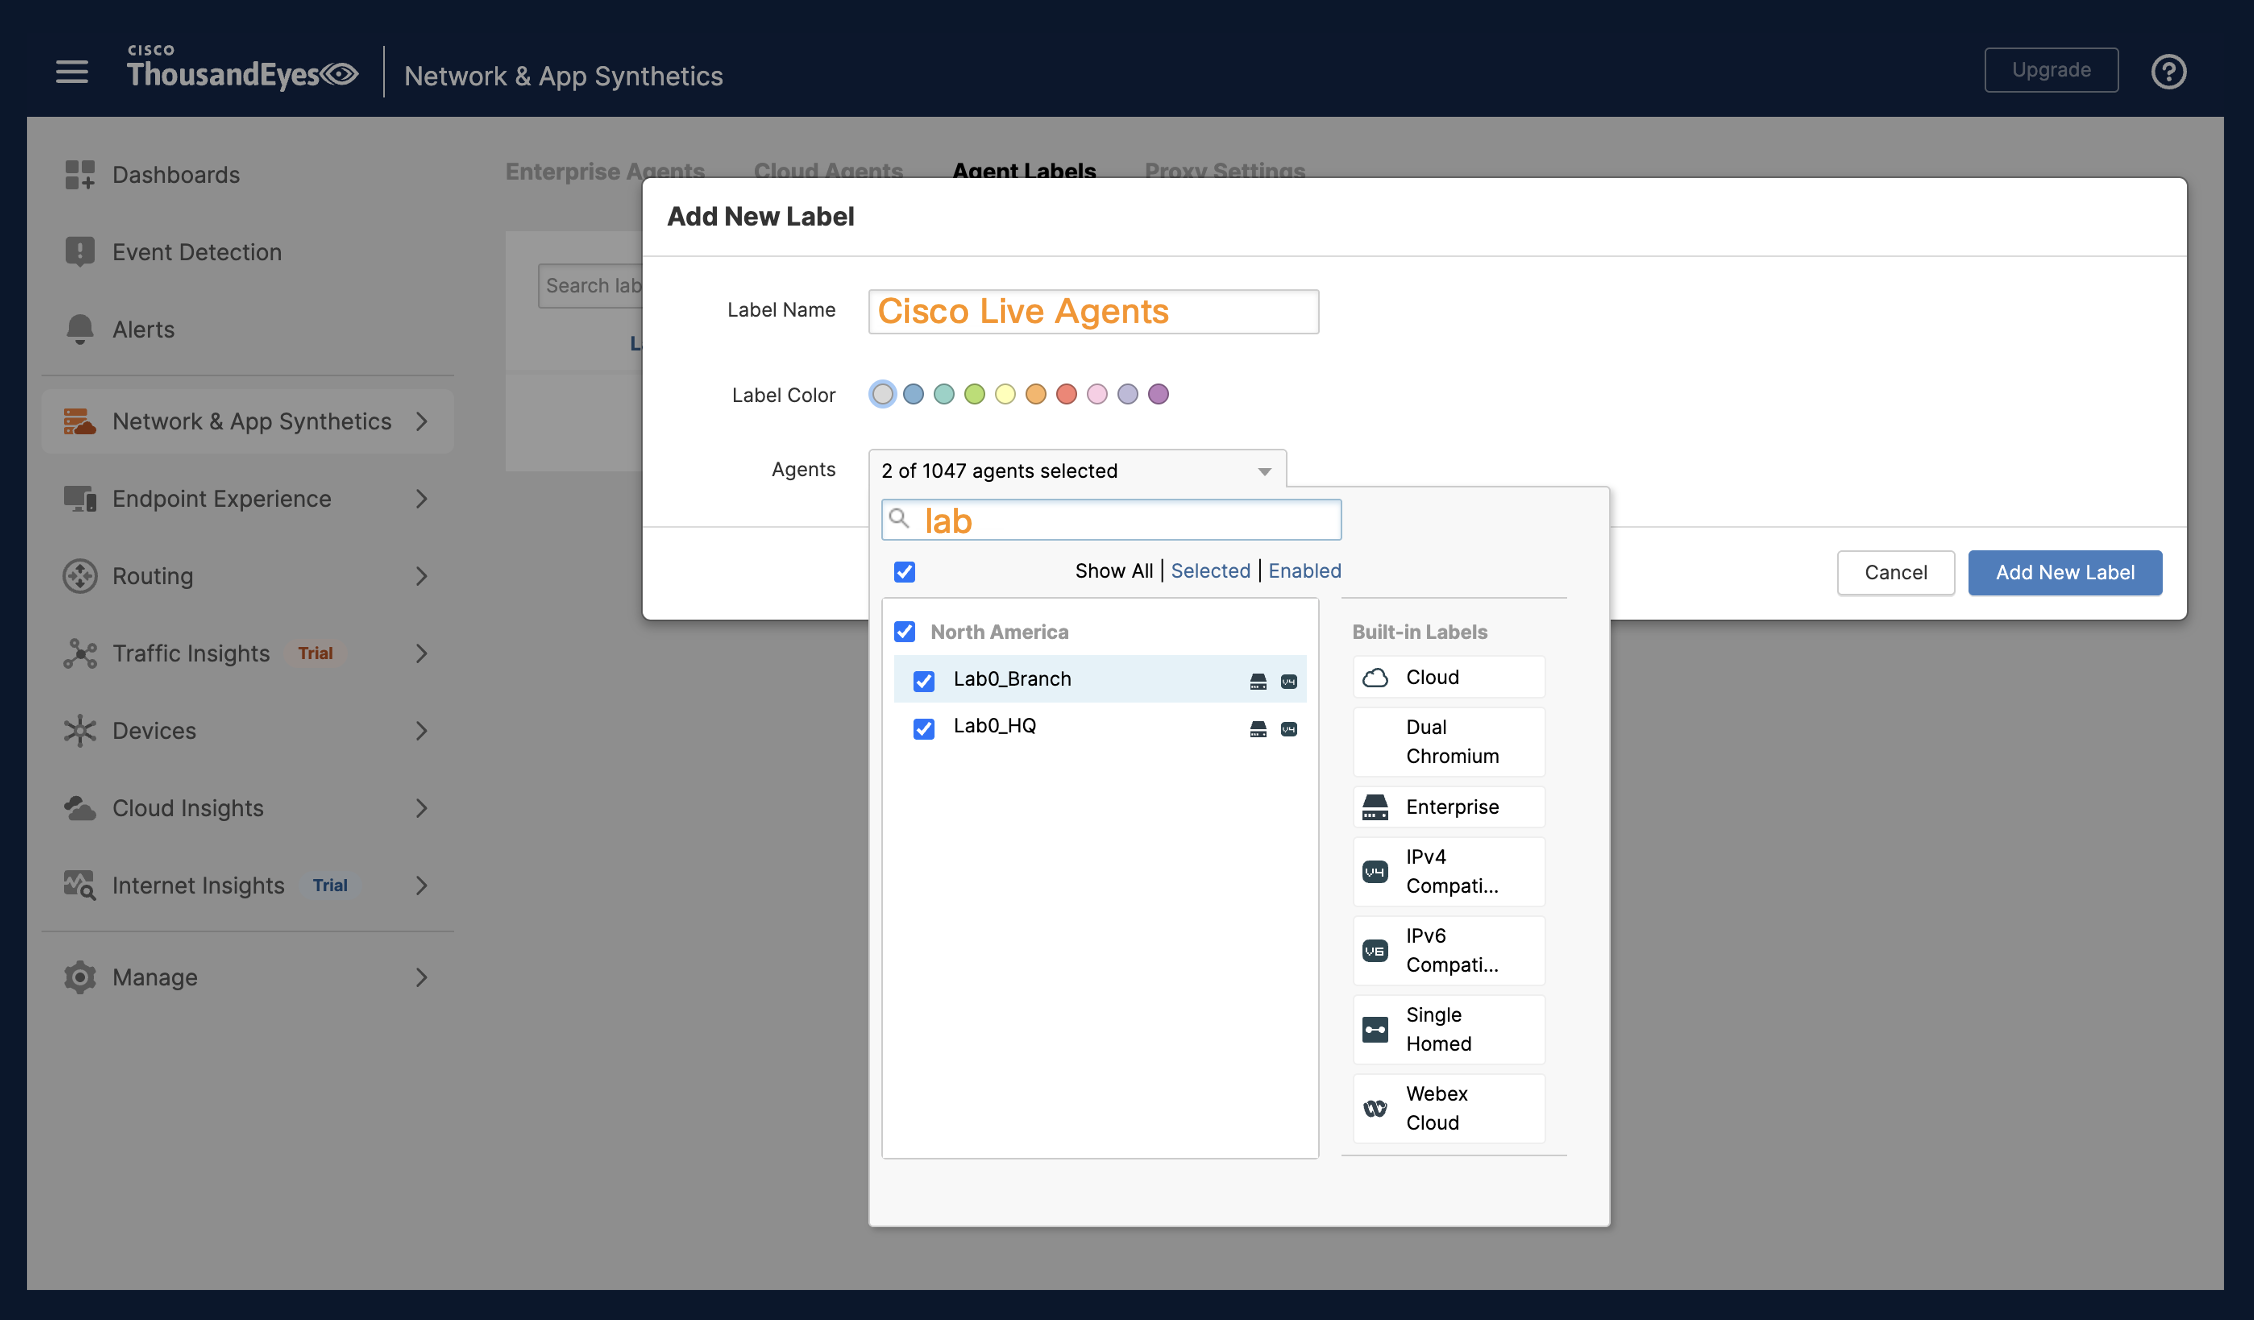
  2. Name the New Label -- Cisco Live Agents

  3. Search the "HQ" and "Branch" agent and add these to the newly created label.
    Step3.3

  4. When both Enterprise Agents are added, click Add New Label.

Label Challenge

Create another agent label, but this time for Cloud Agents.  Select Three (3)
Cloud Agents of your choice from the United States and name the label.

You have successfully completed Task 2!!

Hold Your Horses!