Mission 1: Configure Your Pod as an Area in Catalyst Center Using Ansible
The first step is to configure your assigned pod as an area in Catalyst Center. This is essential for setting up the foundational structure required for subsequent tasks in the lab. Your pod will also be your tenant in Netbox.
You will achieve this using Ansible and the cisco.dnac.site_workflow_manager module.
Documentation
cisco.dnac.site_workflow_manager
Step 1: Write ansible task to create the area
- Open the existing ansible playbook
create_area.ymlin the editor. The file resides in the directoryansible/playbooksin your repository. - Explore the module documentation (link above)
- Copy the example with
site_type: areaand paste it into your playbook (should be the first example). - Replace all variables with the values specified below.
- Make sure to get your indents correct:
  tasks:
  - name: Create a new area site
    cisco.dnac.site_workflow_manager:
      dnac_host: 198.18.129.100
      #...
Variables
| Site variables | value |
|---|---|
| name | pod5 |
| parent_name | Global |
| site_type | area |
| DNAC variables | value |
|---|---|
| dnac_host | 198.18.129.100 |
| dnac_username | user5 |
| dnac_password | C1sco12345 |
| dnac_verify | false |
| dnac_port | 443 |
| dnac_version | 2.3.7.6 |
| dnac_debug | false |
| dnac_log_level | WARNING |
| dnac_log | false |
Step 2: Run the Playbook
Once your playbook is ready, run it using the following command:
ansible-playbook ./ansible/playbooks/create_area.yml
Step 3: Verification
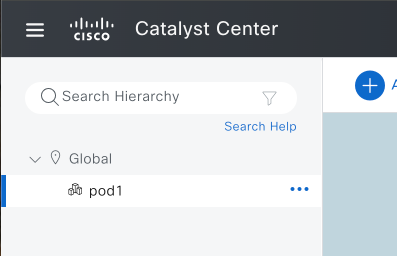
Log into the Catalyst Center with your credentials and navigate to Design > Network Hierarchy. Verify if your area has been successfully created under the Global parent site.
Example Pod-1:
Step 4: Commit your changes to your Gitlab repository
git add .
git commit -m "mission-1"
git push